
Building Auditable, AI-Driven Document Workflows with Foxit APIs

We had an incredible time at API World 2025 connecting with developers, sharing ideas, and seeing how Foxit APIs power everything from AI-driven resume builders to interactive doodle apps. In this post, we’ll walk through the same hands-on workflow Jorge Euceda demoed live on stage—showing how to build an auditable, AI-powered document automation system using Foxit PDF Services and Document Generation APIs.
How to Build an AI Resume Analyzer with Python & Foxit APIs (API World 25′)
This year’s API World was packed with energy—and it was amazing meeting so many developers face-to-face at the Foxit booth. We spent three days trading ideas about document automation, AI workflows, and integration challenges.
Our team hosted a hands-on workshop and sponsored the API World Hackathon, where developers submitted 16 high-quality projects built with Foxit APIs. Submissions ranged from:
Automated legal-advice generators
Compatibility-rating apps that analyze your personality match
AI-powered resume optimizers that tailor your CV to dream-job descriptions
Collaborative doodle games that turn drawings into shareable PDFs
Each project offered a new perspective on what’s possible with Foxit APIs—and we loved seeing the creativity.
Among all the sessions, Jorge Euceda’s workshop stood out as a crowd favorite. It showed how to make AI document decisions auditable, explainable, and replayable using event sourcing and two key Foxit APIs. That’s exactly what we’ll walk through below.
Replicate the Full Demo
Click here to grab the project overview file.
Prefer to follow along with the live session instead of reading step-by-step?
Watch Jorge’s complete “AI-Powered Resume to Report” presentation from API World 2025.
It includes every step shown below—plus real-time API responses.
What You’ll Build
A complete, auditable workflow:
Resume Upload → Extract Resume Data → AI Candidate Scoring → Generate HR Report → Event Store
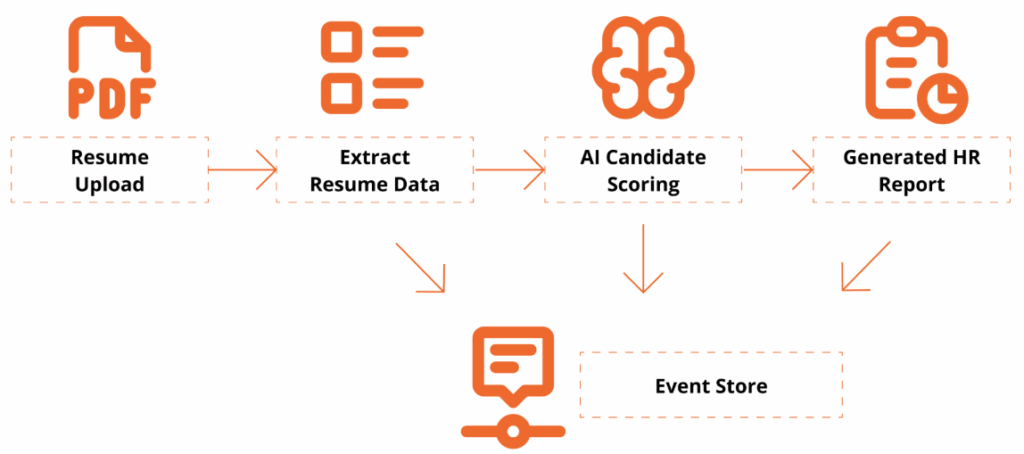
This workshop is designed for technical professionals and managers who want to learn how to use application programming interfaces (APIs) and explore how AI can enhance document workflows. Attendees will get hands-on experience with Foxit’s PDF Services (extraction/OCR) and Document Generation APIs, and see how event sourcing turns AI decisions into an auditable, replayable ledger.
By the end, you’ll have a Python-based demo that extracts data from a PDF resume, analyzes it against a policy, and generates a polished HR Report PDF with a traceable event log.
Getting Set Up
To follow along, you’ll need:
Access to a terminal with a Python 3.9+ Environment and internet connectivity
Visual Studio Code or your preferred IDE
Basic familiarity with REST/JSON (helpful but not required)
- Install Dependencies
python -V
# virtual environment setup, requests installation
python3 -m venv myenv
source myenv/bin/activate
pip3 install requests- Download the project’s zip file below
Now extract the files somewhere in your computer, open in Visual Studio Code or your preferred IDE.
You may use any sample resume PDF for inputs/input_resume.pdf. A sample one is provided, but you may leverage any resume PDF you wish to generate a report on.
- Create a Foxit Account for credentials
Create a Free Developer Account now or navigate to our getting started guide, which will go over how to create a free trial.
Hands-On Walkthrough
Step 1 – Open the Project
Now that you’ve downloaded the workshop source code, navigate to the resume_to_report.py file, which will serve as our main entry point.
Once dependencies are installed and the ZIP file extracted, open your workspace and run:
python3 resume_to_report.pyYou should see console logs showing:
An AI Report printed as JSON
A generated PDF (
outputs/HR_Report.pdf)An event ledger (
outputs/events.json) with traceable actions
Step 2 — Inspect the outputs
Open the generated HR report to review:
Candidate name and phone
Overall fit score
Matching skills & gaps
Summary and policy reference in the footer
Then open events.json to see your audit trail—each entry captures the AI’s decision context.
{
  "eventType": "DecisionProposed",
  "traceId": "8d1e4df6-8ac9-4f31-9b3a-841d715c2b1c",
  "payload": {
    "fitScore": 82,
    "policyRef": "EvaluationPolicy#v1.0"
  }
}
This is your audit trail.
Step 3 — Replay & Explain a Policy Change
Replay demonstrates why event-sourcing matters:
Edit
inputs/evaluation_policy.json: add a hard requirement (e.g.,"kubernetes") or adjust the job_description emphasis.Re-run the script with the same resume.
Compare:
New decision and updated PDF content
Event log now reflects the updated rationale (
PolicyLoadedsnapshot → newDecisionProposedwith the sametraceIdlineage)
Emphasize: The input resume hasn’t changed; only policy did — the event ledger explains the difference.
Policy: Drive Auditable & Replayable Decisions
The AI assistant uses a JSON policy file to control how it scores, caps, and summarizes results. Every policy snapshot is logged as its own event, creating a replayable audit trail for governance and compliance.
{
  "policyId": "EvaluationPolicy#v1.0",
  "job_description": "Looking for a software engineer with expertise in C++, Python, and AWS cloud services. Experience building scalable applications in agile teams; familiarity with DevOps and CI/CD.",
  "overall_summary": "Make the summary as short as possible",
  "hard_requirements": ["C++", "python", "aws"]
}
Notes:
policyIdappears in both the report and event log.job_descriptiondefines what the AI is looking for.Changing these values creates a new traceable event.
Generate a Polished Report
Next, use the Foxit Document Generation API to fill your Word template and create a formatted PDF report.
Open inputs/hr_report_template.docx, you will find the following HR reporting template with placeholders for the fields we will be entering:
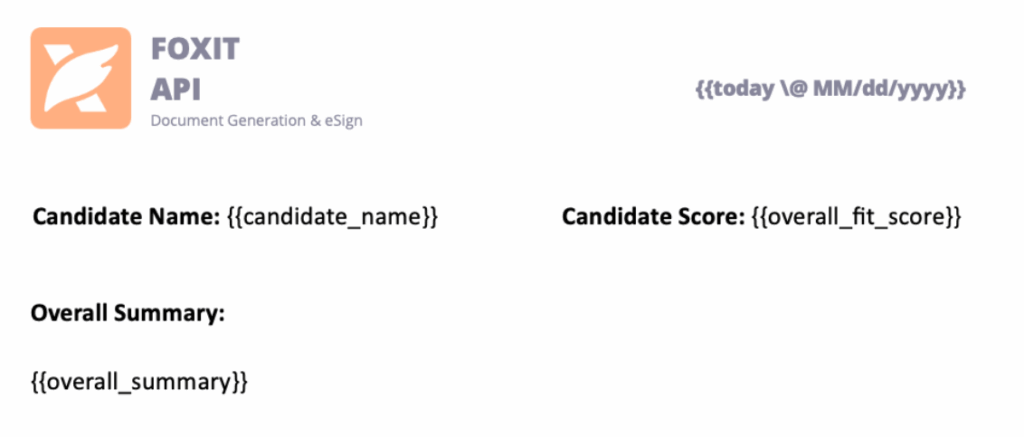
Tips:
Include lightweight branding (logo/header) to make the generated PDF presentation-ready.
Include a footer with traceable Policy ID and Trace ID Events
Results and Audit Trail
Here’s what the final HR Report PDF looks like:

Every decision has a Trace ID and Policy Ref, so you can recreate the report at any time and verify how the AI arrived there.
Why Event-Sourced AI Matters
This pattern does more than score resumes—it proves that AI decisions can be transparent, deterministic, and trustworthy.
By using Foxit APIs to extract, analyze, and generate documents, developers can bring auditability to any workflow that relies on machine logic.
Key Takeaways
Auditability – Every AI step emits a verifiable event.
Replayability – Change a policy and regenerate for deterministic results.
Explainability – Decisions carry policy and trace references for clear “why.”
Automation – PDF Services and Document Generation handle the document lifecycle end-to-end.
Try It Yourself
Ready to build your own auditable AI workflow?
Demo and Source Code: document-workflows-with-foxit.pages.dev
Foxit Developer Portal: developer-api.foxit.com
API Docs: docs.developer-api.foxit.com
Watch the Full Presentation: Euceda’s API World session
Closing Thought
At API World, we set out to show how Foxit APIs can power real, transparent AI workflows—and the community response was incredible. Whether you’re building for HR, legal, finance, or creative industries, the same pattern applies:
Make your AI explain itself.
Start with the Foxit APIs, experiment with policies, and turn every AI decision into a traceable event that builds trust.
Create Custom Invoices with Word Templates and Foxit Document Generation

Invoicing is a critical part of any business. This tutorial shows how to automate the process by creating dynamic, custom PDF invoices with the Foxit Document Generation API. Learn how to design a Microsoft Word template with special tokens, prepare your data in JSON, and then use a simple Python script to generate your final invoices.
Create Custom Invoices with Word Templates and Foxit Document Generation
Invoicing is a critical part of any business, often involving multiple steps—gathering customer data, calculating amounts owed, and sending out invoices so your company can get paid. Foxit’s Document Generation API streamlines this process by making it easy to create well-formatted, dynamic PDF invoices. Let’s walk through an example.
Before You Start
If you want to follow along with this blog post, be sure to get your free credentials over on our developer portal. Also, read our introductory blog post, which covers the basics of working with our API.
As a reminder, the API makes use of Microsoft Word templates. These templates are essentials tokens wrapped in double brackets. When you call the API, you’ll pass the template and your data. Our API then dynamically replaces those tokens with your data and returns you a nice PDF (you can also get a Word file back as well).
Creating Your Custom Invoice with Word Templates
Let’s begin by designing the template in Word. An invoice typically includes things like:
- The customer receiving the invoice
- The invoice number and issue date
- The payment due date
- A detailed list of items, including name, quantity, and price for each line item, with a total at the end
The Document Generation API makes no requirements in terms of how you design your templates. Size, alignment, and so forth, can match your corporate styles and be as fancy, or simple, as you like. Let’s consider the template below (I’ll link to where you can download this file at the end of the article):

Let's break it down from the top.
- The first token,
{{ invoiceNum }}, represents the invoice number for the customer. - The next token is special.
{{ today \@ MM/dd/yyyy }}represents two different features of the Document Generation API. First,todayis a special value representing the present time, or more accurately, when you call the API. The next portion represents a date mask for representing a date value. Our docs have a list of available masks. {{ accountName }}is another regular token.- The payment date,
{{ paymentDueDate \@ MM/dd/yyyy }}, shows how the date mask feature can be used on dates in your own data as well. - Now let's look at the table. You can format tables however you like, but a common setup includes one row for the header and one row for the dynamic data. (In this example, there’s also a third row, which I'll explain shortly.) To start, you’ll use a marker tag:
{{TableStart:lineItems}}, wherelineItemsrepresents an array in your data. The row ends with the matching{{TableEnd:lineItems}}tag. Between these two tags, you'll place additional tags for each value in the array. For example, we have aproduct,qty,price, andtotalPricefor each item. You'll also see the specialROW_NUMBERvalue, which automatically counts each row starting at 1. Finally, the\# Currencyformat is applied to thetotalPricevalue to display it as a currency. - The last row in the table uses two special features together, namely
SUM(ABOVE), which maps to creating a total of the last column from the table. This can be paired with currency formatting as shown.
Alright, now that you've seen the template, let's talk data!
The Data for Your Custom Invoices
Usually the data for an operation like this would come from a database, or perhaps an API with an ecommerce system. For this demo, the data will come from a simple JSON file. Let's take a look at it:
[
{
	"invoiceNum":100,
	"accountName":"Customer Alpha",
	"accountNumber":1,
	"paymentDueDate":"August 15, 2025",
	"lineItems":[
		{"product":"Product 1", "qty":5, "price":2, "totalPrice":10},
		{"product":"Product 5", "qty":3, "price":9, "totalPrice":18},
		{"product":"Product 4", "qty":1, "price":50, "totalPrice":50},
		{"product":"Product X", "qty":2, "price":15, "totalPrice":30}
	]
},
{
	"invoiceNum":25,
	"accountName":"Customer Beta",
	"accountNumber":2,
	"paymentDueDate":"August 15, 2025",
	"lineItems":[
		{"product":"Product 2", "qty":9, "price":2, "totalPrice":18},
		{"product":"Product 4", "qty":1, "price":8, "totalPrice":8},
		{"product":"Product 3", "qty":10, "price":25, "totalPrice":250},
		{"product":"Product YY", "qty":3, "price":15, "totalPrice":45},
		{"product":"Product AA", "qty":2, "price":100, "totalPrice":200}
	]
},
{
	"invoiceNum":51,
	"accountName":"Customer Gamma",
	"accountNumber":3,
	"paymentDueDate":"August 15, 2025",
	"lineItems":[
		{"product":"Product 9", "qty":1, "price":2, "totalPrice":2},
		{"product":"Product 23", "qty":30, "price":9, "totalPrice":270},
		{"product":"Product ZZ", "qty":6, "price":15, "totalPrice":90}
	]
}
]
The data consists of an array of 3 sets of invoice data. Each set follows the same pattern and matches what you saw above in the Word template. The only exception being the accountNumber value which wasn't used in the template. That's fine – sometimes your data will include things not necessary for the final PDF. In this case, though, we're actually going to make use of it (you'll see in a moment). Onward to code!
Calling the Foxit API with Our Data
Now for my favorite part – actually calling the API. The Generate Document API is incredibly simple; needing just your credentials, a base64 version of the template, and your data. The entire demo is slightly over 50 lines of Python code, so let's look at the template and then break it down.
import os
import requests
import sys
from time import sleep
import base64
import json
from datetime import datetime

CLIENT_ID = os.environ.get('CLIENT_ID')
CLIENT_SECRET = os.environ.get('CLIENT_SECRET')
HOST = os.environ.get('HOST')

def docGen(doc, data, id, secret):

	headers = {
		"client_id":id,
		"client_secret":secret
	}

	body = {
		"outputFormat":"pdf",
		"documentValues": data,
		"base64FileString":doc
	}

	request = requests.post(f"{HOST}/document-generation/api/GenerateDocumentBase64", json=body, headers=headers)

	return request.json()

with open('invoice.docx', 'rb') as file:
	bd = file.read()
	b64 = base64.b64encode(bd).decode('utf-8')

with open('invoicedata.json', 'r') as file:
	data = json.load(file)

for invoiceData in data:
	result = docGen(b64, invoiceData, CLIENT_ID, CLIENT_SECRET)

	if result["base64FileString"] == None:
		print("Something went wrong.")
		print(result)
		sys.exit()

	b64_bytes = result["base64FileString"].encode('ascii')
	binary_data = base64.b64decode(b64_bytes)

	filename = f"invoice_account_{invoiceData["accountNumber"]}.pdf"

	with open(filename, 'wb') as file:
		file.write(binary_data)
		print(f"Done and stored to {filename}")
After importing the necessary modules and loading credentials from the environment, we define a simple docGen method. This method takes the template, data, and credentials, then calls the API endpoint. The API responds with the rendered PDF in Base64 format, which the method returns.
The main code of the template breaks down to:
- Reading in the template and converting it to base64.
- Reading in the JSON file
- Iterating over each block of invoice data and calling the API
- Remember how I said
accountNumberwasn't used in the template? We actually use it here to generate a unique filename. Technically, you don't need to store the results at all. You could take the raw binary data and email it. But having a copy of the results does mean you can re-use it later, such as if the customer is late to pay.
Here's an example of one of the results:

Next Steps
If you want to try this demo yourself, first grab yourself a shiny free set of credentials and then head over to our GitHub to grab the template, Python, and sample output values yourself.
Generate Dynamic PDFs from JSON using Foxit APIs

See how easy it is to generate PDFs from JSON using Foxit’s Document Generation API. With Word as your template engine, you can dynamically build invoices, offer letters, and agreements—no complex setup required. This tutorial walks through the full process in Python and highlights the flexibility of token-based document creation.
Generate Dynamic PDFs from JSON using Foxit APIs
One of the more fascinating APIs in our library is the Document Generation API. This document generation API lets you create dynamic PDFs or Word documents using your own data as templates. That may sound simple – and the code you’re about to see is indeed simple – but the real power lies in how flexible Word can be as a template engine. This API could be used for:
- Creating invoices
- Creating offer letters
- Creating dynamic agreements (which can integrate with our eSign API)
All of this is made available via a simple API and a “token language” you’ll use within Word to create your templates. Let’s take a look at how this is done.
Credentials
Before we go any further, head over to our developer portal and grab a set of free credentials. This will include a client ID and secret values – you’ll need both to make use of the API.
Don’t want to read all of this? You can also follow along by video:
Using the API
The Document Generation API flow is a bit different from our PDF Services APIs in that the execution is synchronous. You don’t need to upload your document beforehand or download a result result. You simply call the API (passing your data and template) and the result has your new PDF (or Word document). With it being this simple, let’s get into the code.
Loading Credentials
My script begins by loading in the credentials and API root host via the environment:
CLIENT_ID = os.environ.get('CLIENT_ID')
CLIENT_SECRET = os.environ.get('CLIENT_SECRET')
HOST = os.environ.get('HOST')
As always, try to avoid hard coding credentials directly into your code.
Calling the API
The endpoint only requires you to pass the output format, your data, and a base64 version of your file. “Your data” can be almost anything you like—though it should start as an object (i.e., a dictionary in Python with key/value pairs). Beneath that, anything goes: strings, numbers, arrays of objects, and so on.
Here’s a Python wrapper showing this in action:
def docGen(doc, data, id, secret):

    headers = {
        "client_id":id,
        "client_secret":secret
    }

    body = {
        "outputFormat":"pdf",
        "documentValues": data,
        "base64FileString":doc
    }

    request = requests.post(f"{HOST}/document-generation/api/GenerateDocumentBase64", json=body, headers=headers)
    return request.json()
And here’s an example calling it:
with open('../../inputfiles/docgen_sample.docx', 'rb') as file:
bd = file.read()
b64 = base64.b64encode(bd).decode('utf-8')
data = {
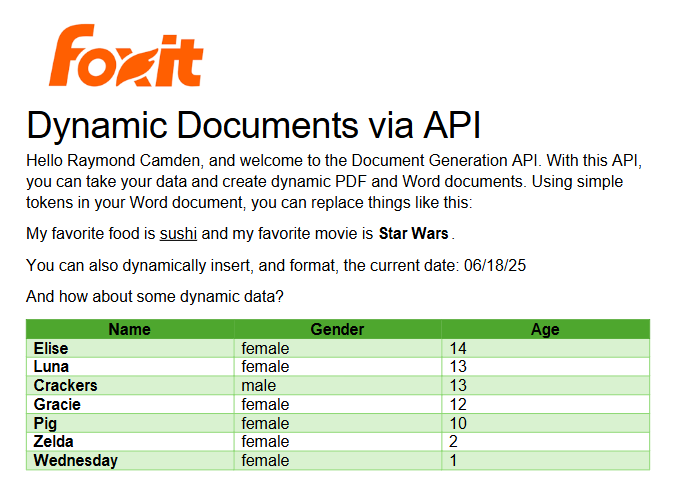
"name":"Raymond Camden",
"food": "sushi",
"favoriteMovie": "Star Wars",
"cats": [
{"name":"Elise", "gender":"female", "age":14 },
{"name":"Luna", "gender":"female", "age":13 },
{"name":"Crackers", "gender":"male", "age":13 },
{"name":"Gracie", "gender":"female", "age":12 },
{"name":"Pig", "gender":"female", "age":10 },
{"name":"Zelda", "gender":"female", "age":2 },
{"name":"Wednesday", "gender":"female", "age":1 },
],
}
result = docGen(b64, data, CLIENT_ID, CLIENT_SECRET)You’ll note here that my data is hard-coded. In a real application, this would typically be dynamic—read from the file system, queried from a database, or sourced from any other location.
The result object contains a message representing the success or failure of the operation, the file extension for the result, and the base64 representation of the result. Most likely you’ll always be outputting PDFs, so here’s a simple bit of code that stores the result:
with open('../../output/docgen1.pdf', 'wb') as file:
    file.write(binary_data)
    print('Done and stored to ../../output/docgen1.pdf')
There’s a bit more to the API than I’ve shown here so be sure to check the docs, but now it’s time for the real star of this API, Word
Using Word as a Template
I’ve probably used Microsoft Word for longer than you’ve been alive and I’ve never really thought much about it. But when you begin to think of a simple Word document as a template, all of a sudden the possibilities begin to excite you. In our Document Generation API, the template system works via simple “tokens” in your document marked by opening and closing double brackets.
Consider this block of text:
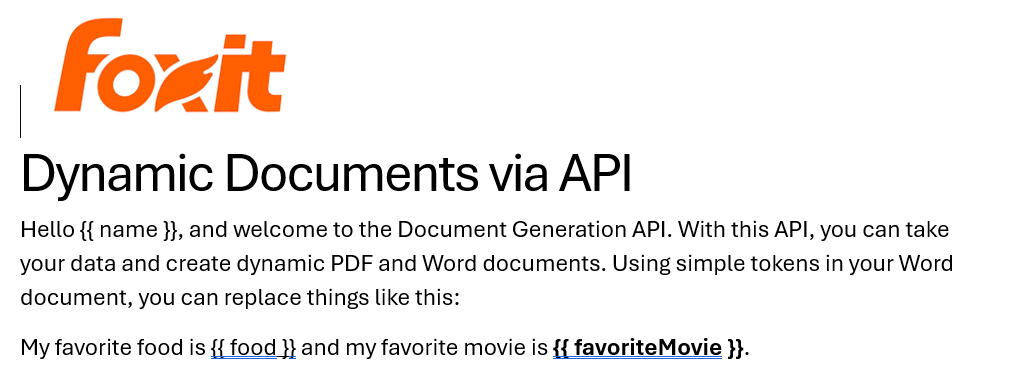
See how name is surrounded by double brackets? And food and favoriteMovie? When this template is sent to the API along with the corresponding values, those tokens are replaced dynamically. In the screenshot, notice how favoriteMovie is bolded. That’s fine. You can use any formatting, styling, or layout options you wish.
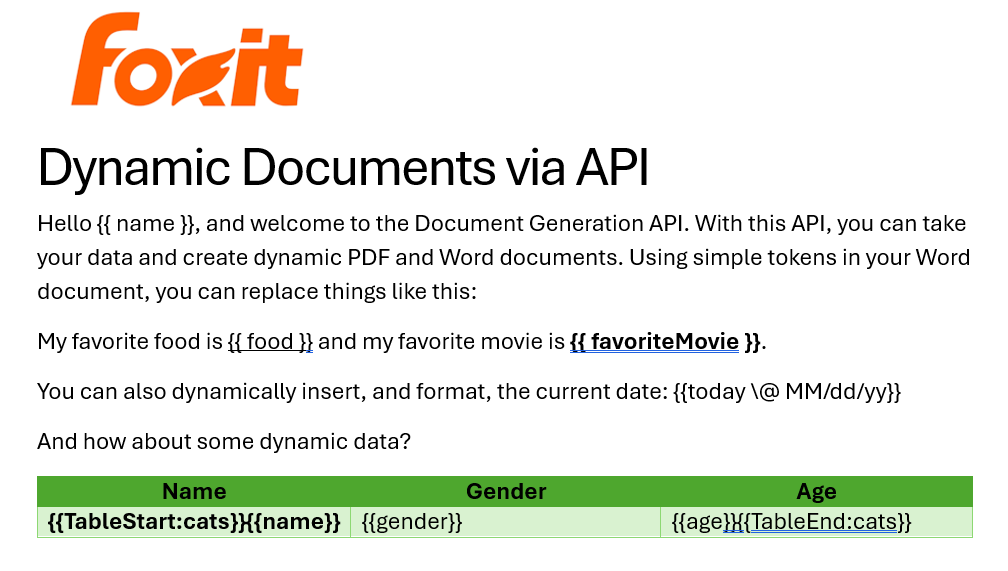
That’s one example, but you also get some built-in values as well. For example, including today as a token will insert the current date, and can be paired with date formatting to specify how the date looks:
Remember the array of cats from earlier? You can use that to create a table in Word like this:

Notice that I’ve used two new tags here, TableStart and TableEnd, both of which reference the array, cats. Then in my table cells, I refer to the values from that array. Again, the color you see here is completely arbitrary and was me making use of the entirety of my Word design skills.
Here’s the template as a whole to show you everything in context:
The Result
Given the code shown above with those values, and given the Word template just shared, once passed to the API, the following PDF is created:
Ready to Try?
If this looks cool, be sure to check the docs for more information about the template language and API. Sign up for some free developer credentials and reach out on our developer forums with any questions.
Want the code? Get it on GitHub.
If you are more of a Node person, check out that version. Get it on GitHub.