
Embedded Signing with the Foxit eSign API: From Envelope Creation to In-App iFrame in One Session
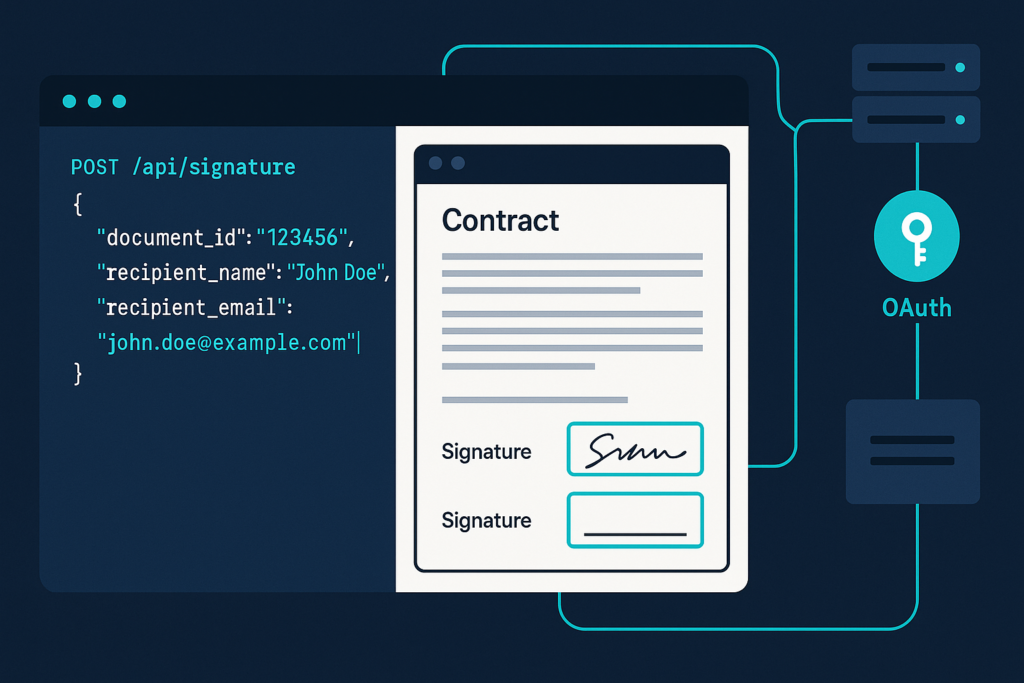
This guide walks through the Foxit eSign API end to end: authenticate, create a folder, generate an embedded session URL, and render the signing experience in an iFrame your users never leave.
Most embedded signing tutorials hand you a three-step abstraction: get a token, create an envelope, open a recipient view. The implementation details live somewhere else, usually mapped to a different API’s object model that doesn’t quite match what you’re working with.
This tutorial covers the Foxit eSign API embedded signing mechanics from start to finish. Authenticate once, create a “folder” (Foxit’s term for what other platforms call an envelope), receive an embedded session URL in that same response, and render it in an iFrame your users never leave. No separate field-placement API call, no client-side SDK to install.
What You’ll Build
By the end of this guide, you’ll have a working embedded signing session: a PDF loaded into your app via iFrame, signature fields defined by Text Tags, a webhook handler that verifies completion events, and a post-signing redirect that keeps users inside your product. Every step runs against the Foxit eSign sandbox with credentials you can generate in under five minutes.
1. Prerequisites and Auth Setup
Before any code runs, make sure you have the following installed and configured:
venv for project isolation
The requests library
A code editor: VS Code with the Python extension is a solid choice. PyCharm, Sublime Text, and JetBrains Fleet work equally well.
A Foxit eSign developer account, available at account.foxit.com/site/sign-up with no credit card required
Set up your workspace:
mkdir foxit-esign-tutorial && cd foxit-esign-tutorial

python3 -m venv .venv && source .venv/bin/activate

pip install requests
The Foxit eSign API Is a Separate Portal from PDF Services
Developers who already use Foxit tools hit this wall first: the Foxit eSign API runs at its own base host, with its own API Key and API Secret. These credentials don’t work with the client_id and client_secret from the PDF Services developer portal at developer-api.foxit.com. The eSign documentation lives at developersguide.foxitesign.foxit.com, separate from docs.developer-api.foxit.com. The API Playground handles PDF Services sandbox testing; eSign sandbox calls go to the eSign portal directly.
The NA environment base host is https://na1.foxitesign.foxit.com. All subsequent code samples reference this as {HOST_NAME}.
Generating an OAuth 2.0 Access Token
Set your credentials as environment variables before running anything:
export FOXIT_ESIGN_CLIENT_ID="your_api_key"

export FOXIT_ESIGN_CLIENT_SECRET="your_api_secret"
Then generate a Bearer token via the OAuth 2.0 client credentials flow:
curl -X POST "https://na1.foxitesign.foxit.com/api/oauth2/access_token" \

-d "client_id=$FOXIT_ESIGN_CLIENT_ID" \

-d "client_secret=$FOXIT_ESIGN_CLIENT_SECRET" \

-d "grant_type=client_credentials" \

-d "scope=read-write"
The response carries an access_token field. Pass it as Authorization: Bearer {token} on every subsequent call, and store it server-side so your credentials never travel to the browser.
2. Creating an Envelope Programmatically with /api/folders/createfolder
Foxit eSign calls what other platforms call an “envelope” a folder. If you’re coming from DocuSign or PandaDoc, that naming difference will catch you on the first read of the docs. The endpoint is POST {HOST_NAME}/api/folders/createfolder. A template-based variant also exists at POST {HOST_NAME}/api/templates/createFolder (note the camelCase) for assembling envelopes from saved templates. This tutorial focuses on the direct document-upload flow.
Defining Signature Fields with Text Tags
Foxit eSign reads signature field definitions from the PDF itself at upload time. You embed them as Text Tags directly in the document, and the API parses the tags on ingest and converts them to interactive fields. The tag syntax follows this structure: ${fieldtype:party_number:required:field_name:width}. Here, y marks a field as required and n marks it as optional. The party number maps to the signing sequence for that recipient. Width is expressed as underscores.
A minimal set covering the four field types required for a real signing flow:
${s:1: } # signature field, party 1

${i:1:______} # initials field, party 1

${d:1:n::____} # optional date field, party 1

${t:1:y:Full_Name:__________} # required text field, party 1, named "Full_Name"
The full set of supported tag types includes signfield (or s), initialfield (or i), datefield (or d), textfield (or t), textboxfield (or tb), checkboxfield (or c), radiobuttonfield (or rb), securedfield (or sc), attachmentfield (or a), imagefield (or img), accept (or ab), decline (or db), payfield (or pf), and formulafield (or ff).
To hide tags in production, set the tag font color to match the page background color. Foxit eSign converts the tags to fields but does not strip them from the rendered document.
Use this sample PDF with Text Tags pre-embedded to follow along. It includes a signature field, initials, a date field, and a text input, all mapped to party 1.
Submitting the createfolder Request
You can supply the PDF two ways against the same endpoint. In URL mode you pass a fileUrls array of publicly reachable PDF links alongside a matching fileNames array. In base64 mode you set "inputType": "base64" and pass a base64FileString array of base64-encoded PDF bytes, again with a matching fileNames array. The API rejects a request that supplies neither, returning fileUrls or base64FileString cannot be empty.
One parameter is easy to miss and breaks the whole flow when omitted. Set processTextTags to true so the API parses the Text Tags embedded in the PDF and converts them into interactive fields. Leave it out and the folder still gets created successfully, but the tags stay inert literal text on the page, the signing UI reports zero required fields, and a signer can reach Finish without ever signing. If your source PDF carries native AcroForm fields instead of Text Tags, the companion processAcroFields flag handles those.
URL-based submission via cURL, pointing at the hosted sample PDF:
curl -X POST "https://na1.foxitesign.foxit.com/api/folders/createfolder" \

-H "Authorization: Bearer $FOXIT_ESIGN_ACCESS_TOKEN" \

-H "Content-Type: application/json" \

-d '{

"folderName": "Service Agreement",

"sendNow": false,

"processTextTags": true,

"createEmbeddedSigningSession": true,

"embeddedSignersEmailIds": ["[email protected]"],

"fileUrls": ["https://github.com/lucienchemaly/foxit-demo-templates/raw/main/esign/sample-text-tags.pdf"],

"fileNames": ["sample-text-tags.pdf"],

"parties": [

{

"firstName": "Alex",

"lastName": "Rivera",

"emailId": "[email protected]",

"permission": "FILL_FIELDS_AND_SIGN",

"sequence": 1

}

]

}'
In this request you ask Foxit eSign to fetch the tagged PDF from its public URL, hold the folder as a draft instead of emailing it by setting sendNow to false, and mint an embedded signing session for the party identified in embeddedSignersEmailIds. The single signer is defined in the parties array with a name, email, the FILL_FIELDS_AND_SIGN permission, and a signing sequence.
Base64 upload via Python, which avoids needing a public URL by sending the file bytes inline:
import os

import base64

import requests


HOST = "https://na1.foxitesign.foxit.com"

TOKEN = os.environ["FOXIT_ESIGN_ACCESS_TOKEN"]


with open("sample-text-tags.pdf", "rb") as pdf:

encoded = base64.b64encode(pdf.read()).decode()


payload = {

"folderName": "Service Agreement",

"sendNow": False,

"processTextTags": True,

"inputType": "base64",

"base64FileString": [encoded],

"fileNames": ["sample-text-tags.pdf"],

"createEmbeddedSigningSession": True,

"embeddedSignersEmailIds": ["[email protected]"],

# Recipient defined in the body overrides any tag-defined party

"parties": [

{

"firstName": "Alex",

"lastName": "Rivera",

"emailId": "[email protected]",

"permission": "FILL_FIELDS_AND_SIGN",

"sequence": 1,

}

],

}


response = requests.post(

f"{HOST}/api/folders/createfolder",

headers={"Authorization": f"Bearer {TOKEN}"},

json=payload,

)


print(response.json())
In this code, you read the local PDF, base64-encode its bytes, and place the result inside the base64FileString array with inputType set to base64 so the API knows to decode it rather than fetch a URL. The rest of the payload mirrors the cURL example, sending the folder as a draft and requesting an embedded session for the listed signer, after which you print the JSON response to read back the folder.folderId and the session URL. When both the PDF’s Text Tags and the API body define recipient parties, the body values take precedence, so you can reuse a tagged PDF template and swap in different signers at request time without touching the document.
3. Generating the Embedded Signing Session and Rendering the iFrame
Setting createEmbeddedSigningSession: true in the createfolder body, paired with an embeddedSignersEmailIds array naming which parties sign in your app, gives you a signed session URL in the same response. No second API call, no separate “recipient view” endpoint. The response carries an embeddedSigningSessions array, and each entry holds the signer email in emailIdOfSigner, the raw token in embeddedToken, and the ready-to-render link in embeddedSessionURL. That URL follows this format, where eetid is the URL-encoded embedded token:
https://{HOST_NAME}/embedded/embeddedsign?eetid={URL-ENCODED-EMBEDDED-TOKEN}
If you omit embeddedSignersEmailIds, the API returns email id of embedded signer(s) not submitted, so always list the embedded signers explicitly. For multi-party workflows you can set createEmbeddedSigningSessionForAllParties: true so every recipient signs in an embedded session rather than over email. When you need each signer’s live URL, request it per signer through the regenerate endpoint described below.
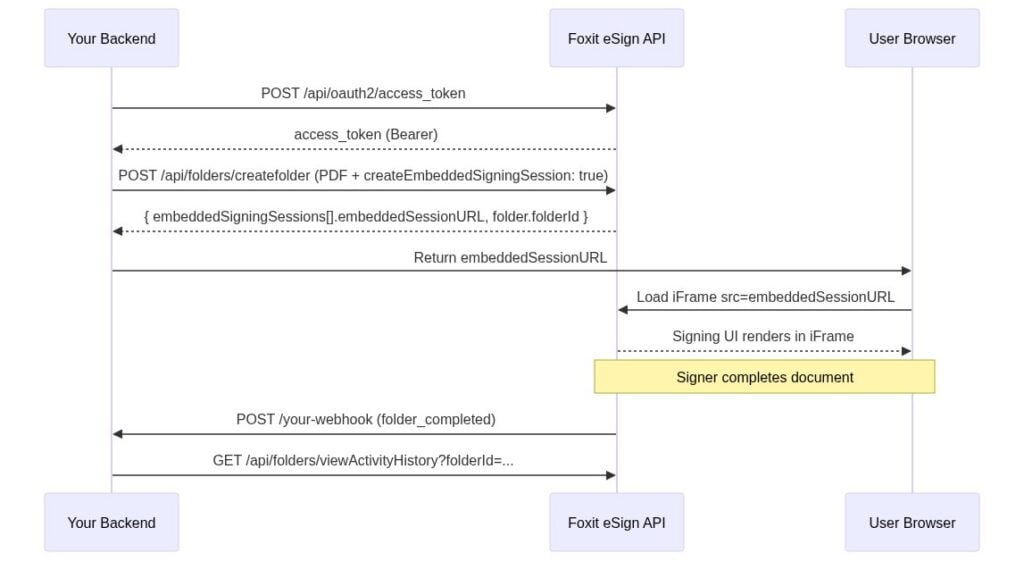
The full lifecycle runs from token request through webhook delivery:
Injecting the Session URL into an iFrame
The signing UI renders entirely inside the iFrame with no additional JavaScript library required.
function launchSigningSession(embeddedSessionURL) {

const iframe = document.createElement("iframe");


// These five sandbox permissions are the minimum required for the signing UI

iframe.setAttribute(

"sandbox",

"allow-scripts allow-same-origin allow-forms allow-popups allow-top-navigation",

);


iframe.src = embeddedSessionURL;

iframe.style.width = "100%";

iframe.style.height = "700px";

iframe.style.border = "none";


iframe.onload = function () {

console.log("Signing session ready");

};


document.getElementById("signing-container").appendChild(iframe);

}
The sandbox attribute matters here. Remove allow-popups or allow-top-navigation and the signing UI breaks in ways that produce no obvious error. The five attributes above are the minimum viable set. Don’t strip them without testing the complete signing flow.
To verify the flow without wiring this into your app first, download the ready-to-run iFrame test page from the demo repo, open it in a browser, paste the embeddedSessionURL from your createfolder response into the input box, and click Load. It applies the same five sandbox permissions shown above. A correctly tagged document renders with the signing controls active, as shown below.
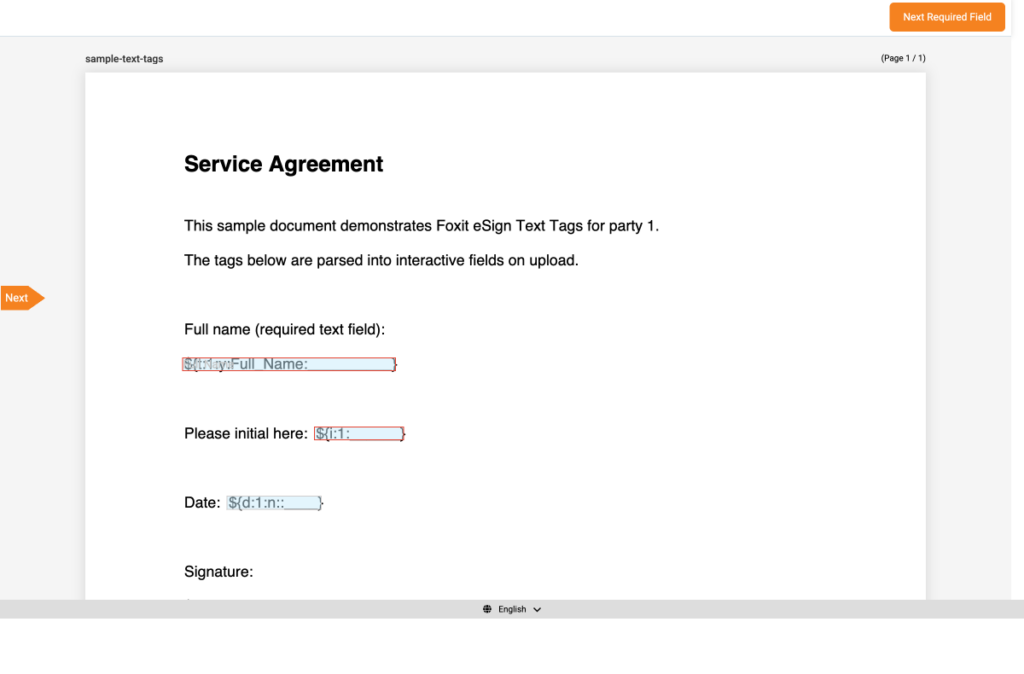
The sample document loaded in the iFrame with processTextTags enabled. The header shows “Required Fields Left: 2” and a “Next Required Field” button, confirming the Text Tags became interactive fields. If that counter reads zero or the page shows the raw ${...} tag text with no input boxes, recheck that processTextTags was set to true on the createfolder request.
Session URLs are short-lived. Generate the URL at request time and pass it directly to the client. Don’t cache it. If a user returns to an incomplete workflow after the session expires, call POST {HOST_NAME}/api/embedded/regenerateEmbeddedSigningSession with the folder ID and the signer email to get a fresh URL. The response mirrors a single embedded session entry, returning emailIdOfSigner, embeddedToken, and the new embeddedSessionURL.
4. White-Labeling the Signing Experience
Foxit eSign exposes branding control at several levels. You can apply a custom logo to the signing UI and outgoing notification emails, set application colors to match your product’s visual design, and configure a personalized sender name so recipients see your company name rather than a generic Foxit sender identity.
For logo and color configuration, manage these settings through the eSign Portal’s branding section. The portal publishes canonical limits on file size and supported formats. Check the branding settings in your account for current specifications rather than relying on numbers printed here that may have changed.
Configuring Post-Signing Redirect URLs
Custom redirect URLs keep users inside your application after they sign, decline, defer, or hit an error. Pass them as parameters in the createfolder body:
payload = {

"folderName": "Service Agreement",

"sendNow": False,

"processTextTags": True,

"createEmbeddedSigningSession": True,

"embeddedSignersEmailIds": ["[email protected]"],

# Return the user to your confirmation page after a successful signature

"signSuccessUrl": "https://app.example.com/contracts/signed",

# Return to a dedicated page when the signer declines

"signDeclineUrl": "https://app.example.com/contracts/declined",

# Return here when the signer chooses to finish later

"signLaterUrl": "https://app.example.com/contracts/later",

# Return here if the signing session errors out

"signErrorUrl": "https://app.example.com/contracts/error",

"parties": [ ... ],

"fileUrls": [ ... ],

"fileNames": [ ... ],

}
Foxit eSign appends two query parameters to your success URL when it redirects, namely folderId for the folder that was signed and event, whose value is signing_success on a completed signature or signing_declined when the signer declines. Without these URLs, signers land on Foxit’s default confirmation page. With them, your application controls the entire post-signing navigation experience.
Tailoring Signer Instructions for Regulated Industries
Regulated workflows often need specific disclosure language in front of signers, which matters for ESIGN Act or eIDAS compliance scenarios where your legal team controls the wording. The createfolder body accepts a signerInstructionId and a confirmationInstructionId that reference instruction templates configured in your account, and you can drop explicit accept and decline button fields into the document itself using the accept (or ab) and decline (or db) Text Tag types. The eSign Developers Guide at developersguide.foxitesign.foxit.com documents these parameters.
5. Handling Webhook Callbacks for Completion Events
Foxit eSign fires HTTP POST requests to your registered endpoint when these lifecycle events occur: folder_sent, folder_viewed, folder_signed, folder_cancelled, folder_completed, folder_executed, and folder_deleted. Register your callback URL in the eSign Portal under API Settings. Make sure the endpoint is publicly reachable over HTTPS before you start testing with the sandbox.
Verifying the Webhook Signature
Every webhook POST includes a signature query parameter. It’s a base64-encoded HMAC-SHA-256 digest of the raw request body, computed using your webhook secret. Recompute the same digest server-side and compare before doing any processing. An unverified webhook is an open door.
import os

import hmac

import hashlib

import base64

from flask import Flask, request, abort


app = Flask(__name__)

WEBHOOK_SECRET = os.environ["FOXIT_ESIGN_WEBHOOK_SECRET"].encode()


@app.route("/webhook/foxit", methods=["POST"])

def foxit_webhook():

# Step 1: Pull the signature from the query string

received_sig = request.args.get("signature", "")


# Step 2: Recompute HMAC-SHA-256 over the raw request body

raw_body = request.get_data()

computed_sig = base64.b64encode(

hmac.new(WEBHOOK_SECRET, raw_body, hashlib.sha256).digest()

).decode()


# Step 3: Constant-time comparison guards against timing attacks

if not hmac.compare_digest(received_sig, computed_sig):

abort(403)


payload = request.json

event_name = payload.get("event_name")

folder_id = payload.get("data", {}).get("folder", {}).get("folderId")


if event_name in ("folder_completed", "folder_executed"):

handle_completion(folder_id)

elif event_name == "folder_cancelled":

handle_cancellation(folder_id)


# A non-2xx response triggers Foxit's automatic retry logic.

# Return 200 once verification and basic parsing succeed.

return "", 200
The payload structure is consistent across all events, carrying a top-level event_name, an event_date timestamp, and a data object whose folder field holds the full folder record. The folder identifier lives at data.folder.folderId, alongside the rest of the envelope-level metadata such as folderName and folderStatus.
Downstream Actions Triggered from folder_completed
When folder_completed or folder_executed fires, two actions cover the majority of production workflows. Fetch the signed document via the documents endpoint using the folder ID and store the result in your document storage layer. For contracts that require sequential agreements (a master services agreement followed by a statement of work, for example), fire the next createfolder call as part of the completion handler.
Audit history is available programmatically via GET {HOST_NAME}/api/folders/viewActivityHistory?folderId={FOLDER_ID}, which returns the full signing log once a folder has been shared or sent. This is a GET-only endpoint, and a folder still in DRAFT returns logs of a non-shared folder can not be viewed.
6. Common Mistakes and Troubleshooting
Text Tag Syntax Breaks on Copy-Paste
Smart-quote autocorrect in Word, Google Docs, and many other editors replaces straight ASCII brackets and quote characters with typographic equivalents. Tag parsing fails silently when this happens. Always paste tags into a plain-text editor first and verify the bracket characters are straight ASCII. The eSign Developers Guide writes every field-type notation in lowercase, such as signfield or s and textfield or t, so author your tags in lowercase to match the documented syntax rather than experimenting with capitalized variants.
Visible Text Tags Reaching Production
Foxit eSign converts embedded tags to fields but does not remove them from the document. If you ship a PDF without setting the tag text color to match the page background, signers see the raw ${...} strings on the page. Build the color-hide step into your PDF preparation pipeline before it becomes a support ticket.
Body-Level parties Overriding Tag-Defined Recipients
Tags define field layout and recipient assignment and must be embedded in the PDF itself, while recipient definitions in the API request body override tag-defined recipient metadata. If you’re seeing the wrong signer name or email appear, check whether a body-level parties definition is overriding the tag.
Expired Session URLs
Embedded session URLs are short-lived. Caching one and reusing it on the next page load will fail. Call POST {HOST_NAME}/api/embedded/regenerateEmbeddedSigningSession with the folder ID and signer email each time a returning user needs access to an incomplete session.
Over-Restrictive sandbox on the iFrame
The five required sandbox permissions are allow-scripts, allow-same-origin, allow-forms, allow-popups, and allow-top-navigation. If the UI loads but behaves unexpectedly, check your sandbox attributes first.
Credential Confusion Between eSign and PDF Services
The API Key and API Secret from the eSign Portal are specific to the eSign API, and the OAuth 2.0 flows also differ between the two. Using PDF Services credentials against the eSign /api/oauth2/access_token endpoint returns an authentication error. Keep the two credential sets separate and named clearly in your environment configuration.
Skipping Webhook Signature Verification
Always verify the signature query parameter before processing any payload. Return a 200-class status code once verification and basic parsing succeed, because a non-2xx response causes Foxit to retry delivery, which can create duplicate processing if your handler is not idempotent.
FAQ
Can I regenerate an expired embedded signing session?
Yes. Call POST {HOST_NAME}/api/embedded/regenerateEmbeddedSigningSession with the folder ID and signer email. Foxit eSign returns a fresh embeddedSessionURL for the same envelope without resetting the signing state.
Do I need a separate Foxit account if I’m already using Foxit PDF Services?
Yes. The Foxit eSign API operates from a separate portal at na1.foxitesign.foxit.com with its own credentials. The two portals don’t share API keys, secrets, or authentication tokens.
Can I use an existing template instead of uploading a PDF?
Yes. Use POST {HOST_NAME}/api/templates/createFolder to assemble the envelope from a saved template rather than a raw document upload.
Does the embedded signing session work on mobile browsers?
Yes. The iFrame renders responsively on modern mobile browsers without additional configuration.
Is the audit trail accessible programmatically?
Yes. GET {HOST_NAME}/api/folders/viewActivityHistory?folderId={FOLDER_ID} returns the full signing activity log for any shared or sent envelope, including timestamps for each event. A folder still in DRAFT has no shared history to return.
What is the difference between folder_completed and folder_executed?
Both events signal that the folder has been completed with all required parties’ signatures, and the eSign Developers Guide describes them in the same terms, each delivering the folder record in data.folder. Listen for either to trigger downstream retrieval of the signed document, and make your handler idempotent so receiving both for the same folder does not double-process it.
Next Step
Activate your free Foxit eSign developer account at account.foxit.com/site/sign-up, no credit card required. Generate your OAuth token, fire a POST /api/folders/createfolder request with createEmbeddedSigningSession: true against the sandbox, and verify the returned URL loads in a local iFrame. From account creation to a working embedded signing session takes under 30 minutes.