
Create Custom Invoices with Word Templates and Foxit Document Generation

Invoicing is a critical part of any business. This tutorial shows how to automate the process by creating dynamic, custom PDF invoices with the Foxit Document Generation API. Learn how to design a Microsoft Word template with special tokens, prepare your data in JSON, and then use a simple Python script to generate your final invoices.
Create Custom Invoices with Word Templates and Foxit Document Generation
Invoicing is a critical part of any business, often involving multiple steps—gathering customer data, calculating amounts owed, and sending out invoices so your company can get paid. Foxit’s Document Generation API streamlines this process by making it easy to create well-formatted, dynamic PDF invoices. Let’s walk through an example.
Before You Start
If you want to follow along with this blog post, be sure to get your free credentials over on our developer portal. Also, read our introductory blog post, which covers the basics of working with our API.
As a reminder, the API makes use of Microsoft Word templates. These templates are essentials tokens wrapped in double brackets. When you call the API, you’ll pass the template and your data. Our API then dynamically replaces those tokens with your data and returns you a nice PDF (you can also get a Word file back as well).
Creating Your Custom Invoice with Word Templates
Let’s begin by designing the template in Word. An invoice typically includes things like:
- The customer receiving the invoice
- The invoice number and issue date
- The payment due date
- A detailed list of items, including name, quantity, and price for each line item, with a total at the end
The Document Generation API makes no requirements in terms of how you design your templates. Size, alignment, and so forth, can match your corporate styles and be as fancy, or simple, as you like. Let’s consider the template below (I’ll link to where you can download this file at the end of the article):

Let's break it down from the top.
- The first token,
{{ invoiceNum }}, represents the invoice number for the customer. - The next token is special.
{{ today \@ MM/dd/yyyy }}represents two different features of the Document Generation API. First,todayis a special value representing the present time, or more accurately, when you call the API. The next portion represents a date mask for representing a date value. Our docs have a list of available masks. {{ accountName }}is another regular token.- The payment date,
{{ paymentDueDate \@ MM/dd/yyyy }}, shows how the date mask feature can be used on dates in your own data as well. - Now let's look at the table. You can format tables however you like, but a common setup includes one row for the header and one row for the dynamic data. (In this example, there’s also a third row, which I'll explain shortly.) To start, you’ll use a marker tag:
{{TableStart:lineItems}}, wherelineItemsrepresents an array in your data. The row ends with the matching{{TableEnd:lineItems}}tag. Between these two tags, you'll place additional tags for each value in the array. For example, we have aproduct,qty,price, andtotalPricefor each item. You'll also see the specialROW_NUMBERvalue, which automatically counts each row starting at 1. Finally, the\# Currencyformat is applied to thetotalPricevalue to display it as a currency. - The last row in the table uses two special features together, namely
SUM(ABOVE), which maps to creating a total of the last column from the table. This can be paired with currency formatting as shown.
Alright, now that you've seen the template, let's talk data!
The Data for Your Custom Invoices
Usually the data for an operation like this would come from a database, or perhaps an API with an ecommerce system. For this demo, the data will come from a simple JSON file. Let's take a look at it:
[
{
	"invoiceNum":100,
	"accountName":"Customer Alpha",
	"accountNumber":1,
	"paymentDueDate":"August 15, 2025",
	"lineItems":[
		{"product":"Product 1", "qty":5, "price":2, "totalPrice":10},
		{"product":"Product 5", "qty":3, "price":9, "totalPrice":18},
		{"product":"Product 4", "qty":1, "price":50, "totalPrice":50},
		{"product":"Product X", "qty":2, "price":15, "totalPrice":30}
	]
},
{
	"invoiceNum":25,
	"accountName":"Customer Beta",
	"accountNumber":2,
	"paymentDueDate":"August 15, 2025",
	"lineItems":[
		{"product":"Product 2", "qty":9, "price":2, "totalPrice":18},
		{"product":"Product 4", "qty":1, "price":8, "totalPrice":8},
		{"product":"Product 3", "qty":10, "price":25, "totalPrice":250},
		{"product":"Product YY", "qty":3, "price":15, "totalPrice":45},
		{"product":"Product AA", "qty":2, "price":100, "totalPrice":200}
	]
},
{
	"invoiceNum":51,
	"accountName":"Customer Gamma",
	"accountNumber":3,
	"paymentDueDate":"August 15, 2025",
	"lineItems":[
		{"product":"Product 9", "qty":1, "price":2, "totalPrice":2},
		{"product":"Product 23", "qty":30, "price":9, "totalPrice":270},
		{"product":"Product ZZ", "qty":6, "price":15, "totalPrice":90}
	]
}
]
The data consists of an array of 3 sets of invoice data. Each set follows the same pattern and matches what you saw above in the Word template. The only exception being the accountNumber value which wasn't used in the template. That's fine – sometimes your data will include things not necessary for the final PDF. In this case, though, we're actually going to make use of it (you'll see in a moment). Onward to code!
Calling the Foxit API with Our Data
Now for my favorite part – actually calling the API. The Generate Document API is incredibly simple; needing just your credentials, a base64 version of the template, and your data. The entire demo is slightly over 50 lines of Python code, so let's look at the template and then break it down.
import os
import requests
import sys
from time import sleep
import base64
import json
from datetime import datetime

CLIENT_ID = os.environ.get('CLIENT_ID')
CLIENT_SECRET = os.environ.get('CLIENT_SECRET')
HOST = os.environ.get('HOST')

def docGen(doc, data, id, secret):

	headers = {
		"client_id":id,
		"client_secret":secret
	}

	body = {
		"outputFormat":"pdf",
		"documentValues": data,
		"base64FileString":doc
	}

	request = requests.post(f"{HOST}/document-generation/api/GenerateDocumentBase64", json=body, headers=headers)

	return request.json()

with open('invoice.docx', 'rb') as file:
	bd = file.read()
	b64 = base64.b64encode(bd).decode('utf-8')

with open('invoicedata.json', 'r') as file:
	data = json.load(file)

for invoiceData in data:
	result = docGen(b64, invoiceData, CLIENT_ID, CLIENT_SECRET)

	if result["base64FileString"] == None:
		print("Something went wrong.")
		print(result)
		sys.exit()

	b64_bytes = result["base64FileString"].encode('ascii')
	binary_data = base64.b64decode(b64_bytes)

	filename = f"invoice_account_{invoiceData["accountNumber"]}.pdf"

	with open(filename, 'wb') as file:
		file.write(binary_data)
		print(f"Done and stored to {filename}")
After importing the necessary modules and loading credentials from the environment, we define a simple docGen method. This method takes the template, data, and credentials, then calls the API endpoint. The API responds with the rendered PDF in Base64 format, which the method returns.
The main code of the template breaks down to:
- Reading in the template and converting it to base64.
- Reading in the JSON file
- Iterating over each block of invoice data and calling the API
- Remember how I said
accountNumberwasn't used in the template? We actually use it here to generate a unique filename. Technically, you don't need to store the results at all. You could take the raw binary data and email it. But having a copy of the results does mean you can re-use it later, such as if the customer is late to pay.
Here's an example of one of the results:

Next Steps
If you want to try this demo yourself, first grab yourself a shiny free set of credentials and then head over to our GitHub to grab the template, Python, and sample output values yourself.
Convert Office Docs to PDFs Automatically with Foxit PDF Services API

See how to build a powerful, automated workflow that converts Office documents (Word, Excel, PowerPoint) into PDFs. This step-by-step guide uses the Foxit PDF Services API, the Pipedream low-code platform, and Dropbox to create a seamless “hands-off” document processing system. We’ll walk through every step, from triggering on a new file to uploading the final PDF.
Convert Office Docs to PDFs Automatically with Foxit PDF Services API
With our REST APIs, it is now possible for any developer to set up an integration and document workflow using their language of choice. But what about workflow automations? Luckily, this is even simpler (of course, depending on platform) as you can rely on the workflow service to handle a lot the heavy lifting of whatever automation needs you may have. In this blog post, I’m going to demonstrate a workflow making use of Pipedream. Pipedream is a low-code platform that lets you build flexible workflows by piecing together various small atomic steps. It’s been a favorite of mine for some time now, and I absolutely recommend it. But note that what I’ll be showing here today could absolutely be done on other platforms, like n8n.
Want the televised version? Catch the video below:
Our Office Document to PDF Workflow
Our workflow is based on Dropbox folders and handles automatic conversion of Office docs to PDFs. To support that, it does the following:
- Listen for new files in a Dropbox folder
- Do a quick sanity check (is it in the input subdirectory and an Office file)
- Download the file to Pipedream
- Send it to Foxit via the Upload API
- Kick off the appropriate conversion based on the Office type
- Check status via the Status API
- When done, download the result to Pipedream
- And finally, push it up to Dropbox in an output subdirectory
Here’s a nice graphical representation of this workflow:
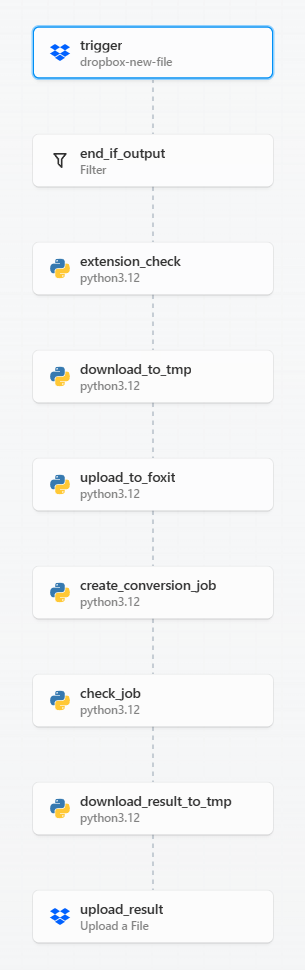
Before we get into the code, note that workflow platforms like Pipedream are incredibly flexible. When I build workflows with platforms like this I try to make each step as atomic, and focused as possible. I could absolutely have built a shorter, more compact version of this workflow. However, having it broken out like this makes it easier to copy and modify going forward (which is exactly how this one came about, it was based on a simpler, earlier version).
Ok, let's break it down, step-by-step.
Getting Triggered
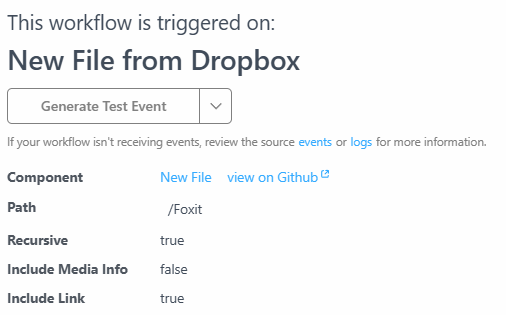
In Pipedream, workflows begin with a trigger. While there are many options for this, my workflow uses a "New File From Dropbox" trigger. I logged into Dropbox via Pipedream so it had access to my account. I then specified a top level folder, "Foxit", for the integration. Additionally, there are two more important settings:
- Recursive – this tells the trigger to file for any new file under the root directory, "Foxit". My Dropbox Foxit folder has both an input and output directory.
- Include Link – this tells Pipedream to ensure we get a link to the new file. This is required to download it later.
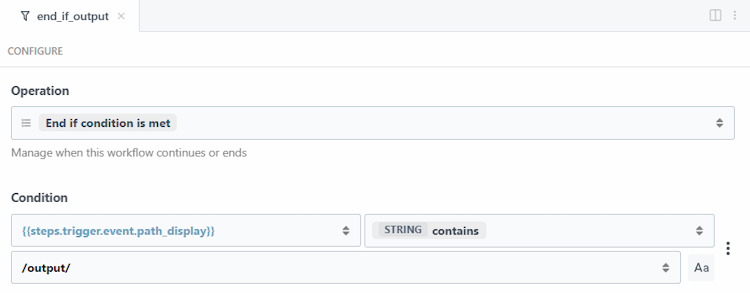
Filtering the Document Flow
The next two steps are focused on filtering and stopping the workflow, if necessary. The first, end_if_output, is a built-in Pipedream step that lets me provide a condition for the workflow to end. First, I'll check the path value from the trigger (the path of the new file) and if it contains "output", this means it's a new file in the output directory and the workflow should not run.
The next filter is a code step that handles two tasks. First, it checks whether the new file is a supported Office type—.docx, .xlsx, or .pptx—using our APIs. If the extension isn’t one of these, the workflow ends programmatically.
Later in the workflow, I’ll also need that same extension to route the request to the correct endpoint. So the code handles both: validation and preservation of the extension.
import os

def handler(pd: "pipedream"):
  base, extension = os.path.splitext(pd.steps['trigger']['event']['name'])

  if extension == ".docx":
    api = "/pdf-services/api/documents/create/pdf-from-word"
  elif extension == ".xlsx":
    api = "/pdf-services/api/documents/create/pdf-from-excel"
  elif extension == ".pptx":
    api = "/pdf-services/api/documents/create/pdf-from-ppt"
  else:
    return pd.flow.exit(f"Exiting workflow due to unknow extension: {extension}.")

  return { "api":api }
As you can see, if the extension isn't valid, I'm exiting the workflow using pd.flow.exit (while also logging out a proper message, which I can check later via the Pipedream UI). I also return the right endpoint if a supported extension was used. This will be useful later in the flow.
Download and Upload API Data
The next two steps are primarily about moving data from the input source (Dropbox) to our API (Foxit).
The first step, download_to_tmp, uses a simple Python script to transfer the Dropbox file into the /tmp directory for use in the workflow
import requests

def handler(pd: "pipedream"):
    download_url = pd.steps["trigger"]["event"]["link"]
    file_path = f"/tmp/{pd.steps['trigger']['event']['name']}"

    with requests.get(download_url, stream=True) as response:
      response.raise_for_status()
      with open(file_path, "wb") as file:
          for chunk in response.iter_content(chunk_size=8192):
            file.write(chunk)

    return file_path
Notice at the end that I return the path I used in Pipedream. This action then leads directly into the next step of uploading to Foxit via the Upload API:
import os
import requests

def handler(pd: "pipedream"):
  clientid = os.environ.get('FOXIT_CLIENT_ID')
  secret = os.environ.get('FOXIT_CLIENT_SECRET')
  HOST = os.environ.get('FOXIT_HOST')

  headers = {
    "client_id":clientid,
    "client_secret":secret
  }

  with open(pd.steps['download_to_tmp']['$return_value'], 'rb') as f:
    files = {'file': (pd.steps['download_to_tmp']['$return_value'], f)}

    request = requests.post(f"{HOST}/pdf-services/api/documents/upload", files=files, headers=headers)

    return request.json()
The result of this will be a documentId value that looks like so:
{
  "documentId": "<string>"
}
Pipedream lets you define environment variables and I've made use of them for my Foxit credentials and host. Grab your own free credentials here!
Converting the Document Using the Foxit API
The next step will actually kick off the conversion. My workflow supports three different input types (Word, PowerPoint, and Excel). These map to three API endpoints. But remember that earlier we sniffed the extension of our input and set the endpoint there. Since all three APIs work the same, that's literally all we need to do – hit the endpoint and pass the document value from the previous step.
import os
import requests

def handler(pd: "pipedream"):

  clientid = os.environ.get('FOXIT_CLIENT_ID')
  secret = os.environ.get('FOXIT_CLIENT_SECRET')
  HOST = os.environ.get('FOXIT_HOST')

  headers = {
    "client_id":clientid,
    "client_secret":secret,
    "Content-Type":"application/json"
  }

  body = {
    "documentId": pd.steps['upload_to_foxit']['$return_value']['documentId']
  }

  api = pd.steps['extension_check']['$return_value']['api']

  print(f"{HOST}{api}")
  request = requests.post(f"{HOST}{api}", json=body, headers=headers)
return request.json(){
"taskId": "<string>"
}
Checking Your Document API Status
The next step is one that may take a few seconds – checking the job status. Foxit's endpoint returns a value like so:
{
  "taskId": "<string>",
  "status": "<string>",
  "progress": "<int32>",
  "resultDocumentId": "<string>",
  "error": {
    "code": "<string>",
    "message": "<string>"
  }
}import os
import requests
from time import sleep
def handler(pd: "pipedream"):
clientid = os.environ.get('FOXIT_CLIENT_ID')
secret = os.environ.get('FOXIT_CLIENT_SECRET')
HOST = os.environ.get('FOXIT_HOST')
headers = {
"client_id":clientid,
"client_secret":secret,
"Content-Type":"application/json"
}
done = False
while done is False:
request = requests.get(f"{HOST}/pdf-services/api/tasks/{pd.steps['create_conversion_job']['$return_value']['taskId']}", headers=headers)
status = request.json()
if status["status"] == "COMPLETED":
done = True
return status
elif status["status"] == "FAILED":
print("Failure. Here is the last status:")
print(status)
return pd.flow.exit("Failure in job")
else:
print(f"Current status, {status['status']}, percentage: {status['progress']}")
sleep(5)As shown, errors are simply logged by default—but you could enhance this by adding notifications, such as emailing an admin, sending a text message, or other alerts.
On success, the final output is passed along, including the key value we care about: resultDocumentId.
Download and Upload – Again
Ok, if the workflow has gotten this far, it's time to finish the process. The next step handles downloading the result from Foxit using the download endpoint:
import requests
import os

def handler(pd: "pipedream"):
  clientid = os.environ.get('FOXIT_CLIENT_ID')
  secret = os.environ.get('FOXIT_CLIENT_SECRET')
  HOST = os.environ.get('FOXIT_HOST')

  headers = {
    "client_id":clientid,
    "client_secret":secret,
  }

  # Given a file of input.docx, we need to use input.pdf
  base_name, _ = os.path.splitext(pd.steps['trigger']['event']['name'])
  path = f"/tmp/{base_name}.pdf"
  print(path)

  with open(path, "wb") as output:

    bits = requests.get(f"{HOST}/pdf-services/api/documents/{pd.steps['check_job']['$return_value']['resultDocumentId']}/download", stream=True, headers=headers).content
    output.write(bits)

    return {
      "filename":f"{base_name}.pdf",
      "path":path
    }
Note that I'm using the base name of the input, which is basically the filename minus the extension. So for example, input.docx will become input, which I then slap a pdf extension on to create the filename used to store locally to Pipedream.
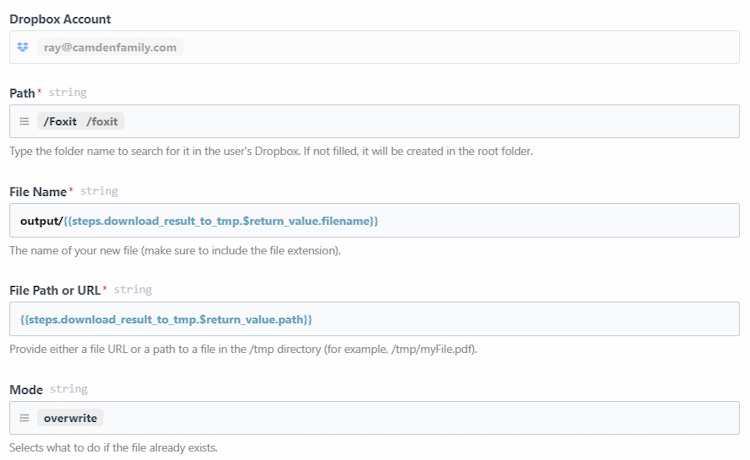
Finally, I push the file back up to Dropbox, but for this, I can use a built-in Pipedream step that can upload to Dropbox. Here's how I configured it:
- Path: Once again,
Foxit - File Name: This one's a bit more complex, I want to store the value in the output subdirectory, and ensure the filename is dynamic. Pipedream lets you mix and match hard-coded values and expressions. I used this to enable that:
output/{{steps.download_result_to_tmp.$return_value.filename}}. In this expression the portion inside the double bracket will be dynamic based on the PDF file generated previously. - File Path: This is an expression as well, pointing to where I saved the file previously:
{{steps.download_result_to_tmp.$return_value.path}} - Mode: Finally, the mode attribute specifies what to do on a conflict. This setting will be based on whatever your particular workflow needs are, but for my workflow, I simply told Dropbox to overwrite the existing file.
Here's how that step looks configured in Pipedream:
Conclusion
Believe it or not, that's the entire workflow. Once enabled, it runs in the back ground and I can simply place any files into my Dropbox folder and my Office docs will be automatically converted. What's next? Definitely get your own free credentials and check out the docs to get started. If you run into any trouble at all, hit is up on the forums and we'll be glad to help!
Embed Secure eSignatures into Your App with Foxit API

Foxit eSign makes electronic signatures easy, but developers can take it further by automating the process. This tutorial shows how to use the Foxit eSign API to embed secure eSignatures in your apps. With Python code examples, you’ll learn to send documents for signing, dispatch reminders, and check the signing status programmatically.
Embed Secure eSignatures into Your App with Foxit API
Foxit eSign is an electronic signature solution that enables individuals and businesses to securely sign, send, and manage documents online. It streamlines the document signing process by allowing users to create legally binding eSignatures, prepare forms, and track document status in real time. With features like reusable templates, automated workflows, and audit trails, it enhances productivity and reduces the need for manual paperwork.
At the simplest level, a user can log into the eSign dashboard and handle 100% of their signing needs. So for example, they can upload a Microsoft Word template and then drag and drop fields that will be used during the signing process. I did this with a simple Word document. After uploading, I was given an easy to use editor to drag and drop fields:
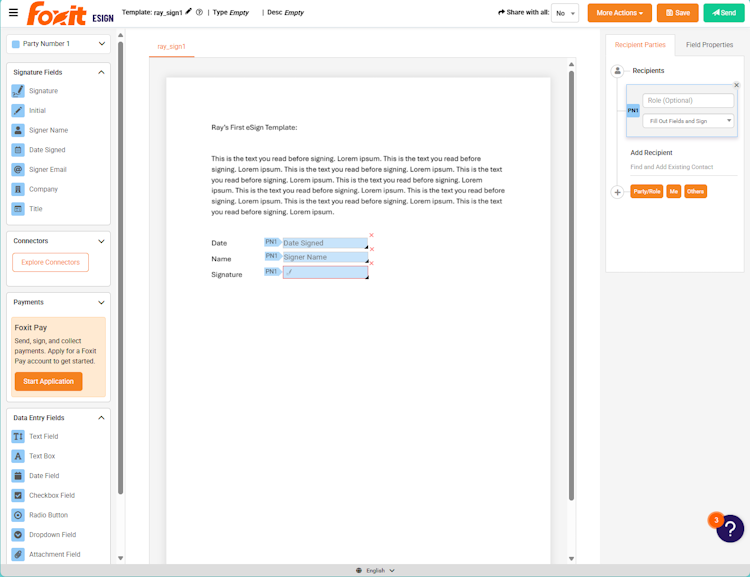
In the screen shot above, I’ve added three fields to my document. The first is a date field. The second is for the signers name. The last field is the actual signature spot. Each of these fields have many options, and your own documents could have far more (or heck, even less) fields. The point is – you’re allowed to design these forms to meet whatever need you may have. Also note that you can do all of this directly within Word, as well. Our docs show how to add fields directly into Word that will become enabled in the signing process.
Once you’ve got your template in a nice place, you can initiate the signing process right from the app. The dashboard also gives you a full history and audit trail of that process (have they signed yet? when did they do it? who signed?) which is handy. But, of course, you’re here because you’re a developer, and you’re probably asking yourself – can we automate this? The answer? Of course!
If you would rather watch an introduction to the API, enjoy the video below!
eSign Via API
Before we begin digging into the APIs, be sure to take a quick look at the API Reference. As I’ve stated a few times, the signing process itself can be incredibly complex. For example, there may be 2, 3, or more people who need to sign a document, and in a particular order. Also, remember that I shared that the template process of adding fields and such can be done entirely in Word itself. This is to say that our look here is going to focus on a simple example of signing. But there’s nothing to stop the creation of more advanced, flexible workflows.
The first step in any API usage will be authentication. When you have an eSign account with API access, you’ll be given a client_id and client_secret value, both of which need to be exchanged for an access token at the appropriate endpoint. Here’s a simple example of this with Python:
CLIENT_ID = os.environ.get("CLIENT_ID")
CLIENT_SECRET = os.environ.get("CLIENT_SECRET")

def getAccessToken(id, secret):
	url = "https://na1.foxitesign.foxit.com/api/oauth2/access_token"
	payload=f"client_id={id}&client_secret={secret}&grant_type=client_credentials&scope=read-write"
	headers = {
	'Content-Type': 'application/x-www-form-urlencoded'
	}

	response = requests.request("POST", url, headers=headers, data=payload)

	token = (response.json())["access_token"]
	return token

access_token = getAccessToken(CLIENT_ID, CLIENT_SECRET)
All the rest of the demos will make use of this method, and at the end of this post I'll share GitHub links for the source.
Kicking Off the Signing API Process
Now that we've authenticated with the API, our code can start doing… well, everything. The first thing we will add is a signing process with the template I showed above. From the dashboard itself I was able to make note of the template ID, 392230, but note that there's APIs for working with templates where that could be done via code as well.
To start the signing process, we can use the Create Envelope from Template endpoint. You can think of an envelope as a set of documents a user has to sign. For our demo, it's one, but you can include multiple documents. If you look at the API reference example, you'll see a large input body. As I've said, and will probably keep saying, the electronic signing process can be quite complex. For our simple demo, however, we just need to know the name of the person we're asking to sign the document and their email address. I whipped up this simple Python utility to enable that:
def sendForSigning(template_id, first_name, last_name, email, token):
	url = "https://na1.foxitesign.foxit.com/api/templates/createFolder"
	body = {
		"folderName":"Sending for Signing",
		"templateIds":[template_id],
		"parties":[
		{
			"permission":"FILL_FIELDS_AND_SIGN",
			"firstName":first_name,
			"lastName":last_name,
			"emailId":email,
			"sequence":1
		}
		],
		"senderEmail":"raymond_camden@foxitsoftware.com"
	}

	headers = {
		'Authorization': f'Bearer {token}',
	}

	response = requests.request("POST", url, headers=headers, json=body)
	return response.json()
Make note that parties is an array of one person, as only one person is needed in the process. Also note that permission is required as it defines the role that person will play in the party.
Calling this method is simple:
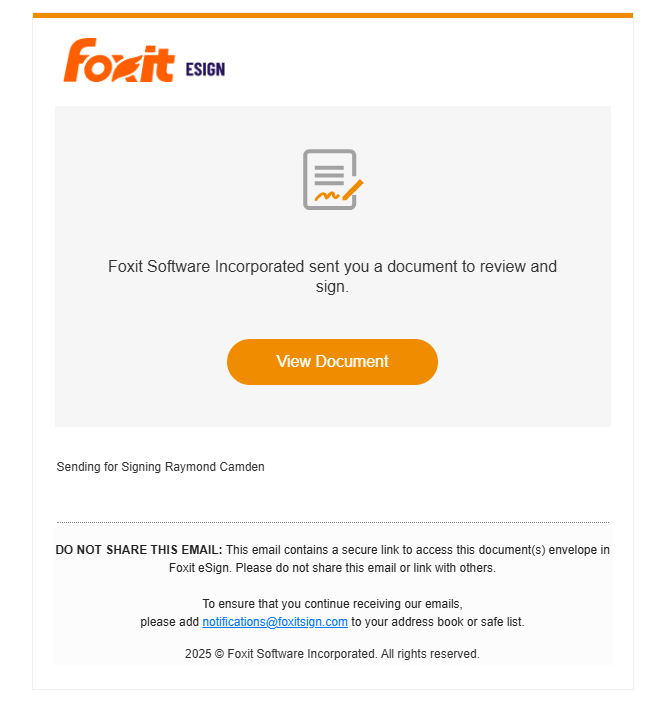
# Hard coded template id
tid = "392230"

sendForSigningResponse = sendForSigning(tid, "Raymond", "Camden", "raymondcamden@gmail.com", access_token)envelopeId = sendForSigningResponse['folder']['folderId']
print(f"ID of the envelope created: {envelopeId}")
Note: You'll see 'folder' referenced in the API endpoints and results, but the eSign API is migrating to the 'envelope' term instead.
A few seconds after running this code, the email showed up in my account:
Obviously at this point, I could sign it… but what if I didn't?
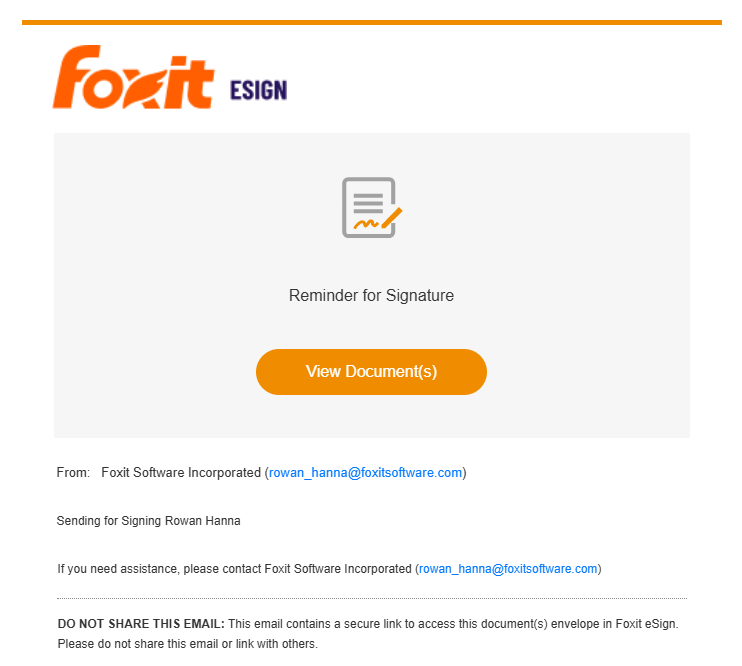
Sending out Electronic Reminders
One way to help ensure your important documents get signed is to remind the people who need to sign that – well, they need actually sign the document. To enable this, we can use the Send Signature Reminder endpoint. All it needs is the ID of the envelope created earlier (and again, see my note about envelope vs folder):
def sendReminder(envelope_id, token):
	url = "https://na1.foxitesign.foxit.com/api/folders/signaturereminder"
	body = {
		"folderId":envelope_id
	}
	headers = {
		'Authorization': f'Bearer {token}',
	}

	response = requests.request("POST", url, headers=headers, json=body)
	result = response.json()
	return result
access_token = getAccessToken(CLIENT_ID, CLIENT_SECRET)
result = sendReminder(envelope_id, access_token)
Ok, But Did They Sign Their Document Yet??
So far, you've seen an example of sending out a document for signing as well as politely reminding the person to do their job. How can you tell if they've completed the process? For this, we can turn to the Get Envelope Details endpoint. It's also rather simple in that it just needs the envelope ID value from before. Once again, here's a wrapper to that API built in Python:
def getStatus(envelope_id, token):
	url = f"https://na1.foxitesign.foxit.com/api/folders/myfolder?folderId={envelope_id}"

	headers = {
		'Authorization': f'Bearer {token}',
	}

	response = requests.request("GET", url, headers=headers)
	result = response.json()
	return result
result = getStatus(envelope_id, access_token)

print(f"Envelope status: {result['folder']['folderStatus']}")
While there's a lot of important information returned, we can output just the status to see at a high level what state the process is currently in.
Given the example I've shown so far, the status of the envelope is SHARED. Let's actually click the link:
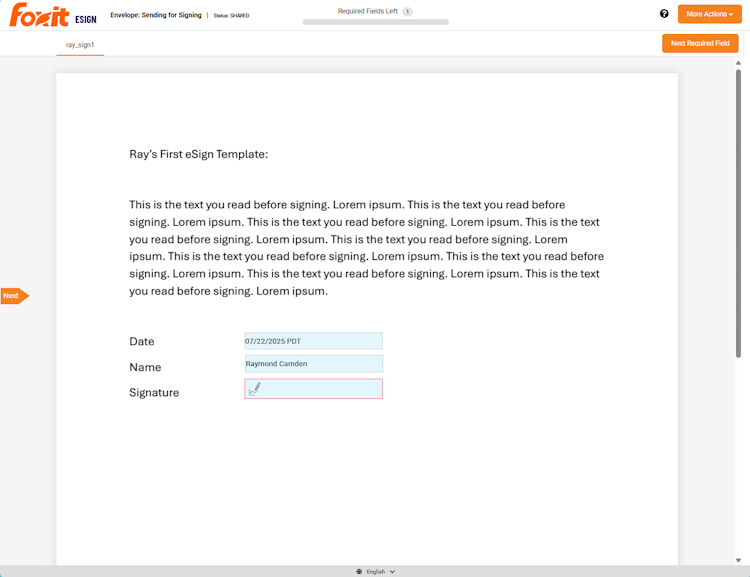
In the screenshot above, notice how the date is already filled to today's data. Also note that name was prefilled as eSign knows who it was sent to. All I need to do is click and sign. Once I do, the same code above will now return EXECUTED.
Next Steps
Wondering where to go next? If you are completely new to eSign, check out the main homepage for an introduction. You can also check out the Foxit eSign YouTube channel for lots of good video content on the service. If you want a copy of the code I showed in this post, you can find all three examples here on our GitHub repo. Finally, don't forget to visit our forums and bring your questions!
How to Chain PDF Actions with Foxit

Performing a single action with the Foxit PDF Services API is straightforward, but what’s the best way to handle a sequence of operations? Instead of downloading and re-uploading a file for each step, you can chain actions together by passing the output of one job as the input for the next. This tutorial walks you through a complete Python example of how to build an efficient document optimization workflow that compresses and then linearizes a PDF.
How to Chain PDF Actions with Foxit
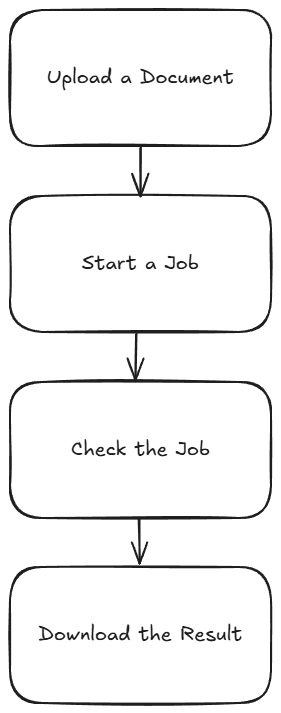
When working with Foxit’s PDF Services, you’ll remember that the basic flow involves:
- Uploading your document to Foxit to get an ID
- Starting a job
- Checking the job
- Downloading the result
This is handy for one off operations, for example, converting a Word document to PDF, but what if you need to do two or more operations? Luckily this is easy enough by simply handing off one result to the next. Let’s take a look at how this can work.
Credentials
Remember, to start developing and testing with the APIs, you’ll need to head over to our developer portal and grab a set of free credentials. This will include a client ID and secret values you’ll need to make use of the API.
If you would rather watch a video (or why not both?) – you can watch the walkthrough below:
Creating a Document Optimization Workflow
To demonstrate how to chain different operations together, we’re going to build a basic document optimization workflow that will:
- Compress the document by reducing image resolution and other compression algorithims.
- Linearize the document to make it better viewable on the web.
Given the basic flow described above, you may be tempted to do this:
- Upload the PDF
- Kick off the Compress job
- Check until done
- Download the compressed PDF
- Upload the PDF
- Kick off the Linearize job
- Check until done
- Download the compressed and linearized PDF
This wouldn’t require much code, but we can simplify the process by using the result of the compress job—once it’s complete—as the source for the linearize job. This gives us the following streamlined flow:
- Upload the PDF
- Kick off the Compress job
- Check until done
- Kick off the Linearize job
- Check until done
- Download the compressed and linearized PDF
Less is better! Alright, let’s look at the code.
First, here’s the typical code used to bring in our credentials from the environment, and define the Upload job:
import os
import requests
import sys
from time import sleep

CLIENT_ID = os.environ.get('CLIENT_ID')
CLIENT_SECRET = os.environ.get('CLIENT_SECRET')
HOST = os.environ.get('HOST')

def uploadDoc(path, id, secret):

	headers = {
		"client_id":id,
		"client_secret":secret
	}

	with open(path, 'rb') as f:
		files = {'file': f}

		request = requests.post(f"{HOST}/pdf-services/api/documents/upload", files=files, headers=headers)
return request.json()def compressPDF(doc, level, id, secret):
headers = {
"client_id":id,
"client_secret":secret,
"Content-Type":"application/json"
}
body = {
"documentId":doc,
"compressionLevel":level
}
request = requests.post(f"{HOST}/pdf-services/api/documents/modify/pdf-compress", json=body, headers=headers)
return request.json()
def linearizePDF(doc, id, secret):
headers = {
"client_id":id,
"client_secret":secret,
"Content-Type":"application/json"
}
body = {
"documentId":doc
}
request = requests.post(f"{HOST}/pdf-services/api/documents/optimize/pdf-linearize", json=body, headers=headers)
return request.json()Note that the compressPDF method takes a required level argument that defines the level of compression. From the docs, we can see the supported values are LOW, MEDIUM, and HIGH.
Now, two more utility methods – one that checks the task returned by the API operations above and one that downloads a result to the file system:
def checkTask(task, id, secret):

	headers = {
		"client_id":id,
		"client_secret":secret,
		"Content-Type":"application/json"
	}

	done = False
	while done is False:

		request = requests.get(f"{HOST}/pdf-services/api/tasks/{task}", headers=headers)
		status = request.json()
		if status["status"] == "COMPLETED":
			done = True
			# really only need resultDocumentId, will address later
			return status
		elif status["status"] == "FAILED":
			print("Failure. Here is the last status:")
			print(status)
			sys.exit()
		else:
			print(f"Current status, {status['status']}, percentage: {status['progress']}")
			sleep(5)

def downloadResult(doc, path, id, secret):

	headers = {
		"client_id":id,
		"client_secret":secret
	}

	with open(path, "wb") as output:

		bits = requests.get(f"{HOST}/pdf-services/api/documents/{doc}/download", stream=True, headers=headers).content
output.write(bits)input = "../../inputfiles/input.pdf"
print(f"File size of input: {os.path.getsize(input)}")
doc = uploadDoc(input, CLIENT_ID, CLIENT_SECRET)
print(f"Uploaded doc to Foxit, id is {doc['documentId']}")
task = compressPDF(doc["documentId"], "HIGH", CLIENT_ID, CLIENT_SECRET)
print(f"Created task, id is {task['taskId']}")
result = checkTask(task["taskId"], CLIENT_ID, CLIENT_SECRET)
print("Done converting to PDF. Now doing linearize.")
task = linearizePDF(result["resultDocumentId"], CLIENT_ID, CLIENT_SECRET)
print(f"Created task, id is {task['taskId']}")
result = checkTask(task["taskId"], CLIENT_ID, CLIENT_SECRET)
print("Done with linearize task.")
output = "../../output/really_optimized.pdf"
downloadResult(result["resultDocumentId"], output , CLIENT_ID, CLIENT_SECRET)
print(f"Done and saved to: {output}.")
print(f"File size of output: {os.path.getsize(output)}") This code matches the flow described above, with the exception of outputting the size as a handy way to see the result of the compression call. When run, the initial size is 355994 bytes and the final size is 16733. That's a great saving! You should, however, ensure the result matches the quality you desire and if not, consider reducing the level of compression. Linearize doesn't impact the file size, but as stated above will make it work nicer on the web.
For a complete listing, find the sample on our GitHub repo.
Next Steps
Obviously, you could do even more chaining based on the code above. For example, as part of your optimization flow, you could even split the PDF to return a 'sample' of a document that may be for sale. You could extract information to use for AI purposes and more. Dig more into our PDF Service APIs to get an idea and let us know what you build on our developer forums!
How to Extract Text from PDFs using Foxit’s REST APIs

Want to extract text from PDF files with just a few lines of Python? This guide shows how to use Foxit’s REST Extract API to pull text content from PDFs, ideal for search, automation, or AI workflows. From setting up credentials to searching for keywords across multiple files, this post walks through the full process with example code and GitHub demos.
How to Extract Text from PDFs using Foxit’s REST APIs
PDFs are an excellent way to store information—they combine text, images, and more in a perfectly laid-out, eye-catching design that fulfills every marketer’s wildest dreams. But sometimes you just need the text! There’s a variety of reasons you may want to convert a rich PDF document into plain text:
- For indexing in a search engine
- To search documents for keywords
- To pass to generative AI services for introspection
Let’s take a look at the Extract API to see just how easy this is.
Start Here: Obtain Free Credentials to Use the Foxit API
Before we go any further, head over to our developer portal and grab a set of free credentials. This will include a client ID and secret values – you’ll need both to make use of the API.
Rather watch the movie version? Check out the video below:
Foxit PDF API Workflow Overview with Python
The API follows the same format as the rest of our PDF Services in that you upload your input, kick off the job, check the job’s status, and download the result. As we’ve covered this a few times now on the blog (see my introductory post, we’ll skip over the details of uploading the document and loading in credentials. Here’s the Python code we’ve demonstrated before showing this in action:
CLIENT_ID = os.environ.get('CLIENT_ID')
CLIENT_SECRET = os.environ.get('CLIENT_SECRET')
HOST = os.environ.get('HOST')

def uploadDoc(path, id, secret):

	headers = {
		"client_id":id,
		"client_secret":secret
	}

	with open(path, 'rb') as f:
		files = {'file': (path, f)}

		request = requests.post(f"{HOST}/pdf-services/api/documents/upload", files=files, headers=headers)
		return request.json()

doc = uploadDoc("../../inputfiles/input.pdf", CLIENT_ID, CLIENT_SECRET)
print(f"Uploaded pdf to Foxit, id is {doc['documentId']}")
Now let's get into the meat of the Extract API. The API takes three arguments:
- The ID of the previously uploaded document.
- The type of information to extract—either TEXT, IMAGE, or PAGE. In theory, it should be pretty obvious what these do, but just in case: TEXT returns the text contents of the PDF. IMAGE gives you a ZIP file of images from the PDF. PAGE returns a new PDF containing just the page you requested.
- You can also pass in a page range, which can be a combo of specific pages and ranges. If you don’t include one, the entire PDF gets processed for extraction.
To make this simple to use, I've built a wrapper function that lets you pass these arguments:
def extractPDF(doc, type, id, secret, pageRange=None):

    headers = {
        "client_id":id,
        "client_secret":secret,
        "Content-Type":"application/json"
    }

    body = {
        "documentId":doc,
        "extractType":type
    }

    if pageRange:
        body["pageRange"] = pageRange

    request = requests.post(f"{HOST}/pdf-services/api/documents/modify/pdf-extract", json=body, headers=headers)
    return request.json()
Literally, that's it. At this point, you get a task object back that – like with our other APIs – can be checked for completion, and once it’s done, the results can be downloaded. Since we're working with text, though, let's simplify and just grab the text as a variable:
def getResult(doc, id, secret):

    headers = {
        "client_id":id,
        "client_secret":secret
    }

return requests.get(f"{HOST}/pdf-services/api/documents/{doc}/download", headers=headers).textdoc = uploadDoc("../../inputfiles/input.pdf", CLIENT_ID, CLIENT_SECRET)
print(f"Uploaded pdf to Foxit, id is {doc['documentId']}")
task = extractPDF(doc["documentId"], "TEXT", CLIENT_ID, CLIENT_SECRET)
print(f"Created task, id is {task['taskId']}")
result = checkTask(task["taskId"], CLIENT_ID, CLIENT_SECRET)
print(f"Final result: {result}")
text = getResult(result["resultDocumentId"], CLIENT_ID, CLIENT_SECRET)
print(text)Searching PDFs for Keywords
# Get PDFs from our input directory
inputFiles = list(filter(lambda x: x.endswith('.pdf'), os.listdir('../../inputfiles')))
# Keyword to match on:
keyword = "Shakespeare"
for file in inputFiles:

    doc = uploadDoc(f"../../inputfiles/{file}", CLIENT_ID, CLIENT_SECRET)
    print(f"Uploaded pdf, {file}, to Foxit, id is {doc['documentId']}")

    task = extractPDF(doc["documentId"], "TEXT", CLIENT_ID, CLIENT_SECRET)
    result = checkTask(task["taskId"], CLIENT_ID, CLIENT_SECRET)

    text = getResult(result["resultDocumentId"], CLIENT_ID, CLIENT_SECRET)
    if keyword in text:
        print(f"\033[32mThe pdf, {file}, matched on our keyword: {keyword}\033[0m")
    else:
        print(f"The pdf, {file}, did not match on our keyword: {keyword}")

    print("")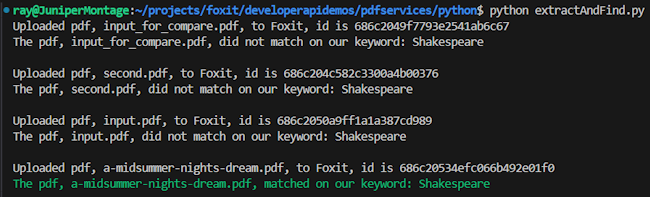
What’s Next?
Generate Dynamic PDFs from JSON using Foxit APIs

See how easy it is to generate PDFs from JSON using Foxit’s Document Generation API. With Word as your template engine, you can dynamically build invoices, offer letters, and agreements—no complex setup required. This tutorial walks through the full process in Python and highlights the flexibility of token-based document creation.
Generate Dynamic PDFs from JSON using Foxit APIs
One of the more fascinating APIs in our library is the Document Generation API. This document generation API lets you create dynamic PDFs or Word documents using your own data as templates. That may sound simple – and the code you’re about to see is indeed simple – but the real power lies in how flexible Word can be as a template engine. This API could be used for:
- Creating invoices
- Creating offer letters
- Creating dynamic agreements (which can integrate with our eSign API)
All of this is made available via a simple API and a “token language” you’ll use within Word to create your templates. Let’s take a look at how this is done.
Credentials
Before we go any further, head over to our developer portal and grab a set of free credentials. This will include a client ID and secret values – you’ll need both to make use of the API.
Don’t want to read all of this? You can also follow along by video:
Using the API
The Document Generation API flow is a bit different from our PDF Services APIs in that the execution is synchronous. You don’t need to upload your document beforehand or download a result result. You simply call the API (passing your data and template) and the result has your new PDF (or Word document). With it being this simple, let’s get into the code.
Loading Credentials
My script begins by loading in the credentials and API root host via the environment:
CLIENT_ID = os.environ.get('CLIENT_ID')
CLIENT_SECRET = os.environ.get('CLIENT_SECRET')
HOST = os.environ.get('HOST')
As always, try to avoid hard coding credentials directly into your code.
Calling the API
The endpoint only requires you to pass the output format, your data, and a base64 version of your file. “Your data” can be almost anything you like—though it should start as an object (i.e., a dictionary in Python with key/value pairs). Beneath that, anything goes: strings, numbers, arrays of objects, and so on.
Here’s a Python wrapper showing this in action:
def docGen(doc, data, id, secret):

    headers = {
        "client_id":id,
        "client_secret":secret
    }

    body = {
        "outputFormat":"pdf",
        "documentValues": data,
        "base64FileString":doc
    }

    request = requests.post(f"{HOST}/document-generation/api/GenerateDocumentBase64", json=body, headers=headers)
    return request.json()
And here’s an example calling it:
with open('../../inputfiles/docgen_sample.docx', 'rb') as file:
    bd = file.read()
    b64 = base64.b64encode(bd).decode('utf-8')

data = {
    "name":"Raymond Camden",
    "food": "sushi",
    "favoriteMovie": "Star Wars",
    "cats": [
        {"name":"Elise", "gender":"female", "age":14 },
        {"name":"Luna", "gender":"female", "age":13 },
        {"name":"Crackers", "gender":"male", "age":13 },
        {"name":"Gracie", "gender":"female", "age":12 },
        {"name":"Pig", "gender":"female", "age":10 },
        {"name":"Zelda", "gender":"female", "age":2 },
        {"name":"Wednesday", "gender":"female", "age":1 },
    ],
}

result = docGen(b64, data, CLIENT_ID, CLIENT_SECRET)
You’ll note here that my data is hard-coded. In a real application, this would typically be dynamic—read from the file system, queried from a database, or sourced from any other location.
The result object contains a message representing the success or failure of the operation, the file extension for the result, and the base64 representation of the result. Most likely you’ll always be outputting PDFs, so here’s a simple bit of code that stores the result:
with open('../../output/docgen1.pdf', 'wb') as file:
    file.write(binary_data)
    print('Done and stored to ../../output/docgen1.pdf')
There’s a bit more to the API than I’ve shown here so be sure to check the docs, but now it’s time for the real star of this API, Word
Using Word as a Template
I’ve probably used Microsoft Word for longer than you’ve been alive and I’ve never really thought much about it. But when you begin to think of a simple Word document as a template, all of a sudden the possibilities begin to excite you. In our Document Generation API, the template system works via simple “tokens” in your document marked by opening and closing double brackets.
Consider this block of text:
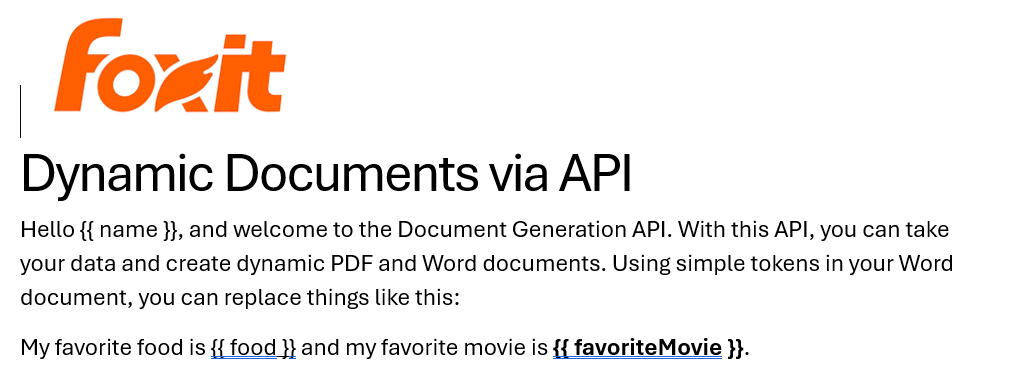
See how name is surrounded by double brackets? And food and favoriteMovie? When this template is sent to the API along with the corresponding values, those tokens are replaced dynamically. In the screenshot, notice how favoriteMovie is bolded. That’s fine. You can use any formatting, styling, or layout options you wish.
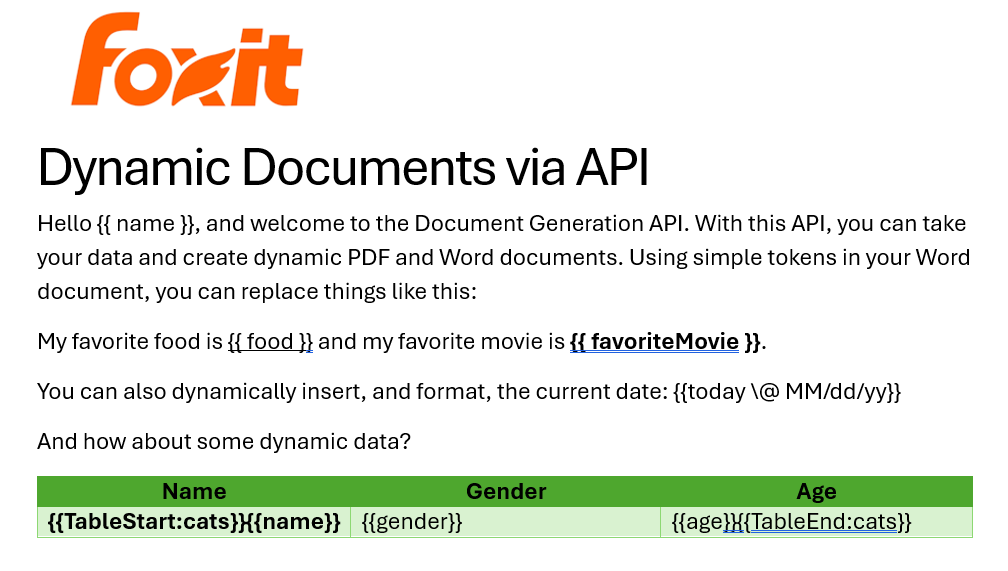
That’s one example, but you also get some built-in values as well. For example, including today as a token will insert the current date, and can be paired with date formatting to specify how the date looks:
Remember the array of cats from earlier? You can use that to create a table in Word like this:

Notice that I’ve used two new tags here, TableStart and TableEnd, both of which reference the array, cats. Then in my table cells, I refer to the values from that array. Again, the color you see here is completely arbitrary and was me making use of the entirety of my Word design skills.
Here’s the template as a whole to show you everything in context:
The Result
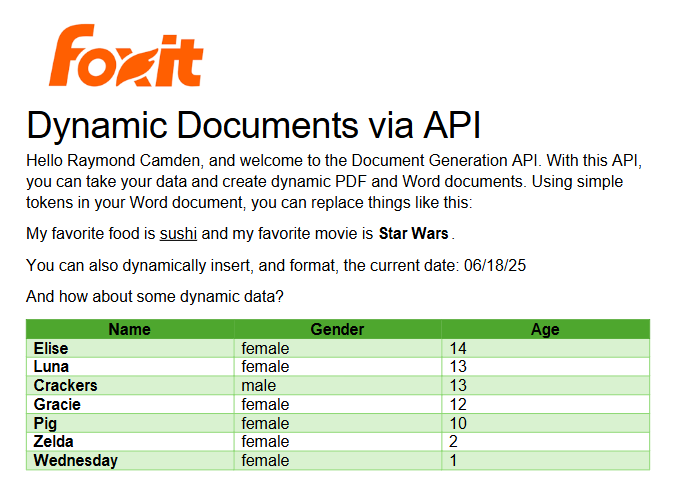
Given the code shown above with those values, and given the Word template just shared, once passed to the API, the following PDF is created:
Ready to Try?
If this looks cool, be sure to check the docs for more information about the template language and API. Sign up for some free developer credentials and reach out on our developer forums with any questions.
Want the code? Get it on GitHub.
If you are more of a Node person, check out that version. Get it on GitHub.
Introducing PDF APIs from Foxit

Get started with Foxit’s new PDF APIs—convert Word to PDF, generate documents, and embed files using simple, scalable REST APIs. Includes sample Python code and walkthrough.
Introducing PDF APIs from Foxit
At the end of June, Foxit introduced a brand-new suite of tools to help developers work with documents. These APIs cover a wide range of features, including:
- Convert between Office document formats and PDF files seamlessly
- Optimize, manipulate, and secure PDFs with advanced APIs
- Generate dynamic documents using Microsoft Word templates
- Extract text and images from PDFs with powerful tools
- Embed PDFs into web pages in a context-aware, controlled manner
- Integrate with eSign APIs for streamlined signature workflows
These APIs are simple to use, and best of all, follow the “don’t surprise me” principal of development. In this post, I’m going to demonstrate one simple example – converting a Word document to PDF – but you can rest assured that nearly all the APIs will follow incredibly similar patterns. I’ll be using Python for my examples here, but will link to a Node.js version of the same example. And given that we’re talking REST APIs here, any language is welcome to join the document party. Let’s dive in.
Credentials
Before we go any further, head over to our developer portal and grab a set of free credentials. This will include a client ID and secret values you’ll need to make use of the API.
Don’t want to read all of this? You can also follow along by video:
API Flow
As I mentioned above, most of the PDF Services APIs will follow a similar flow. This comes down to:
- Upload your input (like a Word document)
- Kick off a job (like converting to PDF)
- Check the job (hey, how ya doin?)
- Download the result
Or, in pretty graphical format –
The great thing is, once you’ve completed one integration (this post focuses on converting Word to PDF), switching to another is easy—and much of your existing code can be reused. A lazy developer is happy developer! Let’s get started.
Loading Credentials
My script begins by loading the credentials and API root host via the environment:
CLIENT_ID = os.environ.get('CLIENT_ID')
CLIENT_SECRET = os.environ.get('CLIENT_SECRET')
HOST = os.environ.get('HOST')
It’s never a good idea to hard-code credentials in your code. But if you do it this one time, I won’t tell. Honest.
Uploading Your Input
As I mentioned, in this example we’ll be making use of the Word to PDF API. Our input will be a Word document, which we’ll upload to Foxit using the upload API. This endpoint is fairly simple – aside from your credentials, all you need to provide is the binary data of the input file. Here’s the method I created to make this process easier:
def uploadDoc(path, id, secret):

    headers = {
        "client_id":id,
        "client_secret":secret
    }

    with open(path, 'rb') as f:
        files = {'file': (path, f)}

        request = requests.post(f"{HOST}/pdf-services/api/documents/upload", files=files, headers=headers)
        return request.json()
And here’s how it’s used:
doc = uploadDoc("../../inputfiles/input.docx", CLIENT_ID, CLIENT_SECRET)
print(f"Uploaded doc to Foxit, id is {doc['documentId']}")
The upload API only returns one value, a documentId, which we can use in future calls.
Starting the Job
Each API operation is a job creator. By this I mean you call the endpoint and it begins your action. For Word to PDF, the only required input is the document ID from the previous call. We can build a nice little wrapper function like so:
def convertToPDF(doc, id, secret):

    headers = {
        "client_id":id,
        "client_secret":secret,
        "Content-Type":"application/json"
    }

    body = {
        "documentId":doc
    }

    request = requests.post(f"{HOST}/pdf-services/api/documents/create/pdf-from-word", json=body, headers=headers)
    return request.json()
And then call it like so:
task = convertToPDF(doc["documentId"], CLIENT_ID, CLIENT_SECRET)
print(f"Created task, id is {task['taskId']}")
The result of this call, if no errors were found, isa taskId. We can use this to gauge how the job’s performing. Let’s do that now.
Job Checking
Ok, so the next part can be a bit tricky depending on your language of choice. We need to use the task status endpoint to determine how the job is performing. How often we do this, how quickly and so forth, will depend on your platform and needs. For our little sample script here, everything is running at once. I wrote a function that will check the status. If the job isn’t finished (whether successful or not), it pauses briefly before trying again. While this approach isn’t the most sophisticated, it should work well enough for basic testing:
def checkTask(task, id, secret):

    headers = {
        "client_id":id,
        "client_secret":secret,
        "Content-Type":"application/json"
    }

    done = False
    while done is False:

        request = requests.get(f"{HOST}/pdf-services/api/tasks/{task}", headers=headers)
        status = request.json()
        if status["status"] == "COMPLETED":
            done = True
            # really only need resultDocumentId, will address later
            return status
        elif status["status"] == "FAILED":
            print("Failure. Here is the last status:")
            print(status)
            sys.exit()
        else:
            print(f"Current status, {status['status']}, percentage: {status['progress']}")
            sleep(5)
As you can see, I’m using a while loop that—at least in theory—will continue running until a success or failure response is returned, with a five-second pause between each call. You can adjust that interval as needed—test different values to see what works best for your use case. Typically, most API calls should complete in under ten seconds, so a five-second delay felt like a reasonable default.
Each call to the endpoint returns a task status result. Here’s an example:
{
    'taskId': '685abc95a0d113558e4204d7',
    'status': 'COMPLETED',
    'progress': 100,
    'resultDocumentId': '685abc952475582770d6917b'
}
The important part here is the status. But you could also use progress to give some feedback to the code waiting for results. Here’s my code calling this:
result = checkTask(task["taskId"], CLIENT_ID, CLIENT_SECRET)
print(f"Final result: {result}")
Downloading Your Result
The last piece of the puzzle is simply saving the result. If you noticed above, the task returned a resultDocumentId value. Taking that, and the [Download Document](NEED LINK) endpoint, we can build a utility to store the result like so:
def downloadResult(doc, path, id, secret):

    headers = {
        "client_id":id,
        "client_secret":secret
    }

    with open(path, "wb") as output:

        bits = requests.get(f"{HOST}/pdf-services/api/documents/{doc}/download", stream=True, headers=headers).content
        output.write(bits)
And finally, call it:
downloadResult(result["resultDocumentId"], "../../output/input.pdf", CLIENT_ID, CLIENT_SECRET)
print("Done and saved to: ../../output/input.pdf")
And that’s it! While this script could certainly benefit from more robust error handling, it demonstrates the basic flow. As mentioned, most of our APIs follow this same logic.
Next Steps
Want the complete scripts? Get it on GitHub.
Want it in Node.js? Get it on GitHub.
Rather try this yourself? Sign up for a free developer account now. Need help? Head over to our developer forums and post your questions and comments.