
Automating Financial Document Workflows with Foxit APIs: Generate Statements, Embed eSign, and Extract Audit-Ready Data
Learn how to automate financial services document workflows using Foxit APIs, covering quarterly statement generation, embedded eSign for account onboarding, and audit-ready PDF/A archiving with PII redaction.
The standard financial services document pipeline looks fine until a compliance audit exposes it. A templating tool generates quarterly statements. A standalone eSign vendor handles account onboarding. A manual export process (or a fragile ETL job nobody fully owns) produces the data package your audit team needs. Three vendor contracts, three auth systems, and three event logs that stop at their own API boundaries.
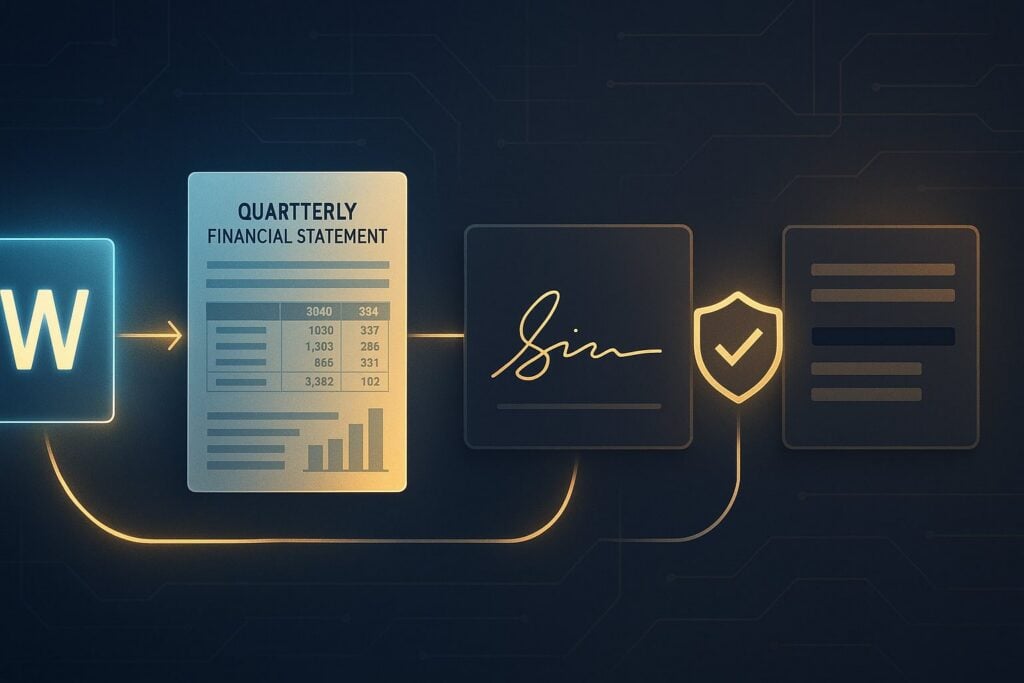
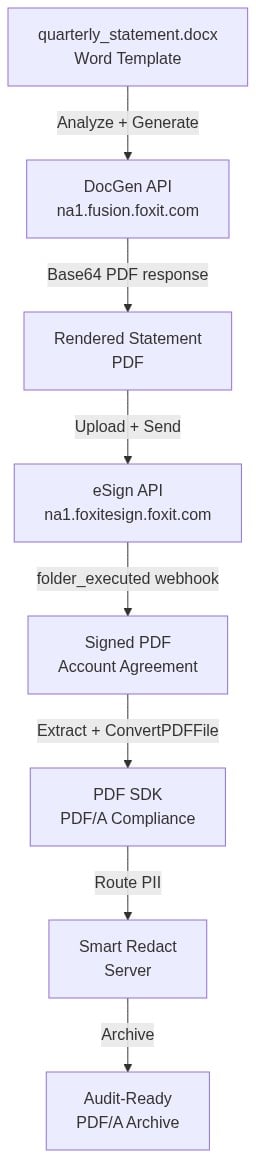
The more durable architecture treats document generation, e-signature orchestration, and audit-ready data extraction as a single API-backed pipeline. This article wires that pipeline together end to end, using the Foxit Document Generation API for quarterly statements, the Foxit eSign API for embedded onboarding signatures, and the Foxit PDF SDK plus Smart Redact Server for downstream extraction, PDF/A archiving, and PII scrubbing. All examples run against a free Foxit developer account.
Prerequisites
Before you run any code, get two accounts and one workspace set up.
Accounts. Create your Foxit developer account at https://account.foxit.com/site/sign-up, where activation is instant and includes free credits. Retrieve your client_id and client_secret from the Foxit Developer Portal. The eSign API runs on a different platform and requires a separate account in the Foxit eSign Portal. Activate API access under the API tab in the eSign settings menu, then fill out the form to receive your API Key and API Secret. These are not the same credentials as your DocGen account, and that distinction matters for every auth call in Section 3.
SDK and license files. If you plan to run Section 4’s PDF/A archive step, also request a Foxit PDF SDK trial through the Foxit Developer Hub. The PyPI wheel covered in Section 4 is the runtime binary your code imports, and the trial download provides gsdk_sn.txt and gsdk_key.txt, which are the credentials Library.Initialize requires. Confirm the license you receive lists Compliance on its Modules= line, since the archive step needs that module. Evaluation licenses also carry a fixed expiry window from the issue date (the distribution validated for this article was issued for a 36-day window), so request a fresh trial through the portal if yours has lapsed.
Runtime. You’ll need Python 3.8+ and cURL. Install jq if you want to inspect JSON responses inline. VS Code with the Python extension works well as a default; PyCharm and Sublime Text both work fine too.
Workspace bootstrap. Run this block to get a clean isolated environment:
mkdir foxit-financial && cd foxit-financial
python3 -m venv .venv && source .venv/bin/activate
pip install requests
Credentials. Never hardcode API keys. Set these five environment variables before running any snippet in this article:
export BASE_URL="https://na1.fusion.foxit.com"
export DOCGEN_CLIENT_ID="your_docgen_client_id"
export DOCGEN_CLIENT_SECRET="your_docgen_client_secret"
export ESIGN_API_KEY="your_esign_api_key"
export ESIGN_API_SECRET="your_esign_api_secret"
1. Why Three-Vendor Document Pipelines Break Under Compliance Pressure
The fragmentation pattern is consistent across mid-market brokerages and fintechs, where one vendor generates documents, another handles signatures, and a third (or an internal script) handles data extraction for audit packages. Each seam creates a specific compliance problem.
When a client signs their account agreement in the eSign portal, that event lives in the eSign vendor’s audit log. The generated quarterly statement lives in your templating tool’s system. The trade confirmation data lives in your data warehouse. None of these systems talk to each other by default. If an examiner asks for a unified event trail (who generated the document, who signed it, when, and where the underlying data went), you’re assembling that answer manually from three separate exports. That’s a control gap, not just an inconvenience.
There’s also a maintenance cost. Every vendor boundary means a separate OAuth2 registration, separate webhook configuration, separate error-handling logic, and separate retry strategies. When the eSign vendor rotates their API endpoint or introduces a breaking schema change, your generation pipeline doesn’t know about it. The two systems are coupled only through your code, which means you absorb every upstream change.
The architectural alternative collapses those seams. A single REST API surface covers generation (na1.fusion.foxit.com), signing (na1.foxitesign.foxit.com), archiving, and redaction. OAuth2 scopes control access at each stage. Webhooks propagate state across systems so a signature event on an account agreement can trigger downstream archival automatically, with no polling job or cron script required.
The rest of this article walks each stage of that pipeline with working code.
2. Auto-Generating Quarterly Statements with the DocGen API
Step 1: Validate Your Template with the AnalyzeDocumentBase64 Endpoint
Download the ready-to-use quarterly statement template here: quarterly_statement.docx. The template uses double-bracket text tags for flat client metadata ({{client_name}}, {{account_number}}, {{statement_period}}, {{portfolio_value}}) plus a {{TableStart:holdings}} / {{TableEnd:holdings}} loop for portfolio positions.
Before wiring up your data pipeline, call the AnalyzeDocumentBase64 endpoint to confirm the API can parse every tag. This catches naming mismatches before they produce silent blank fields in production.
curl -X POST "${BASE_URL}/document-generation/api/AnalyzeDocumentBase64" \

-H "client_id: ${DOCGEN_CLIENT_ID}" \

-H "client_secret: ${DOCGEN_CLIENT_SECRET}" \

-H "Content-Type: application/json" \

-d '{

"base64FileString": "'$(base64 -i quarterly_statement.docx)'",

"fileType": "docx"

}'
The response returns a singleTagsString (comma-separated list of scalar tags and loop column names) and a doubleTagsString (comma-separated list of loop names). For quarterly_statement.docx, the response should be {"singleTagsString":"client_name,account_number,statement_period,portfolio_value,ROW_NUMBER,symbol,quantity,marketValue","doubleTagsString":"holdings"}. Verify that every tag your data payload will populate appears in one of those two strings before you proceed. If a tag is missing, check whether Word split it across multiple text runs (see the Common Mistakes appendix).
Step 2: Generate the PDF with GenerateDocumentBase64
The GenerateDocumentBase64 endpoint accepts the Word template as a base64-encoded string plus a JSON data payload and returns the rendered document (also base64-encoded) in the same synchronous HTTP response. No polling required.
import os, base64, requests


DOCGEN_URL = "https://na1.fusion.foxit.com/document-generation/api/GenerateDocumentBase64"

CLIENT_ID = os.environ["DOCGEN_CLIENT_ID"]

CLIENT_SECRET = os.environ["DOCGEN_CLIENT_SECRET"]


# Load and encode the Word template

with open("quarterly_statement.docx", "rb") as f:

encoded_template = base64.b64encode(f.read()).decode()


# Build the data payload

payload = {

"base64FileString": encoded_template,

"fileType": "docx",

"outputFormat": "pdf",

"documentValues": {

"client_name": "Alex Rivera",

"account_number": "ACC-20241231-0042",

"statement_period": "Q4 2024",

"portfolio_value": "$248,750.00",

"holdings": [

{"symbol": "AAPL", "quantity": "50", "marketValue": "$9,100.00"},

{"symbol": "MSFT", "quantity": "30", "marketValue": "$12,360.00"},

{"symbol": "VTSAX", "quantity": "400", "marketValue": "$45,200.00"},

],

},

}


resp = requests.post(

DOCGEN_URL,

json=payload,

headers={

"client_id": CLIENT_ID,

"client_secret": CLIENT_SECRET,

"Content-Type": "application/json",

},

)

resp.raise_for_status()


# Decode and save the rendered PDF

pdf_bytes = base64.b64decode(resp.json()["base64FileString"])

with open("statement_q4_2024_rivera.pdf", "wb") as f:

f.write(pdf_bytes)


print(f"Generated: {len(pdf_bytes):,} bytes")
In this code, you load the Word template off disk, base64-encode it, build a documentValues dict that mirrors the template tags exactly (flat scalars for client metadata, an array of objects for the holdings loop), POST the payload to GenerateDocumentBase64, decode the base64FileString field from the JSON response back into raw PDF bytes, and persist the result. The data contract is straightforward, since flat scalar keys map to single-value tags, the holdings array of objects drives the {{TableStart:holdings}} loop, and each object in holdings needs the same keys as the column tags inside the loop (symbol, quantity, marketValue).
Step 3: Batch Generation and the 4 MB Limit
The DocGen API enforces a 4 MB cap on the base64FileString payload, measured as the base64-encoded size and not the raw .docx on disk. A 2.5 MB Word file encodes to roughly 3.3 MB in base64, which leaves little room for embedded images or fonts.
When the cap is exceeded, the API returns HTTP 500 with the plain-text body An error occurred while analyzing the template: Document file contents cannot be larger than 4 MB. To recover, slim the template. Compress images via Word’s Picture Format → Compress Pictures pane (targeting screen resolution is usually enough for PDF output), remove any embedded OLE objects, and drop embedded fonts if they aren’t required for rendering. If the template genuinely needs to stay large, split it into multiple templates and merge the rendered PDFs downstream.
For quarterly runs across thousands of accounts, parallelise POST requests against GenerateDocumentBase64 using a thread pool. The API is stateless and synchronous, so scaling means concurrent requests against your credit budget, not job-queue management.
from concurrent.futures import ThreadPoolExecutor


def generate_statement(client_record):

payload["documentValues"] = client_record

r = requests.post(DOCGEN_URL, json=payload, headers=headers)

r.raise_for_status()

return base64.b64decode(r.json()["base64FileString"])


with ThreadPoolExecutor(max_workers=10) as pool:

pdfs = list(pool.map(generate_statement, client_records))
If your batch jobs need explicit async task tracking with status polling, the Foxit PDF Services API exposes that pattern. For statement generation at quarterly cadence, the synchronous loop above is simpler and just as reliable.
3. Embedding eSign Flows for Account Onboarding
Authentication: A Separate Account on a Separate Host
The eSign API runs on na1.foxitesign.foxit.com, not the na1.fusion.foxit.com host used for DocGen. It also uses a different developer account and a different auth model. DocGen takes client_id and client_secret directly as request headers on every call. eSign requires a proper OAuth2 client_credentials exchange first, then a bearer token on subsequent calls.
Exchange your API Key and API Secret for an access token:
curl -X POST "https://na1.foxitesign.foxit.com/api/oauth2/access_token" \

-d "grant_type=client_credentials" \

-d "client_id=${ESIGN_API_KEY}" \

-d "client_secret=${ESIGN_API_SECRET}" \

-d "scope=read-write"
The response includes access_token. Pass it as Authorization: Bearer <token> on every subsequent eSign API call. Tokens expire, so cache them with their expires_in value and refresh before expiry rather than on every request.
Document Setup with Text Tag Tokens
Download the ready-to-use account agreement here: account_agreement.pdf. The document embeds signature, date, and initials fields using dollar-brace Text Tag tokens. The token format uses colon-delimited segments for field type, party number, mandatory flag, and a placeholder string.
Three tokens cover the common onboarding case:
${signfield:1:y:____}is a mandatory signature for party 1${datefield:2:n::____}is an optional date for party 2${i:2:n}is an optional initials field for party 2
The party number in each token drives multi-party routing automatically. Party 1 sees their signature field; party 2 sees the date and initials fields. No additional routing configuration is needed in the API call, since the document itself encodes the routing.
To create the folder and send it for signature in one call, POST to /folders/createfolder with the document URL, file name, parties array, and sendNow: true. Setting processTextTags: true instructs Foxit eSign to parse the dollar-brace tokens out of the PDF text layer and convert them into the appropriate form fields. The party fields are permission (signing role, typically FILL_FIELDS_AND_SIGN) and sequence (party order within the folder); the request schema does not use partyRole or partyNumber.
curl -X POST "https://na1.foxitesign.foxit.com/api/folders/createfolder" \

-H "Authorization: Bearer ${ACCESS_TOKEN}" \

-H "Content-Type: application/json" \

-d '{

"folderName": "Account Agreement - Alex Rivera",

"fileUrls": ["https://github.com/lucienchemaly/foxit-demo-templates/raw/main/account_agreement.pdf"],

"fileNames": ["account_agreement.pdf"],

"processTextTags": true,

"signInSequence": false,

"sendNow": true,

"parties": [

{

"firstName": "Alex",

"lastName": "Rivera",

"emailId": "[email protected]",

"permission": "FILL_FIELDS_AND_SIGN",

"sequence": 1,

"workflowSequence": 1

}

]

}'
The request above creates a draft folder for Alex Rivera, attaches the published account_agreement.pdf by URL, asks Foxit to parse the embedded Text Tag tokens, and dispatches the folder for signature in a single round trip. The folder status moves through DRAFT → SHARED → WAITING_FOR_SIGNATURE → EXECUTED as the signing process advances. If you prefer a two-step flow (create the draft, then dispatch later), POST the same body with sendNow: false to /folders/createfolder and follow up with a POST /folders/sendDraftFolder carrying the returned folderId. The webhook response uses different field names than the request for these party properties (contractPermissions, partySequence, workflowSignSequence), so map them accordingly when you persist signing events.
Webhook Integration: Seven Events, One That Matters Most for Archival
Register your callback URL in the eSign developer portal under Settings → Webhooks. The eSign API exposes seven webhook events covering the full folder lifecycle:
folder_sent, when the folder is dispatched to all partiesfolder_viewed, when any party opens the folder (payload addsviewing_party)folder_signed, when any party signs (payload addssigning_party)folder_cancelled, when any party declines (payload addscancelling_partyandreason_for_cancelling)folder_completed, once all required signatures are collectedfolder_executed, which fires 5 to 10 seconds afterfolder_completedonce the digital signature is applied to the completed PDFfolder_deleted, when the folder is removed (payload addsdeleting_party)
Every callback POSTs a JSON body with three top-level keys (event_name, event_date in Unix milliseconds, and data). The data.folder object carries the full folder context including folderId, folderName, folderStatus, folderDocumentIds, documentsList, folderRecipientParties, and bulkId.
Hook folder_signed for per-party CRM and onboarding status updates. Hook folder_executed (not folder_completed) for archival triggers. The distinction matters, because folder_completed fires when all signatures are in but before the digital signature has been applied to the PDF, whereas folder_executed guarantees the downloaded PDF is the final, digitally signed document.
Webhook Security: HMAC on the Raw Body
Configure a Webhook Secret in the eSign API settings page. Foxit eSign computes an HMAC-SHA-256 digest of the raw HTTP request body using that secret, base64 encodes it, and appends it to your callback URL as a signature query parameter (for example, https://your-app.example.com/webhook?signature=XXXXXXXXXXXX).
Verify against the raw body bytes, not against the JSON-decoded and re-serialised payload. Any whitespace or key-ordering difference between parse and re-serialize will break the comparison.
import hmac, hashlib, base64


WEBHOOK_SECRET = os.environ["WEBHOOK_SECRET"]


def verify_webhook_signature(raw_body: bytes, signature_param: str) -> bool:

computed = base64.b64encode(

hmac.new(WEBHOOK_SECRET.encode(), raw_body, hashlib.sha256).digest()

).decode()

return hmac.compare_digest(computed, signature_param)


# In your Flask/FastAPI handler:


# raw_body = await request.body() # capture before any parsing


# sig = request.query_params["signature"]


# if not verify_webhook_signature(raw_body, sig):


# return Response(status_code=403)
Rotate the Webhook Secret through the API settings page immediately if it leaks.
Bulk Dispatch for High-Volume Onboarding Campaigns
For campaigns where you’re sending the same agreement to a large group, set partyIsEmailGroup: true on the relevant party in your createfolder body and provide an emailGroupId (the ID of the email group configured in your eSign account). When partyIsEmailGroup is true, the firstName, lastName, and emailId fields on that party are ignored, and the group definition drives the recipients. Set allowSingleSignerInBulk: true if only one member of the group needs to sign to complete the folder. The folder response includes a bulkId field that identifies the bulk run (0 for non-bulk sends).
For onboarding flows that require one personalised folder per recipient (different client data, different document content), parallelise calls to /folders/createfolder from a worker pool sized to your credit budget. No single-call endpoint generates thousands of personalised folders in one shot.
4. Extracting Audit-Ready Data for Financial Document Workflows
Server-Side Text and Table Extraction with the PDF SDK
The Foxit PDF SDK handles programmatic text and table extraction server-side, which eliminates the manual export step that breaks most audit pipelines. Install the Python wrapper from PyPI for the compiled runtime binary (arm64 macOS, x64 Linux, and x64 Windows wheels are published):
pip install FoxitPDFSDKPython3The PyPI wheel ships the runtime binary only. To obtain the serial number and license key that Library.Initialize requires, request a trial through the Foxit Developer Hub and read gsdk_sn.txt and gsdk_key.txt from the unpacked archive. Foxit evaluation licenses are bound to the SDK distribution they ship alongside, so request the trial through the route you actually plan to run. The PyPI wheel needs a license issued for it, not one extracted from the legacy x86_64 macOS download (that bundle is x86_64-only and was built against Python 2, which is incompatible with both arm64 Apple Silicon hosts and modern Python 3 runtimes).
The SDK supports text extraction at the page level and table detection from structured content, which is useful for pulling portfolio positions, transaction histories, and account summaries into JSON before writing to an audit package or data warehouse.
PDF/A Conversion: Convert, Then Verify, Then Reject on Failure
Generated and signed documents need to pass through the Foxit PDF SDK PDF/A Compliance add-on before archiving. The Python binding flattens the underlying C++ namespaces, so the PDFACompliance class lives directly on the top-level FoxitPDFSDKPython3 module (not under a nested addon submodule). It exposes two main methods, namely ConvertPDFFile() to produce a compliant output and Verify() to check an existing PDF against a target version. Initialize the SDK once at process start via foxit.Library.Initialize(sn, key) (the call returns an int error code, not an exception), then boot the ComplianceEngine before instantiating PDFACompliance.
Pull the values for FOXIT_SDK_SN and FOXIT_SDK_KEY from the SDK trial download referenced in the prerequisites. gsdk_sn.txt ships as a single line of the form SN=<value>, and the literal SN= prefix must be stripped before the value is exported (passing the whole line yields e_ErrInvalidLicense from a key that would otherwise work). gsdk_key.txt is an INI-style file starting with [Foxit SDK License], and the value passed to Library.Initialize is only the contents of the Sign= line (the long base64 blob), not the full INI file. Passing the full file yields e_ErrInvalidLicense even with the correct SN. ComplianceEngine.Initialize takes the path to the compliance resource folder as its first argument, and the second argument is the engine unlock code (an empty string for trial keys). The resource folder is the res/ directory inside the SDK trial download; point FOXIT_COMPLIANCE_RESOURCE_FOLDER at that path.
The version enums are direct class attributes (no PDFACompliance.Version sub-namespace). Supported versions span PDF/A-1 through PDF/A-3, including e_VersionPDFA1a, e_VersionPDFA1b, e_VersionPDFA2a, e_VersionPDFA2b, e_VersionPDFA2u, e_VersionPDFA3a, e_VersionPDFA3b, and e_VersionPDFA3u, aligned with ISO 19005-1, 19005-2, and 19005-3. PDF/A-4 (ISO 19005-4) is not in the enum and is not supported.
import os

import logging

import FoxitPDFSDKPython3 as foxit


logger = logging.getLogger(__name__)


SDK_SN = os.environ["FOXIT_SDK_SN"]

SDK_KEY = os.environ["FOXIT_SDK_KEY"]

COMPLIANCE_RESOURCE_FOLDER = os.environ["FOXIT_COMPLIANCE_RESOURCE_FOLDER"]


err = foxit.Library.Initialize(SDK_SN, SDK_KEY)

if err != foxit.e_ErrSuccess:

raise RuntimeError(f"Foxit SDK Library.Initialize failed with code {err}")


# Second argument is the engine unlock code; trial keys use the empty string.

err = foxit.ComplianceEngine.Initialize(COMPLIANCE_RESOURCE_FOLDER, "")

if err != foxit.e_ErrSuccess:

raise RuntimeError(f"Foxit ComplianceEngine.Initialize failed with code {err}")


def archive_as_pdfa(src_path: str, dest_path: str) -> bool:

pdfa = foxit.PDFACompliance()


# Convert to PDF/A-2b (ISO 19005-2, Level B)

convert_result = pdfa.ConvertPDFFile(

src_path,

dest_path,

foxit.PDFACompliance.e_VersionPDFA2b,

None,

)

if not convert_result.IsEmpty():

# Non-empty ResultInformation means the conversion surfaced

# unresolved compliance issues.

logger.error(

"PDF/A conversion left %d unresolved issues for %s",

convert_result.GetHitDataCount(),

src_path,

)

return False


# Verify the output, since silent failure on non-compliant input is the SDK default.

# Signature: Verify(version_enum, file_path, start_page, end_page, progress_callback).

verify_result = pdfa.Verify(

foxit.PDFACompliance.e_VersionPDFA2b,

dest_path,

0,

-1,

None,

)

if not verify_result.IsEmpty():

logger.error(

"PDF/A verification found %d violations in %s",

verify_result.GetHitDataCount(),

dest_path,

)

return False


return True
The code initializes the SDK with Library.Initialize (the v11.1.0 Python binding’s entry point), boots the ComplianceEngine, converts the source PDF to PDF/A-2b, and verifies the output. Both ConvertPDFFile() and Verify() return a ResultInformation object, and an empty result (IsEmpty() == True) indicates a clean run with no unresolved compliance issues. Log non-empty results explicitly with the hit count from GetHitDataCount(), because a non-compliant PDF passed silently to your archive is exactly the gap that surfaces during an SEC or FINRA examination.
PII Scrubbing Before Audit Delivery
Route documents through Foxit Smart Redact Server as a pipeline stage before external delivery or third-party audit access. AI-assisted detection identifies SSNs, account numbers, credit card numbers, names, emails, and phone numbers across 47+ supported file types, including PDF, Word, Excel, HTML, JSON, and XML.
Smart Redact Server protects documents with AES-256 encryption at rest and SSL 2048-bit encryption in transit. It operates under a zero data retention policy, so originals and intermediate files are deleted after processing. The Smart Redact Security and Privacy page documents one nuance, where sensitive findings may be stored in encrypted form for follow-up review actions even though the source document itself is not retained. Wire Smart Redact as the final stage before delivery, not as an afterthought applied to a subset of documents.
5. Compliance Controls You Can Actually Audit
Audit Trail Coverage
The eSign API captures a timestamped event log for every signing action, including who signed, when, from what IP address, and with what authentication method. These events are accessible programmatically through the API, not just through the portal UI. That means you can pipe signing events directly into your SIEM or compliance reporting system without manual exports. The folder_signed webhook event delivers enough detail per party to satisfy most per-transaction audit requirements.
Encryption and Access Control
Every Foxit API tier in this pipeline shares the same encryption posture, with TLS 1.2 or higher in transit and AES-256 at rest. The Foxit API Security and Compliance page documents this posture for both the eSign API and the PDF Services/Embed APIs (which covers the DocGen endpoints used in Section 2), alongside SOC 2 Type II certification, segmented customer data at rest, and HIPAA BAA availability.
OAuth2 scopes control which services can read, write, or execute at each pipeline stage. Structure scope grants to enforce least-privilege access between your generation, signing, and archiving services. A job that only reads signed documents shouldn’t hold a read-write token for the generation endpoint.
Retention and Purge
The eSign API supports applying retention rules and triggering purges of outdated records programmatically. For FINRA Rule 4511 and SEC Rule 17a-4 compliance, you need both provable retention (records preserved for the required period) and provable deletion (records removed at end of retention). An API-driven purge that produces a deletion receipt is far easier to defend in an examination than a manual deletion from a portal UI.
6. Start with the Statement Generation Pipeline Today
The fastest way to harden your financial document workflows is to wire the statement generation stage first and let the rest of the pipeline follow. Create a free developer account at https://account.foxit.com/site/sign-up; no credit card is required and activation is instant. Retrieve your client_id and client_secret from the Foxit Developer Portal.
Download the Postman collection from the developer portal, load the AnalyzeDocumentBase64 request, attach quarterly_statement.docx, and fire it. The response lists every detected placeholder, so you can confirm tag names match your data schema before writing a single line of integration code.
Take the tag list from the Analyze response, construct a minimal JSON payload with one client record, POST it to GenerateDocumentBase64, and verify the PDF output renders locally. Once that loop closes, you have a working proof of concept for the statement generation stage, and the rest of the pipeline follows the same pattern.
Appendix: Common Mistakes
DocGen and eSign use different auth models. DocGen takes client_id and client_secret as headers on every request. eSign requires the OAuth2 client_credentials exchange against /api/oauth2/access_token first, then a bearer token on subsequent calls. They’re different accounts in different portals.
Word’s autocorrect splits tags typed character-by-character across runs. This makes the placeholder unparseable and renders a blank field. Always paste tags in as plain text, then verify with Show/Hide formatting marks (¶).
Smart quotes inside format strings render blank. Disable smart quotes in AutoCorrect Options before authoring the template. A format tag like {{portfolio_value # "$#,##0.00"}} breaks silently if Word replaces the double quotes with curly equivalents.
TableStart and TableEnd for the same array must sit in cells of the same row of the same Word table. Different rows or different tables produce a 400 or a silent blank.
HTTP 500 with the body Document file contents cannot be larger than 4 MB means the base64-encoded .docx exceeded the DocGen 4 MB cap. Slim the template per the Section 2 guidance.
Webhook HMAC verification must run on the raw body bytes, not the parsed JSON. Whitespace normalisation or key-ordering changes between receipt and re-serialisation break the comparison. Capture request.body() before any parsing.
folder_executed is the correct archival hook, not folder_completed. folder_completed fires when all required signatures are collected, but the digital signature hasn’t been applied to the PDF yet. folder_executed fires 5 to 10 seconds later once the digital signature is embedded, and that’s the download-ready version.
Do not claim PDF/A-4 support. The PDFACompliance version enum covers PDF/A-1 (a, b), PDF/A-2 (a, b, u), and PDF/A-3 (a, b, u) only, aligned with ISO 19005-1/2/3. Always branch on the ResultInformation return value, since the SDK does not raise on non-compliant input.
Financial Services Document Automation FAQ
What is document automation for financial services?
Document automation for financial services is the use of APIs to programmatically generate, sign, and archive client-facing documents like quarterly statements, account agreements, and compliance disclosures without manual intervention. Rather than stitching together separate tools for each stage, a unified API pipeline handles the full lifecycle from template rendering through audit-ready archival, reducing vendor fragmentation and closing compliance control gaps.
How does the Foxit DocGen API generate quarterly statements?
The Foxit DocGen API accepts a Word template with double-bracket tags (e.g. {{client_name}}, {{TableStart:holdings}}) and a JSON data payload, then returns a rendered PDF in the same synchronous HTTP response with no polling required. You call AnalyzeDocumentBase64 first to validate every template tag against your data schema, then GenerateDocumentBase64 with your client record to produce the statement. The API enforces a 4 MB cap on the base64-encoded template payload.
What is the difference between folder_completed and folder_executed in the Foxit eSign API?
folder_completed fires once all required signatures are collected, but before the digital signature has been applied to the PDF. folder_executed fires 5 to 10 seconds later, once the digital signature is embedded and the document is finalized. For archival triggers in financial workflows where you need the legally binding, digitally signed version, folder_executed is the correct webhook event to hook, not folder_completed.
How do you verify Foxit eSign webhook authenticity?
Foxit eSign computes an HMAC-SHA-256 digest of the raw HTTP request body using your configured Webhook Secret, base64-encodes it, and appends it to your callback URL as a signature query parameter. Verification must run against the raw body bytes before any JSON parsing, because whitespace normalization or key-reordering during parse and re-serialization will break the comparison. Use hmac.compare_digest() for a timing-safe check.
Which PDF/A versions does the Foxit PDF SDK support for financial document archiving?
The Foxit PDF SDK PDFACompliance class supports PDF/A-1 (a, b), PDF/A-2 (a, b, u), and PDF/A-3 (a, b, u), aligned with ISO 19005-1, 19005-2, and 19005-3. PDF/A-4 is not supported. For SEC Rule 17a-4 and FINRA Rule 4511 compliance, PDF/A-2b is the recommended target. Always call Verify() after ConvertPDFFile() because the SDK does not raise an exception on non-compliant input; it returns a ResultInformation object you must explicitly check.
Generate Dynamic PDFs from JSON using Foxit APIs

See how easy it is to generate PDFs from JSON using Foxit’s Document Generation API. With Word as your template engine, you can dynamically build invoices, offer letters, and agreements—no complex setup required. This tutorial walks through the full process in Python and highlights the flexibility of token-based document creation.
Generate Dynamic PDFs from JSON using Foxit APIs
One of the more fascinating APIs in our library is the Document Generation API. This document generation API lets you create dynamic PDFs or Word documents using your own data as templates. That may sound simple – and the code you’re about to see is indeed simple – but the real power lies in how flexible Word can be as a template engine. This API could be used for:
- Creating invoices
- Creating offer letters
- Creating dynamic agreements (which can integrate with our eSign API)
All of this is made available via a simple API and a “token language” you’ll use within Word to create your templates. Whether you’re feeding in data from a database, a form submission, or a JSON API response, the process looks the same from your Python script. Let’s take a look at how this is done.
Credentials
Before we go any further, head over to our developer portal and grab a set of free credentials. This will include a client ID and secret values – you’ll need both to make use of the API.
Don’t want to read all of this? You can also follow along by video:
Using the API
The Document Generation API flow is a bit different from our PDF Services APIs in that the execution is synchronous. You don’t need to upload your document beforehand or download a result. You simply call the API (passing your data and template) and the result has your new PDF (or Word document). With it being this simple, let’s get into the code.
Loading Credentials
My script begins by loading in the credentials and API root host via the environment:
CLIENT_ID = os.environ.get('CLIENT_ID')
CLIENT_SECRET = os.environ.get('CLIENT_SECRET')
HOST = os.environ.get('HOST')
As always, try to avoid hard coding credentials directly into your code.
Calling the API
The endpoint only requires you to pass the output format, your data, and a base64 version of your file. “Your data” can be almost anything you like—though it should start as an object (i.e., a dictionary in Python with key/value pairs). Beneath that, anything goes: strings, numbers, arrays of objects, and so on.
Here’s a Python wrapper showing this in action:
def docGen(doc, data, id, secret):

    headers = {
        "client_id":id,
        "client_secret":secret
    }

    body = {
        "outputFormat":"pdf",
        "documentValues": data,
        "base64FileString":doc
    }

    request = requests.post(f"{HOST}/document-generation/api/GenerateDocumentBase64", json=body, headers=headers)
    return request.json()
And here’s an example calling it:
with open('../../inputfiles/docgen_sample.docx', 'rb') as file:
    bd = file.read()
    b64 = base64.b64encode(bd).decode('utf-8')

data = {
    "name":"Raymond Camden",
    "food": "sushi",
    "favoriteMovie": "Star Wars",
    "cats": [
        {"name":"Elise", "gender":"female", "age":14 },
        {"name":"Luna", "gender":"female", "age":13 },
        {"name":"Crackers", "gender":"male", "age":13 },
        {"name":"Gracie", "gender":"female", "age":12 },
        {"name":"Pig", "gender":"female", "age":10 },
        {"name":"Zelda", "gender":"female", "age":2 },
        {"name":"Wednesday", "gender":"female", "age":1 },
    ],
}

result = docGen(b64, data, CLIENT_ID, CLIENT_SECRET)
You’ll note here that my data is hard-coded. In a real application, this would typically be dynamic—read from the file system, queried from a database, or sourced from any other location.
The result object contains a message representing the success or failure of the operation, the file extension for the result, and the base64 representation of the result. To turn that base64 string back into a file, decode it first:
b64_bytes = result["base64FileString"].encode('ascii')
binary_data = base64.b64decode(b64_bytes)
Most likely you’ll always be outputting PDFs, so here’s a simple bit of code that stores the result:
with open('../../output/docgen_sample.pdf', 'wb') as file:
    file.write(binary_data)
    print('Done and stored to ../../output/docgen_sample.pdf')
There’s a bit more to the API than I’ve shown here so be sure to check the docs, but now it’s time for the real star of this API, Word.
Using Word as a Template
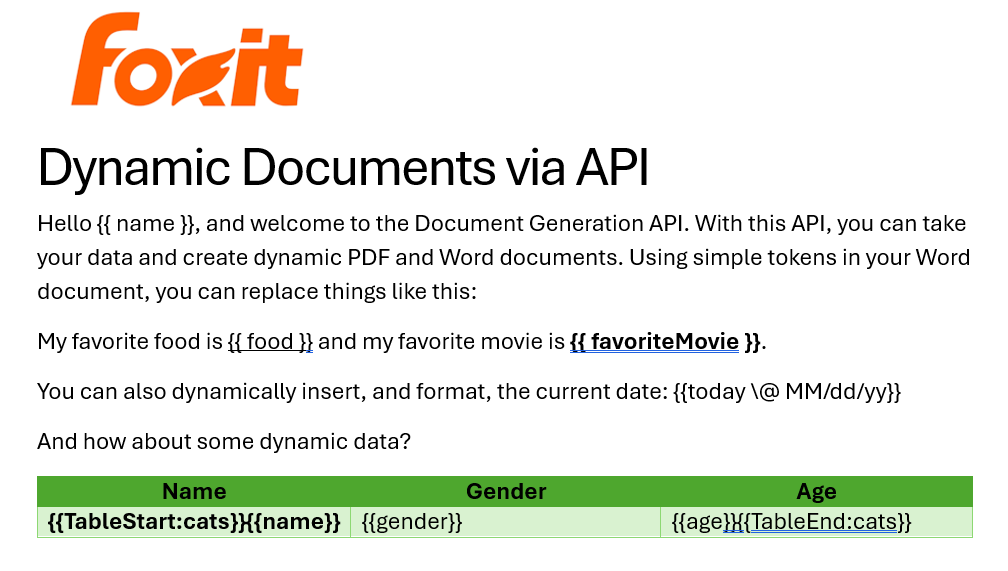
I’ve probably used Microsoft Word for longer than you’ve been alive and I’ve never really thought much about it. But when you begin to think of a simple Word document as a template, all of a sudden the possibilities begin to excite you. In our Document Generation API, the template system works via simple “tokens” in your document marked by opening and closing double brackets.
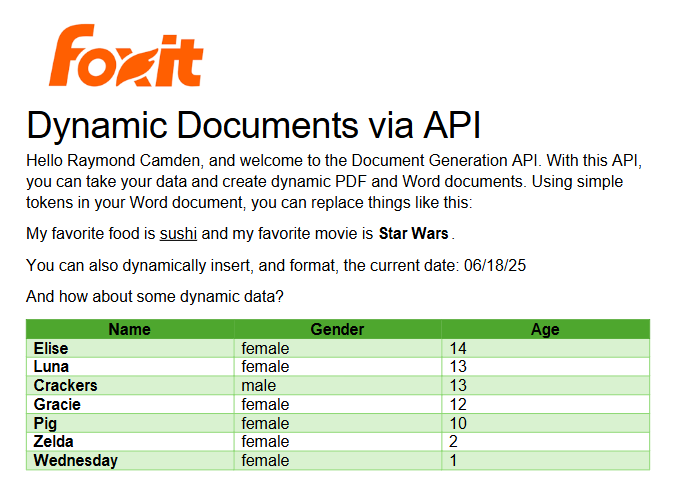
Consider this block of text:
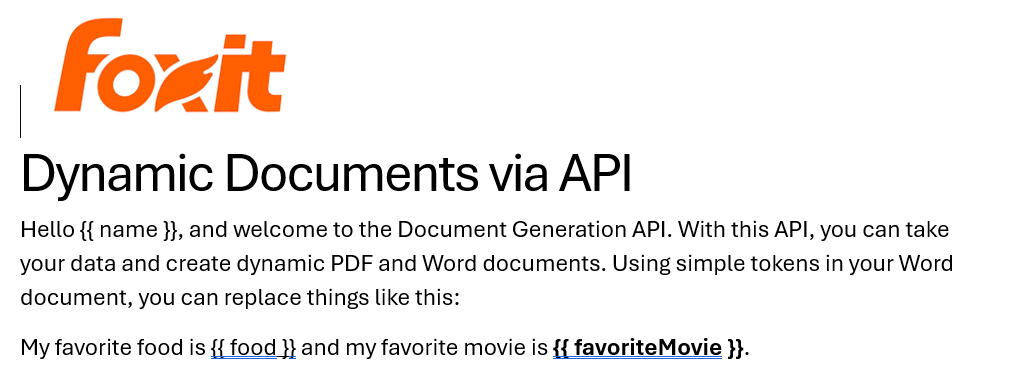
See how name is surrounded by double brackets? And food and favoriteMovie? When this template is sent to the API along with the corresponding values, those tokens are replaced dynamically. In the screenshot, notice how favoriteMovie is bolded. That’s fine. You can use any formatting, styling, or layout options you wish.
That’s one example, but you also get some built-in values as well. For example, including today as a token will insert the current date, and can be paired with date formatting to specify how the date looks:
Remember the array of cats from earlier? You can use that to create a table in Word like this:

Notice that I’ve used two new tags here, TableStart and TableEnd, both of which reference the array, cats. Then in my table cells, I refer to the values from that array. Again, the color you see here is completely arbitrary and was me making use of the entirety of my Word design skills.
Here’s the template as a whole to show you everything in context:
The Result
Given the code shown above with those values, and given the Word template just shared, once passed to the API, the following PDF is created:
What About Converting PDF to JSON?
So far we’ve been going one direction: JSON data in, PDF out. But what if you need to go the other way—extract structured content from a PDF and work with it in your application?
Foxit’s PDF Services API includes an Extract endpoint that handles exactly this. You upload a PDF, specify whether you want TEXT, IMAGE, or PAGE-level data, and the API returns the extracted content. The text output is particularly useful if you want to feed the result into a data pipeline, search index, or AI workflow.
Here’s a quick look at how extraction works in Python. First, upload your PDF:
def uploadDoc(path, id, secret):
    headers = {
        "client_id":id,
        "client_secret":secret
    }
    with open(path, 'rb') as f:
        files = {'file': (path, f)}
        request = requests.post(f"{HOST}/pdf-services/api/documents/upload", files=files, headers=headers)
    return request.json()

doc = uploadDoc("../../inputfiles/input.pdf", CLIENT_ID, CLIENT_SECRET)
Then call the Extract endpoint with the document ID and the type of content you want. The result comes back in a structured format you can parse, store, or pass along to other tools—including an LLM if you’re building an AI document pipeline.
You can read a full walkthrough in our PDF text extraction guide.
Ready to Try?
If this looks cool, be sure to check the docs for more information about the template language and API. Sign up for some free developer credentials and reach out on our developer forums with any questions.
If you’re building AI agents or LLM-powered workflows, Foxit also offers an MCP server that lets you connect your agents directly to Foxit PDF Services—so your AI tools can generate, extract, and process documents without any custom glue code.
Want the code? Get it on GitHub (Python).
If you are more of a Node person, check out that version. Get it on GitHub (Node.js).
Create Custom Invoices with Word Templates and Foxit Document Generation

Invoicing is a critical part of any business. This tutorial shows how to automate the process by creating dynamic, custom PDF invoices with the Foxit Document Generation API. Learn how to design a Microsoft Word template with special tokens, prepare your data in JSON, and then use a simple Python script to generate your final invoices.
Create Custom Invoices with Word Templates and Foxit Document Generation
Invoicing is a critical part of any business, often involving multiple steps—gathering customer data, calculating amounts owed, and sending out invoices so your company can get paid. Foxit’s Document Generation API streamlines this process by making it easy to create well-formatted, dynamic PDF invoices. Let’s walk through an example.
Before You Start
If you want to follow along with this blog post, be sure to get your free credentials over on our developer portal. Also, read our introductory blog post, which covers the basics of working with our API.
As a reminder, the API makes use of Microsoft Word templates. These templates are essentials tokens wrapped in double brackets. When you call the API, you’ll pass the template and your data. Our API then dynamically replaces those tokens with your data and returns you a nice PDF (you can also get a Word file back as well).
Creating Your Custom Invoice with Word Templates
Let’s begin by designing the template in Word. An invoice typically includes things like:
- The customer receiving the invoice
- The invoice number and issue date
- The payment due date
- A detailed list of items, including name, quantity, and price for each line item, with a total at the end
The Document Generation API makes no requirements in terms of how you design your templates. Size, alignment, and so forth, can match your corporate styles and be as fancy, or simple, as you like. Let’s consider the template below (I’ll link to where you can download this file at the end of the article):

Let's break it down from the top.
- The first token,
{{ invoiceNum }}, represents the invoice number for the customer. - The next token is special.
{{ today \@ MM/dd/yyyy }}represents two different features of the Document Generation API. First,todayis a special value representing the present time, or more accurately, when you call the API. The next portion represents a date mask for representing a date value. Our docs have a list of available masks. {{ accountName }}is another regular token.- The payment date,
{{ paymentDueDate \@ MM/dd/yyyy }}, shows how the date mask feature can be used on dates in your own data as well. - Now let's look at the table. You can format tables however you like, but a common setup includes one row for the header and one row for the dynamic data. (In this example, there’s also a third row, which I'll explain shortly.) To start, you’ll use a marker tag:
{{TableStart:lineItems}}, wherelineItemsrepresents an array in your data. The row ends with the matching{{TableEnd:lineItems}}tag. Between these two tags, you'll place additional tags for each value in the array. For example, we have aproduct,qty,price, andtotalPricefor each item. You'll also see the specialROW_NUMBERvalue, which automatically counts each row starting at 1. Finally, the\# Currencyformat is applied to thetotalPricevalue to display it as a currency. - The last row in the table uses two special features together, namely
SUM(ABOVE), which maps to creating a total of the last column from the table. This can be paired with currency formatting as shown.
Alright, now that you've seen the template, let's talk data!
The Data for Your Custom Invoices
Usually the data for an operation like this would come from a database, or perhaps an API with an ecommerce system. For this demo, the data will come from a simple JSON file. Let's take a look at it:
[
{
	"invoiceNum":100,
	"accountName":"Customer Alpha",
	"accountNumber":1,
	"paymentDueDate":"August 15, 2025",
	"lineItems":[
		{"product":"Product 1", "qty":5, "price":2, "totalPrice":10},
		{"product":"Product 5", "qty":3, "price":9, "totalPrice":18},
		{"product":"Product 4", "qty":1, "price":50, "totalPrice":50},
		{"product":"Product X", "qty":2, "price":15, "totalPrice":30}
	]
},
{
	"invoiceNum":25,
	"accountName":"Customer Beta",
	"accountNumber":2,
	"paymentDueDate":"August 15, 2025",
	"lineItems":[
		{"product":"Product 2", "qty":9, "price":2, "totalPrice":18},
		{"product":"Product 4", "qty":1, "price":8, "totalPrice":8},
		{"product":"Product 3", "qty":10, "price":25, "totalPrice":250},
		{"product":"Product YY", "qty":3, "price":15, "totalPrice":45},
		{"product":"Product AA", "qty":2, "price":100, "totalPrice":200}
	]
},
{
	"invoiceNum":51,
	"accountName":"Customer Gamma",
	"accountNumber":3,
	"paymentDueDate":"August 15, 2025",
	"lineItems":[
		{"product":"Product 9", "qty":1, "price":2, "totalPrice":2},
		{"product":"Product 23", "qty":30, "price":9, "totalPrice":270},
		{"product":"Product ZZ", "qty":6, "price":15, "totalPrice":90}
	]
}
]
The data consists of an array of 3 sets of invoice data. Each set follows the same pattern and matches what you saw above in the Word template. The only exception being the accountNumber value which wasn't used in the template. That's fine – sometimes your data will include things not necessary for the final PDF. In this case, though, we're actually going to make use of it (you'll see in a moment). Onward to code!
Calling the Foxit API with Our Data
Now for my favorite part – actually calling the API. The Generate Document API is incredibly simple; needing just your credentials, a base64 version of the template, and your data. The entire demo is slightly over 50 lines of Python code, so let's look at the template and then break it down.
import os
import requests
import sys
from time import sleep
import base64
import json
from datetime import datetime

CLIENT_ID = os.environ.get('CLIENT_ID')
CLIENT_SECRET = os.environ.get('CLIENT_SECRET')
HOST = os.environ.get('HOST')

def docGen(doc, data, id, secret):

	headers = {
		"client_id":id,
		"client_secret":secret
	}

	body = {
		"outputFormat":"pdf",
		"documentValues": data,
		"base64FileString":doc
	}

	request = requests.post(f"{HOST}/document-generation/api/GenerateDocumentBase64", json=body, headers=headers)

	return request.json()

with open('invoice.docx', 'rb') as file:
	bd = file.read()
	b64 = base64.b64encode(bd).decode('utf-8')

with open('invoicedata.json', 'r') as file:
	data = json.load(file)

for invoiceData in data:
	result = docGen(b64, invoiceData, CLIENT_ID, CLIENT_SECRET)

	if result["base64FileString"] == None:
		print("Something went wrong.")
		print(result)
		sys.exit()

	b64_bytes = result["base64FileString"].encode('ascii')
	binary_data = base64.b64decode(b64_bytes)

	filename = f"invoice_account_{invoiceData["accountNumber"]}.pdf"

	with open(filename, 'wb') as file:
		file.write(binary_data)
		print(f"Done and stored to {filename}")
After importing the necessary modules and loading credentials from the environment, we define a simple docGen method. This method takes the template, data, and credentials, then calls the API endpoint. The API responds with the rendered PDF in Base64 format, which the method returns.
The main code of the template breaks down to:
- Reading in the template and converting it to base64.
- Reading in the JSON file
- Iterating over each block of invoice data and calling the API
- Remember how I said
accountNumberwasn't used in the template? We actually use it here to generate a unique filename. Technically, you don't need to store the results at all. You could take the raw binary data and email it. But having a copy of the results does mean you can re-use it later, such as if the customer is late to pay.
Here's an example of one of the results:

Next Steps
If you want to try this demo yourself, first grab yourself a shiny free set of credentials and then head over to our GitHub to grab the template, Python, and sample output values yourself.