

Introducing PDF APIs from Foxit
At the end of June, Foxit introduced a brand-new suite of tools to help developers work with documents. These APIs cover a wide range of features, including:
- Convert between Office document formats and PDF files seamlessly
- Optimize, manipulate, and secure PDFs with advanced APIs
- Generate dynamic documents using Microsoft Word templates
- Extract text and images from PDFs with powerful tools
- Embed PDFs into web pages in a context-aware, controlled manner
- Integrate with eSign APIs for streamlined signature workflows
These APIs are simple to use, and best of all, follow the “don’t surprise me” principal of development. In this post, I’m going to demonstrate one simple example – converting a Word document to PDF – but you can rest assured that nearly all the APIs will follow incredibly similar patterns. I’ll be using Python for my examples here, but will link to a Node.js version of the same example. And given that we’re talking REST APIs here, any language is welcome to join the document party. Let’s dive in.
Credentials
Before we go any further, head over to our developer portal and grab a set of free credentials. This will include a client ID and secret values you’ll need to make use of the API.
Don’t want to read all of this? You can also follow along by video:
API Flow
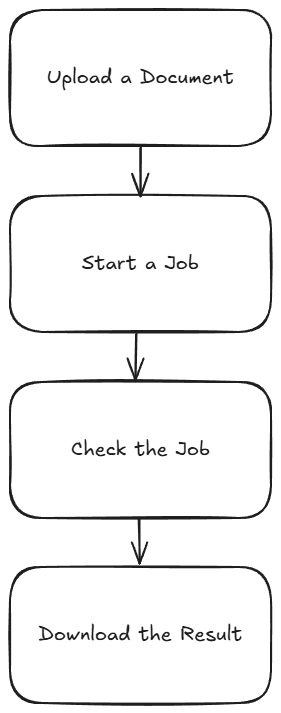
As I mentioned above, most of the PDF Services APIs will follow a similar flow. This comes down to:
- Upload your input (like a Word document)
- Kick off a job (like converting to PDF)
- Check the job (hey, how ya doin?)
- Download the result
Or, in pretty graphical format –
The great thing is, once you’ve completed one integration (this post focuses on converting Word to PDF), switching to another is easy—and much of your existing code can be reused. A lazy developer is happy developer! Let’s get started.
Loading Credentials
My script begins by loading the credentials and API root host via the environment:
CLIENT_ID = os.environ.get('CLIENT_ID')
CLIENT_SECRET = os.environ.get('CLIENT_SECRET')
HOST = os.environ.get('HOST')
It’s never a good idea to hard-code credentials in your code. But if you do it this one time, I won’t tell. Honest.
Uploading Your Input
As I mentioned, in this example we’ll be making use of the Word to PDF API. Our input will be a Word document, which we’ll upload to Foxit using the upload API. This endpoint is fairly simple – aside from your credentials, all you need to provide is the binary data of the input file. Here’s the method I created to make this process easier:
def uploadDoc(path, id, secret):

    headers = {
        "client_id":id,
        "client_secret":secret
    }

    with open(path, 'rb') as f:
        files = {'file': (path, f)}

        request = requests.post(f"{HOST}/pdf-services/api/documents/upload", files=files, headers=headers)
        return request.json()
And here’s how it’s used:
doc = uploadDoc("../../inputfiles/input.docx", CLIENT_ID, CLIENT_SECRET)
print(f"Uploaded doc to Foxit, id is {doc['documentId']}")
The upload API only returns one value, a documentId, which we can use in future calls.
Starting the Job
Each API operation is a job creator. By this I mean you call the endpoint and it begins your action. For Word to PDF, the only required input is the document ID from the previous call. We can build a nice little wrapper function like so:
def convertToPDF(doc, id, secret):

    headers = {
        "client_id":id,
        "client_secret":secret,
        "Content-Type":"application/json"
    }

    body = {
        "documentId":doc
    }

    request = requests.post(f"{HOST}/pdf-services/api/documents/create/pdf-from-word", json=body, headers=headers)
    return request.json()
And then call it like so:
task = convertToPDF(doc["documentId"], CLIENT_ID, CLIENT_SECRET)
print(f"Created task, id is {task['taskId']}")
The result of this call, if no errors were found, isa taskId. We can use this to gauge how the job’s performing. Let’s do that now.
Job Checking
Ok, so the next part can be a bit tricky depending on your language of choice. We need to use the task status endpoint to determine how the job is performing. How often we do this, how quickly and so forth, will depend on your platform and needs. For our little sample script here, everything is running at once. I wrote a function that will check the status. If the job isn’t finished (whether successful or not), it pauses briefly before trying again. While this approach isn’t the most sophisticated, it should work well enough for basic testing:
def checkTask(task, id, secret):

    headers = {
        "client_id":id,
        "client_secret":secret,
        "Content-Type":"application/json"
    }

    done = False
    while done is False:

        request = requests.get(f"{HOST}/pdf-services/api/tasks/{task}", headers=headers)
        status = request.json()
        if status["status"] == "COMPLETED":
            done = True
            # really only need resultDocumentId, will address later
            return status
        elif status["status"] == "FAILED":
            print("Failure. Here is the last status:")
            print(status)
            sys.exit()
        else:
            print(f"Current status, {status['status']}, percentage: {status['progress']}")
            sleep(5)
As you can see, I’m using a while loop that—at least in theory—will continue running until a success or failure response is returned, with a five-second pause between each call. You can adjust that interval as needed—test different values to see what works best for your use case. Typically, most API calls should complete in under ten seconds, so a five-second delay felt like a reasonable default.
Each call to the endpoint returns a task status result. Here’s an example:
{
    'taskId': '685abc95a0d113558e4204d7',
    'status': 'COMPLETED',
    'progress': 100,
    'resultDocumentId': '685abc952475582770d6917b'
}
The important part here is the status. But you could also use progress to give some feedback to the code waiting for results. Here’s my code calling this:
result = checkTask(task["taskId"], CLIENT_ID, CLIENT_SECRET)
print(f"Final result: {result}")
Downloading Your Result
The last piece of the puzzle is simply saving the result. If you noticed above, the task returned a resultDocumentId value. Taking that, and the [Download Document](NEED LINK) endpoint, we can build a utility to store the result like so:
def downloadResult(doc, path, id, secret):

    headers = {
        "client_id":id,
        "client_secret":secret
    }

    with open(path, "wb") as output:

        bits = requests.get(f"{HOST}/pdf-services/api/documents/{doc}/download", stream=True, headers=headers).content
        output.write(bits)
And finally, call it:
downloadResult(result["resultDocumentId"], "../../output/input.pdf", CLIENT_ID, CLIENT_SECRET)
print("Done and saved to: ../../output/input.pdf")
And that’s it! While this script could certainly benefit from more robust error handling, it demonstrates the basic flow. As mentioned, most of our APIs follow this same logic.
Next Steps
Want the complete scripts? Get it on GitHub.
Want it in Node.js? Get it on GitHub.
Rather try this yourself? Sign up for a free developer account now. Need help? Head over to our developer forums and post your questions and comments.