Most document automation tutorials stop at the happy path. Generate a PDF, send it for signature, done. What they skip is the plumbing, which is where a real pipeline lives or dies. How does a CRM event actually hand off to a document API? How do you pass a signed document downstream without a polling loop? What happens when one step fails halfway through and you do not want to re-run the steps that already succeeded?
If you have tried to stitch a multi-step document workflow across a CRM, a generator, and an eSign service, you know exactly where the seams are. The deal data lives in the CRM, the template lives somewhere else, the signature lives in a third system, and a person ends up copying state between them.
This tutorial closes those seams. A CRM deal-closed event fires a webhook, a workflow renders a contract from a Word template, routes it for signature, waits for completion, and archives the signed file, with no human in the loop. You will build it first in n8n, a source-available workflow tool, and then rebuild the same pipeline as a durable function with Vercel Workflows. Both use the Foxit Document Generation API and the Foxit eSign API with real endpoints and real request shapes.
Durability is the theme. A production pipeline must survive a step failure, retry without repeating completed work, and hold state across an asynchronous signing wait that can last minutes or days.
Architecture Overview: Two Ways to Build the Same Pipeline
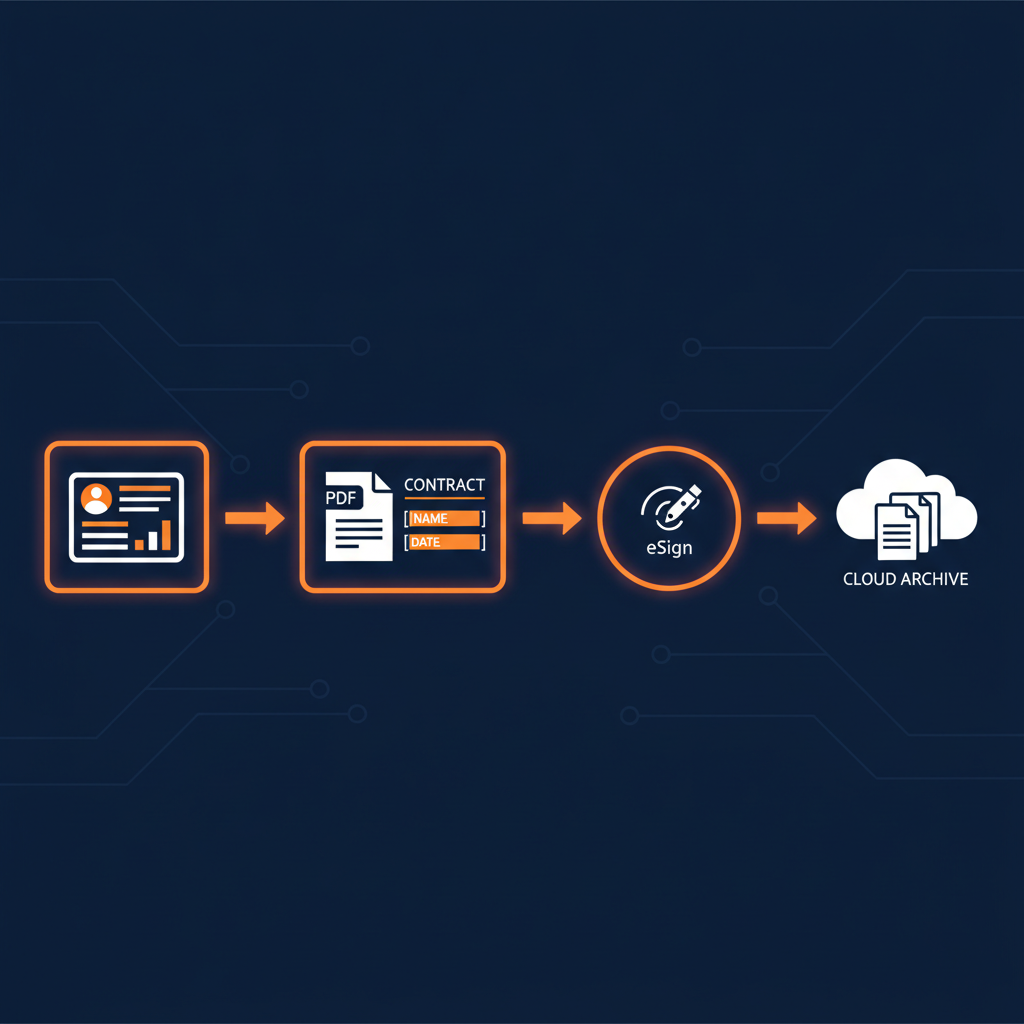
The pipeline is four stages, and each hands its output directly to the next.
Trigger. A CRM webhook (a HubSpot deal-stage change in this example) delivers the deal data.
Generate. The workflow renders a contract PDF from a Word template through Document Generation, a synchronous REST call with no SDK to install.
Sign. The rendered PDF goes straight to the eSign API, which creates a signing folder and routes it to the signer.
Archive. When signing completes, the workflow downloads the executed PDF and writes it to storage.
In n8n, that maps to a Webhook node, an HTTP Request node for generation, an HTTP Request node for signing, a second Webhook node that waits for the eSign completion callback, and a final archive step.
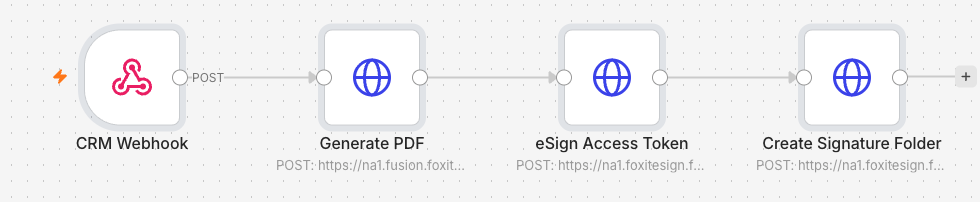
The core chain in the local n8n editor. Each stage is a plain HTTP Request node, and the base64 PDF from the generation node flows straight into the eSign create-folder node.
The same pipeline can be written as code with Vercel Workflows, where the whole flow is one durable function, each Foxit call is a retrying step, and the eSign wait is a hook that resumes when the completion webhook arrives. Reach for n8n when you want visual orchestration and fast prototyping, and for Vercel Workflows when you want code-native durability and already run on Vercel. Section 7 builds that version.
One detail shapes every call. The two APIs live on two hosts and authenticate differently. Document Generation runs on https://na1.fusion.foxit.com and takes client_id and client_secret request headers. eSign runs on https://na1.foxitesign.foxit.com and takes an OAuth2 bearer token obtained from /api/oauth2/access_token.
Step 1: Credentials and Template Prep
The whole build runs on free infrastructure. Run n8n as the self-hosted Community Edition in Docker, and use Foxit’s free Developer plan. There is no n8n Cloud plan and no paid Foxit tier involved.
Register a Foxit account at account.foxit.com/site/sign-up, verify your email, and activate the free Developer plan. From the APIs Dashboard, copy your Document Generation Client ID and Client Secret. The eSign API is provisioned separately, so once eSign is active on your account, retrieve its API Key and API Secret as a distinct pair. You end up with two credential sets, and they are not interchangeable.
Store the Document Generation pair once in n8n’s credential store rather than pasting keys into nodes. Because Foxit needs two custom headers, use the Custom Auth credential type, which is the same type Foxit’s published template uses. Create a credential with this JSON:
{
  "headers": {
    "client_id": "YOUR_FOXIT_CLIENT_ID",
    "client_secret": "YOUR_FOXIT_CLIENT_SECRET"
  }
}
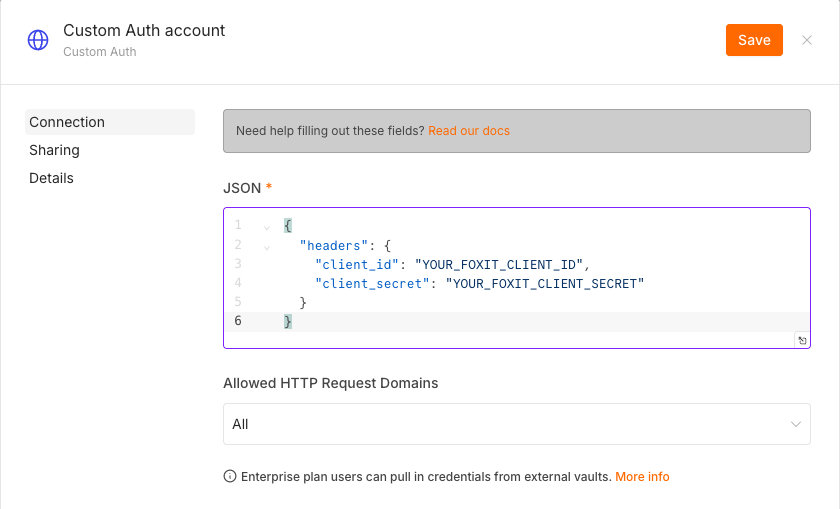
The Custom Auth credential holds both Foxit headers in one place, so your keys never appear in a node field or an exported workflow.
Now the template. Because the goal is a signing-ready contract, one Word file carries two families of tags. Document Generation merge tags use double braces for data, and eSign Text Tags use dollar-brace syntax for signature fields. Download the ready-to-use sample, contract_signing.docx. It carries {{clientName}}, {{dealValue \# "$#,##0.00"}}, {{contractDate \@ MM/dd/yyyy}}, a {{TableStart:lineItems}} / {{TableEnd:lineItems}} loop for line items, and the eSign Text Tags ${signfield:1:y} and ${datefield:1:y}. The Text Tag format is ${fieldtype:party:mandatory}, so ${signfield:1:y} is a required signature for party 1. Keep the raw file under about 3 MB, for the reason covered in Step 2.
Step 2: CRM Webhook to DocGen, Generating the Contract
Start the workflow with a Webhook node, which is how a CRM will call your pipeline when a deal closes. Set the method to POST and give it a path such as deal-closed. n8n gives the node a Test URL for building and a Production URL for live traffic.
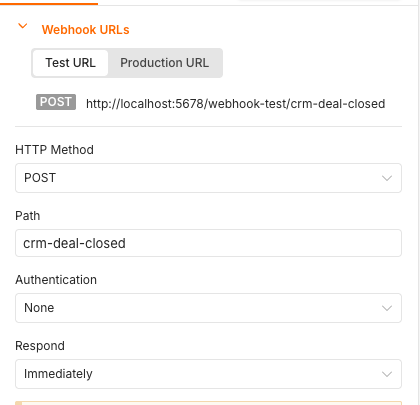
The Webhook node’s Test URL. Click “Listen for test event” to capture a sample request while building.
Because a local build has no real CRM pointed at it, fire the webhook yourself. Click Listen for test event, copy the Test URL, and send a sample deal payload with cURL:
curl -X POST "http://localhost:5678/webhook-test/deal-closed" \
  -H "Content-Type: application/json" \
  -d '{ "clientName": "Acme Robotics", "dealValue": 48500, "contractDate": "2026-07-02" }'
In this request, you POST a small JSON object standing in for the CRM’s deal-closed payload. The Webhook node captures it and its fields become available to later nodes as {{ $json.body.clientName }}. In production, register the node’s Production URL in your CRM’s webhook settings, and expose your local instance with a tunnel such as ngrok if you are testing before deploying.
Add an HTTP Request node for generation. Set the method to POST, the URL to https://na1.fusion.foxit.com/document-generation/api/GenerateDocumentBase64, attach the Custom Auth credential, turn on Send Body, choose JSON, and send:
{
  "base64FileString": "<base64-encoded contract_signing.docx>",
  "documentValues": {
    "clientName": "{{ $json.body.clientName }}",
    "dealValue": "{{ $json.body.dealValue }}",
    "contractDate": "{{ $json.body.contractDate }}",
    "lineItems": [
      { "description": "Platform license (annual)", "amount": "$36,000.00" },
      { "description": "Premium support", "amount": "$5,000.00" }
    ]
  },
  "outputFormat": "pdf"
}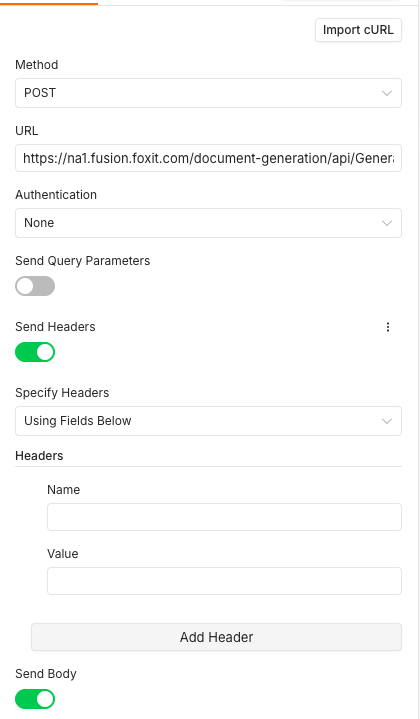
The HTTP Request config panel. Set the method and URL, attach the credential, and turn on Send Body for the JSON payload.
In this body, base64FileString is the template encoded as base64, documentValues is a flat object whose keys match the template tags exactly and whose values come from the webhook payload, and outputFormat is the lowercase "pdf". The keys must match the tag names character for character, because a mismatch does not raise an error. The call returns HTTP 200 and that field simply renders blank, so confirm names with POST /document-generation/api/AnalyzeDocumentBase64 if a field comes back empty. One more limit to plan for, since it surfaces as a bare HTTP 500 rather than a friendly message. Document Generation rejects a .docx payload larger than 4 MB after base64 encoding, which is roughly a 3 MB raw file, so compress images and drop embedded fonts if the template is heavy.
The endpoint is synchronous. The response carries message, fileExtension, and base64FileString, where the last holds the rendered PDF as base64. There is no job id and no polling, which keeps the graph linear. The generated contract has the data merged in and the Text Tags still present in the text, ready for signing.
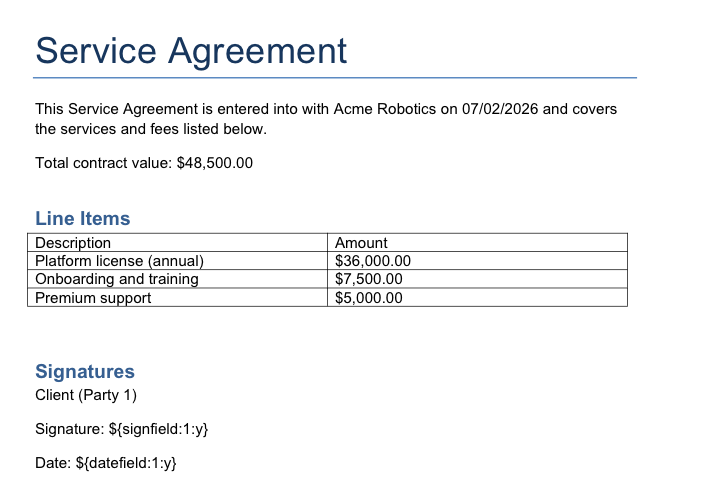
The generated PDF. The merge tags are filled and the ${signfield:1:y} and ${datefield:1:y} Text Tags survive into the output, where eSign will convert them into fields.
Step 3: Routing the PDF into eSign
The eSign leg starts by turning your eSign credentials into a bearer token. Add an HTTP Request node that POSTs to https://na1.foxitesign.foxit.com/api/oauth2/access_token, with the body sent as Form Urlencoded and four fields, grant_type set to client_credentials, client_id, client_secret, and scope set to read-write. The response is JSON with access_token, token_type (the string bearer), expires_in, and instance_url. This is a standard OAuth2 client-credentials grant defined in RFC 6749. Cache the token against expires_in and refresh before it lapses rather than minting one per run.
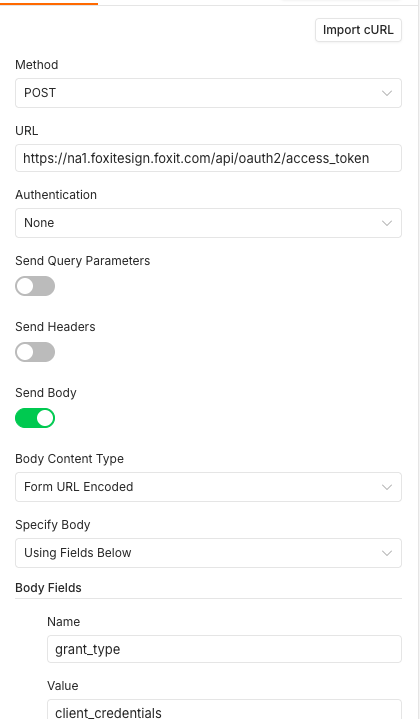
The token node uses a Form URL Encoded body with the four OAuth fields. Click Execute step to confirm it returns a token before wiring the rest.
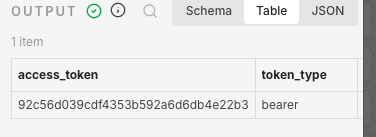
A successful token call. The green check and the returned access_token confirm the credentials and endpoint are correct.
Now add the send-for-signature node. POST to https://na1.foxitesign.foxit.com/api/folders/createfolder with an Authorization: Bearer <access_token> header and this body:
{
  "folderName": "Contract - {{ $('Webhook').item.json.body.clientName }}",
  "inputType": "base64",
  "base64FileString": ["{{ $('Generate PDF').item.json.base64FileString }}"],
  "fileNames": ["contract.pdf"],
  "processTextTags": true,
  "sendNow": true,
  "parties": [
    {
      "firstName": "Alex",
      "lastName": "Rivera",
      "emailId": "[email protected]",
      "permission": "FILL_FIELDS_AND_SIGN",
      "sequence": 1,
      "workflowSequence": 1
    }
  ]
}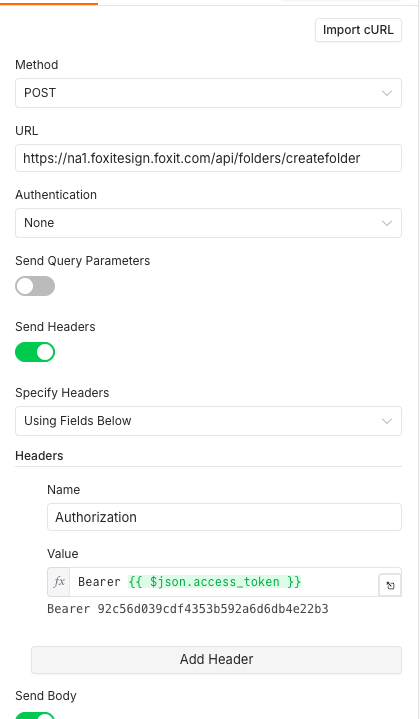
The create-folder node. The Authorization header value Bearer {{ $json.access_token }} pulls the token from the previous node.
In this call, inputType is "base64" and base64FileString is an array holding the PDF from Step 2, which is the direct handoff between the two APIs. processTextTags: true converts the embedded Text Tags into real fields, and sendNow: true dispatches the folder in the same request. The response nests the identifier at folder.folderId, which you keep for the completion step. One rule fails silently, so check it. Every party number used in a Text Tag must have a matching entry in parties, or a sendNow: true call returns success while dropping that party’s fields. If you prefer a review gate, set sendNow: false and dispatch later with POST /api/folders/sendDraftFolder.
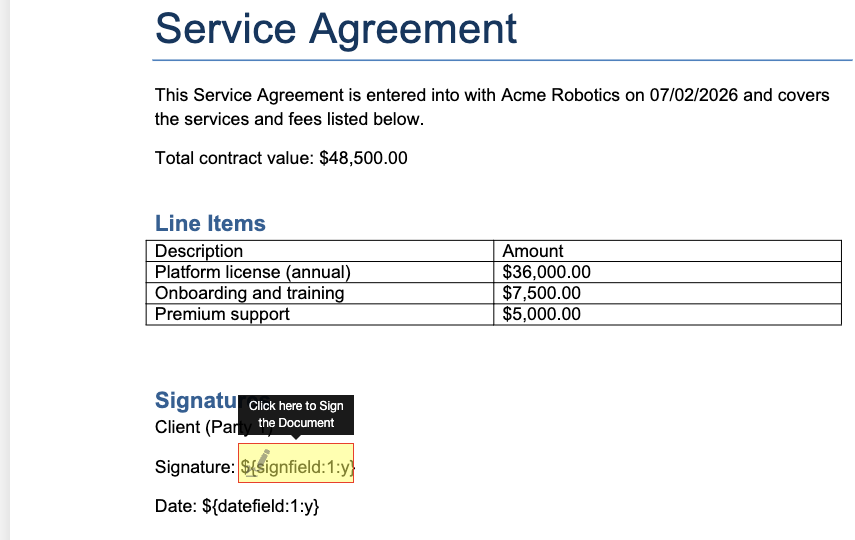
What the signer receives, from a real run of this exact pipeline. The ${signfield:1:y} tag in the template has become an interactive signature field, which confirms processTextTags did its job on the generated contract.
Step 4: eSign Completion Webhook and Archive
Register your callback URL in the eSign portal’s API settings page, under the Configure Webhooks section. This page is visible to the account owner once API access is active, so a non-owner login will not see it. Provide the HTTPS callback URL, a Webhook Secret, and the events you want delivered.
Archive at the right moment by understanding the lifecycle. A folder moves through DRAFT, then SHARED, then PARTIALLY SIGNED, then COMPLETED when all signatures are collected, then EXECUTED a few seconds later once the digital signature is applied. Hook folder_executed, not folder_completed, so the file you store is the finalized, digitally signed PDF.
Add a second Webhook node to receive the callback. Each callback POSTs a JSON body with event_name, event_date in Unix milliseconds, and data, where data.folder carries folderId, folderStatus, folderDocumentIds, and documentsList. Verify authenticity against the HMAC-SHA-256 digest Foxit computes over the raw request body with your Webhook Secret and appends to the callback URL as a signature query parameter. Compare against the raw body bytes, not a re-serialized payload.
On completion, download the executed document and archive it. A GET to https://na1.foxitesign.foxit.com/api/folders/download?folderId={id} with the bearer token returns the signed PDF as application/pdf. Route that binary to a storage node such as Google Drive, an S3 bucket, or an internal file-system node, then fire any downstream update.
Not every send completes, so handle the abandoned-signer path. If the completion webhook never fires, use an n8n Wait node with a timeout, or poll GET /api/folders/viewActivityHistory?folderId={id} (GET only, and it responds once the folder is shared) to read the audit trail, then branch to a follow-up rather than hanging.
The Vercel Workflows Alternative
If your stack already runs on Vercel, you can build the same pipeline as a durable function instead of a visual graph. Vercel Workflows is built on the open-source Workflow SDK. Scaffold a Next.js app, add the SDK, and wrap the config so the build compiles your workflow functions into durable routes:
npm create next-app@latest foxit-vercel-workflow
cd foxit-vercel-workflow
npm i workflow
// next.config.ts
import { withWorkflow } from "workflow/next";
import type { NextConfig } from "next";
const nextConfig: NextConfig = {};
export default withWorkflow(nextConfig);A CRM would kick off a run by POSTing to an API route, which starts the workflow with start() and returns immediately while the durable function runs in the background:
// app/api/trigger/route.ts
import { NextResponse } from "next/server";
import { start } from "workflow/api";
import { contractWorkflow, type Deal } from "@/workflows/contract";

export async function POST(req: Request) {
  const deal = (await req.json()) as Deal;
  await start(contractWorkflow, [deal]);
  return NextResponse.json({ started: true });
}
The orchestration function carries the 'use workflow' directive, which makes it resumable and able to survive deploys and crashes through deterministic replay. It generates the contract, sends it for signature, then awaits a hook keyed by the folderId until the signing completes:
// workflows/contract.ts
import { signatureHook } from "./hooks";

export async function contractWorkflow(deal: Deal) {
  "use workflow";

  const pdfBase64 = await generateContract(deal);
  const folderId = await sendForSignature(pdfBase64, deal);

  // Pause here, consuming no compute, until the eSign webhook resumes it.
  const completion = await signatureHook.create({ token: String(folderId) });

  const archivedBytes = await archiveSigned(folderId);
  return { folderId, event: completion.event_name, archivedBytes };
}
Each Foxit call becomes a step. A function with the 'use step' directive runs a unit of durable work and gets built-in retries on transient failures like network errors, so a flaky call is retried without re-running the rest of the pipeline.
// app/steps/generate-contract.ts
async function generateContract(deal: Deal) {
  'use step';

  const res = await fetch(
    'https://na1.fusion.foxit.com/document-generation/api/GenerateDocumentBase64',
    {
      method: 'POST',
      headers: {
        client_id: process.env.FOXIT_DOCGEN_CLIENT_ID!,
        client_secret: process.env.FOXIT_DOCGEN_CLIENT_SECRET!,
        'Content-Type': 'application/json',
      },
      body: JSON.stringify({
        base64FileString: TEMPLATE_B64,
        documentValues: deal,
        outputFormat: 'pdf',
      }),
    },
  );
  const { base64FileString } = await res.json();
  return base64FileString;
}
The eSign wait is a hook, not a poll. Define a hook, create it keyed by the folderId, and resume it from an API route when Foxit POSTs the completion webhook. The workflow pauses without consuming compute and resumes exactly where it left off.
// workflows/hooks.ts
import { defineHook } from "workflow";

export type FoxitCompletion = {
  event_name: string;
  data: { folder: { folderId: number; folderStatus: string } };
};

export const signatureHook = defineHook<FoxitCompletion>();
// app/api/foxit-webhook/route.ts
import { signatureHook } from "@/workflows/hooks";
export async function POST(req: Request) {
const payload = await req.json();
const folderId = payload?.data?.folder?.folderId;
// Resume only on the terminal event, so earlier lifecycle events
// (viewed, signed, completed) do not consume the single-use hook.
if (folderId && payload?.event_name === "folder_executed") {
await signatureHook.resume(String(folderId), payload);
}
return new Response("OK");
}In this code, the workflow calls two steps and then waits on signatureHook. When Foxit’s folder_executed webhook hits /api/foxit-webhook, the route calls hook.resume with the folderId as the key, which wakes the paused workflow and hands it the payload so it can archive the signed document. The event_name check matters, because the same account webhook also delivers folder_viewed, folder_signed, and folder_completed, and any of those would otherwise consume the single-use hook early. Use sleep() from the workflow package for a timeout fallback if the signer never acts. The credential and endpoint facts are identical to the n8n version, since only the orchestration layer changed. The Workflow Concepts page documents the directives, sleep, and hooks in full, and the full runnable project is in the demo repo.
Deployed to Vercel and triggered with a sample deal, the run shows up under Observability, where you can watch runs pause and resume in real time.
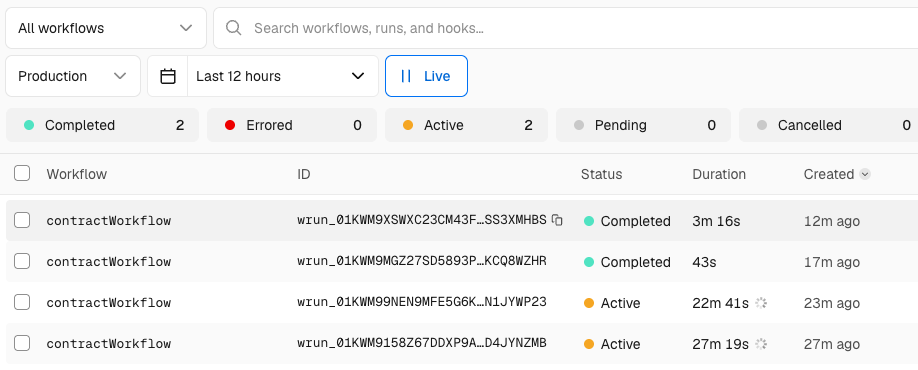
The Workflows runs list in the Vercel dashboard. A run stays Active while it is paused on the signing hook, then flips to Completed once the eSign webhook resumes it.
Opening a completed run shows the whole durable pipeline as a trace. The two Foxit steps run in seconds, the hook span (named by the folderId) accounts for the multi-minute wait while the document sat unsigned, and archiveSigned runs the instant the real folder_executed webhook resumes the workflow.
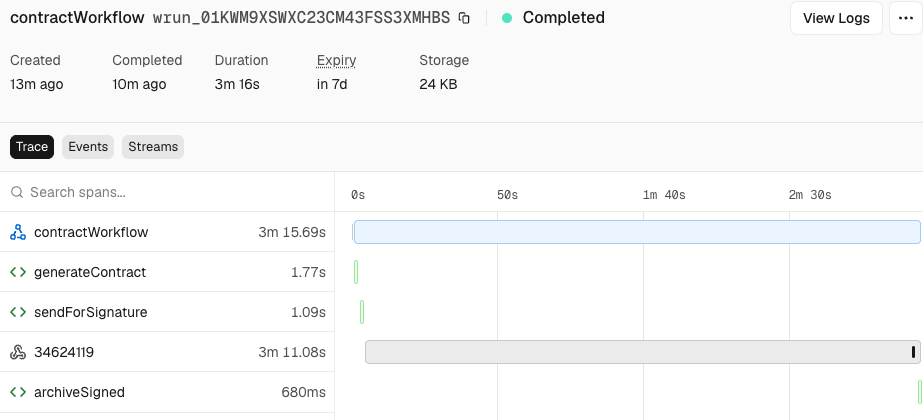
A completed run trace. generateContract (1.77s) and sendForSignature (1.09s) are the real Foxit calls, the 34624119 span is the hook paused for about three minutes until the document was signed, and archiveSigned (680ms) downloads the executed PDF once the webhook fires.
CRM-Triggered Document Pipeline FAQ
Does the Foxit Document Generation API support formats other than PDF?
Yes. Set outputFormat to "docx" to get a merged Word document back instead of a PDF. That’s useful for contracts that need further edits or approvals before going to eSign.
Can I use the eSign API without DocGen?
Yes. createfolder accepts a PDF from any source, such as a publicly accessible URL, multipart form data, or a base64 string you’ve encoded from an existing file. DocGen and eSign are independent APIs that pair well together because DocGen’s base64 output is exactly what createfolder’s inputType: “base64” mode expects, but neither requires the other.
What happens if a signer doesn’t sign within the expected window?
The folder stays in SHARED or PARTIALLY_SIGNED status indefinitely with no automatic expiry. You’re responsible for detecting stalled folders. In n8n, use a Wait node with a timeout. In Vercel Workflows, use sleep() inside a Promise.race. Both paths let you branch to a follow-up action rather than letting the workflow hang.
How do I handle multiple signers who must sign in order?
Add multiple objects to the parties array with sequential sequence values (1, 2, 3…). The eSign API dispatches to party 2 only after party 1 has signed. Make sure each Text Tag in your template references the correct party number (${signfield:2:y} for party 2’s signature field) and that parties includes a matching entry for every number you use.
How do I keep my eSign Bearer token fresh?
The token response includes expires_in in seconds. Cache the token with a timestamp, check before each call whether you’re within a safe margin of expiry (60 seconds is reasonable), and re-fetch from POST /api/oauth2/access_token when needed. Fetching a new token on every API call adds unnecessary latency and wastes credits.
Can this pipeline handle multiple documents in a single eSign envelope?
Yes. base64FileString is an array. Pass multiple base64-encoded PDFs alongside their corresponding fileNames, and all documents will be included in the same folder for the signer to complete in one session.
What is a CRM-triggered document pipeline and why does it matter?
A CRM-triggered document pipeline is an automated workflow that listens for a CRM event, such as a deal moving to “closed won” in HubSpot, and automatically generates, sends for signature, and archives a contract without human intervention. It matters because manual document handling after a deal closes introduces delays, missed steps, and no audit trail when something fails silently mid-process.
Test End-to-End and Harden for Production
Prove the pipeline by firing a sample deal at the n8n Webhook Test URL with the cURL command from Step 2. Confirm the Document Generation call returns a base64 PDF, the eSign folder is created with a folder.folderId, and the signing email reaches your test address. Running the middle by hand first means you catch a bad credential or a tag mismatch before any nodes downstream depend on it.
Harden the credentials next. Store client_id, client_secret, and the eSign keys as n8n credentials or Vercel environment variables, never as plaintext in node config, and add an n8n error workflow that alerts on any 4xx or 5xx from either Foxit API. Distinguish a 4xx (fix the payload) from a 5xx (retry with backoff).
Finally, size for credits. Each Document Generation call and each eSign send consumes credits, so read the Foxit API credits reference before going to production. The free Developer plan covers 500 credits per year, which is plenty to build and validate the whole pipeline.
Create a free Foxit developer account with no credit card required, grab your Client ID and Secret from the APIs Dashboard, and run your first Document Generation call against the live endpoint before wiring it into a workflow. Create your free account to get started.