Building Agentic Document Workflows: How LLM Agents Use PDF APIs to Convert, Extract, and Sign at Scale
This guide walks through building agentic document workflows by exposing Foxit’s PDF and eSign APIs as callable MCP tools, so any compatible agent host can run the full document lifecycle in one automated pipeline.
Never hardcode credentials in config files. The MCP server reads these at startup and uses them to authenticate every request to the PDF Services API.
What “Agentic” Actually Means for Document Workflows
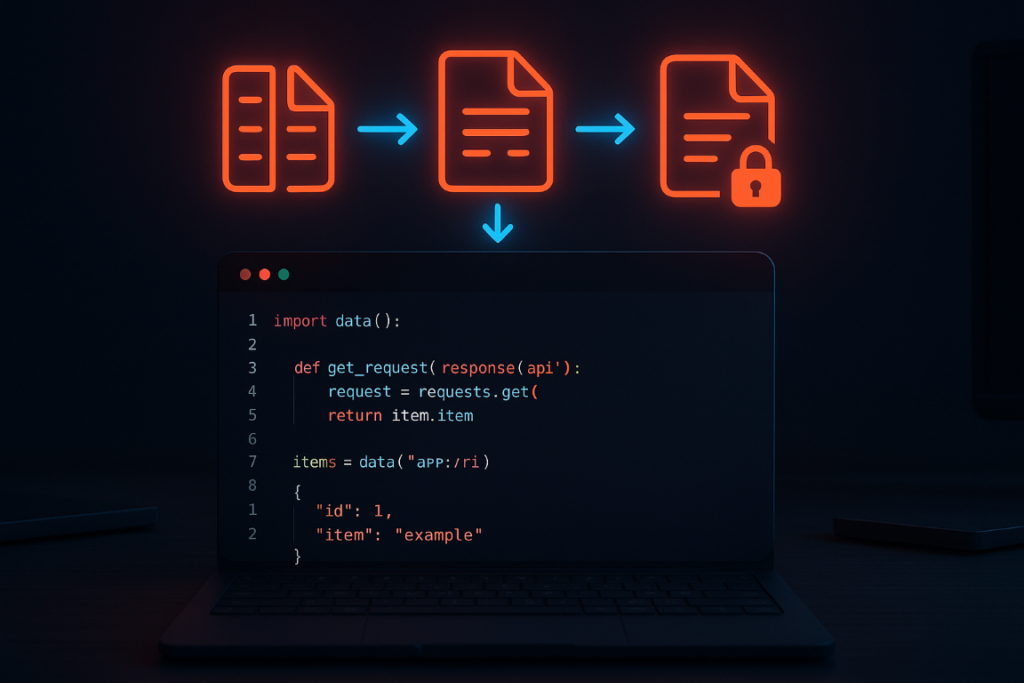
An agentic document workflow executes operations on documents (converting formats, applying OCR, merging pages, routing for signature) rather than simply retrieving text from them. The tool surface required is fundamentally different from a RAG setup.
Retrieval-augmented generation pulls text from a document and injects it into a prompt. An agentic document workflow does something to a document, whether it converts a format, applies OCR to make a scanned image searchable, merges pages from multiple sources, or routes the result for signature.
In a tool-use architecture, the LLM doesn’t call the API directly. It picks the right operation from a catalog of tools based on the task, calls it with structured inputs, processes the result, and decides whether to continue the chain or hand off to the next step. If you’ve worked with web-search or code-execution tools in LangChain or AutoGen, the pattern is identical. The model reasons about which tool to invoke, not about how the underlying HTTP request works.
A REST API is an HTTP surface. An MCP tool is a named, typed function with an input schema, an output contract, and a description the model uses to decide when and whether to call it. MCP standardizes that interface so any compliant host can discover the full tool catalog, call individual operations, and chain results without custom adapter code.
A well-designed MCP server eliminates the bespoke integration layer. Without one, every document-heavy agent pipeline requires someone to write and maintain that plumbing from scratch.
Architecture Overview: Two Modes for Agent-Driven PDF Processing
The Foxit PDF API MCP Server wraps Foxit’s cloud PDF Services API as 30+ callable MCP tools, covering every stage of a document lifecycle. Foxit PDF Editor is the first PDF editor in the industry to act as an MCP Host, connecting outward to external MCP Servers and acting on open documents.
Those two facts define two distinct architectural modes.
Mode 1: Programmatic pipeline. Your MCP host (Claude Desktop, Cursor, VS Code with GitHub Copilot, or a custom agent) registers the Foxit PDF API MCP Server. The agent calls PDF tools directly, the server translates those calls into Foxit PDF Services REST requests, and structured results return to the agent. The agent never writes REST plumbing. This is the right model for automated pipelines running without a human in the loop.
Mode 2: In-app orchestration. Foxit PDF Editor acts as the MCP Host. Its embedded AI Assistant connects to external MCP Servers (Jira, Salesforce, Gmail, Notion, GitHub, Google Workspace) and acts on the open document. You could extract fields from a contract PDF and open a Jira ticket without leaving the editor. This is the right model when a knowledge worker needs AI assistance during document review.
Mode 1 is what the rest of this guide builds. Its data flow runs like this:
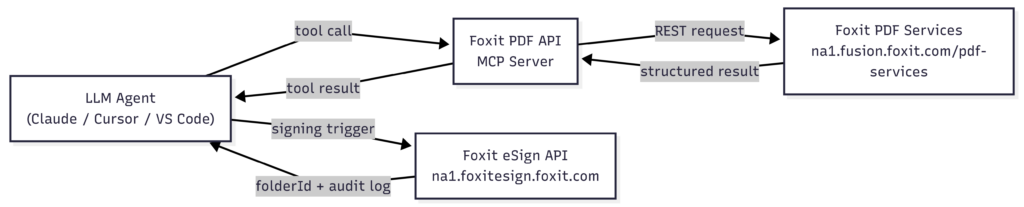
The agent calls tools, the MCP server handles the REST layer against PDF Services, and a prepared document hands off to eSign at the end of the chain.
One detail to understand before you build is that each successful Foxit PDF Services API call consumes one credit from your plan. Failed requests (4xx or 5xx) do not consume credits. The Developer Dashboard shows real-time usage, so you can see exactly what a pipeline costs per document before scaling it up.
Setting Up the Foxit MCP Server
The server exposes tools across six categories (document lifecycle, creation, conversion, manipulation, security, and forms) plus OCR and document compare.
The full tool catalog breaks down as follows:
- Document lifecycle : upload, download, delete
- Creation : Word, Excel, PowerPoint, HTML, URL, plain text, and image to PDF
- Conversion : PDF to Word, Excel, PowerPoint, HTML, plain text, and image
- Manipulation : merge, split, extract pages, compress, flatten, linearize, watermark, and page operations
- Security : add and remove passwords, set permissions
- Forms : export and import form data as JSON
OCR and document compare are also in the catalog. Signing lives in the eSign API covered in Section 6.
Mode 1: Programmatic Pipeline Setup
Clone the repo and pick your implementation. For the Python version with VS Code and GitHub Copilot, create or update your .vscode/mcp.json with the following:
Create Custom Invoices with Word Templates and Foxit Document Generation
This tutorial shows how to design a Word invoice template with dynamic tokens and use Foxit’s Document Generation API and a short Python script to turn JSON data into polished, ready-to-send PDF invoices.


Programmatic PDF Editing with Foxit PDF Services API: Pages, Merges, Splits, and Flattening at Scale
Manually editing PDFs doesn’t scale when you’re processing hundreds of documents a day. This guide uses working Python and cURL examples to walk through the Foxit PDF Editor API’s core operations, covering page manipulation, merging, splitting, and flattening.
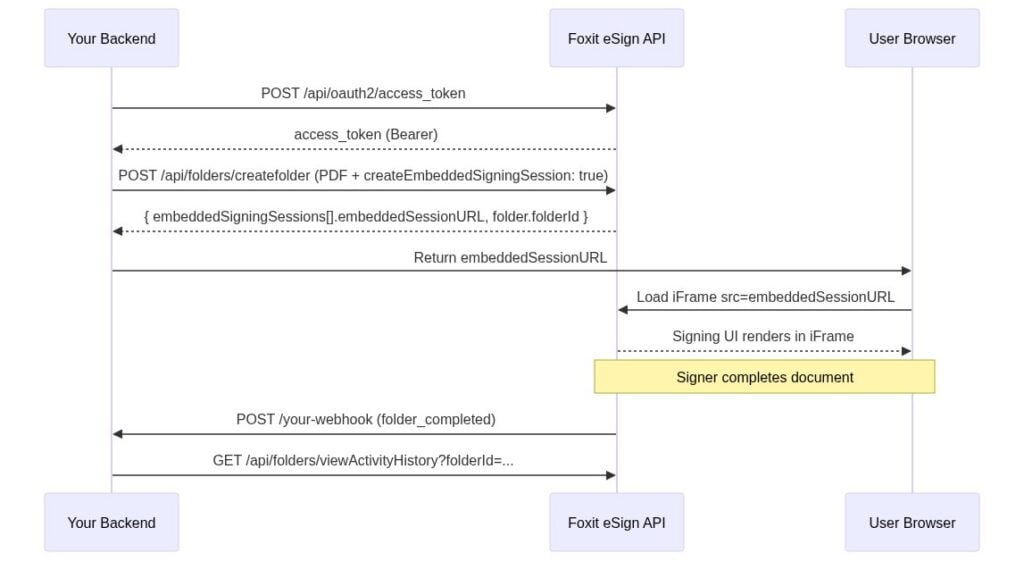
Embedded Signing with the Foxit eSign API: From Envelope Creation to In-App iFrame in One Session
This guide walks through the Foxit eSign API end to end: authenticate, create a folder, generate an embedded session URL, and render the signing experience in an iFrame your users never leave.
DOCX to PDF via the Foxit PDF Services API: Python and cURL Walkthrough
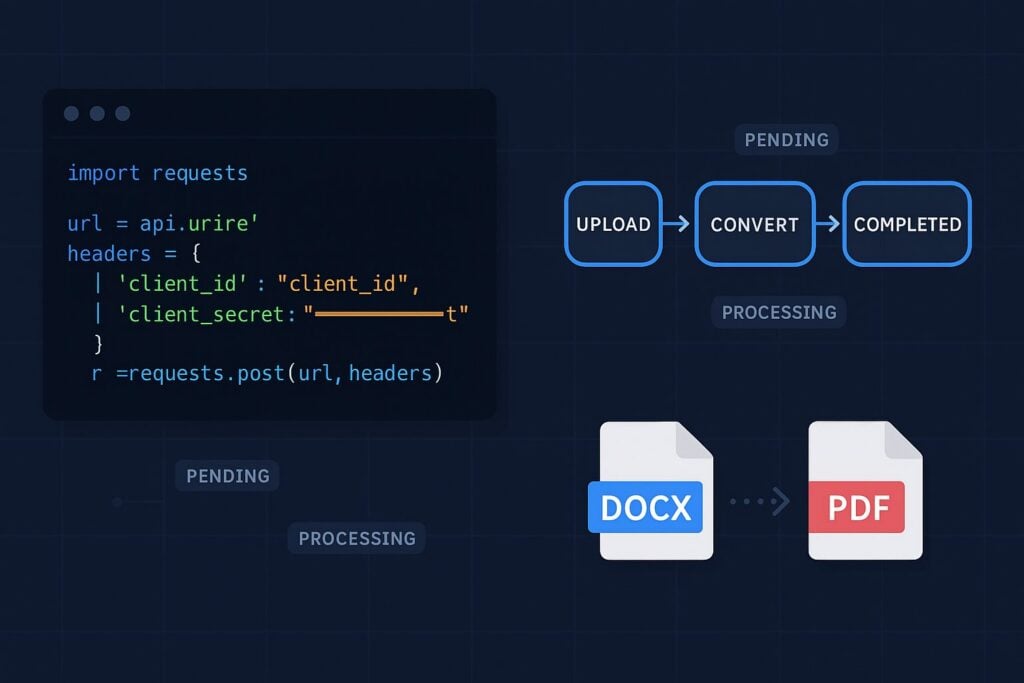
This walkthrough covers the full DOCX-to-PDF flow on the Foxit PDF Services API with runnable Python and cURL for each call.
The endpoint returns 202 Accepted, confirming the job is queued. It also accepts .doc, .rtf, .dot, .dotx, .docm, .dotm, and .wpd files through the same documentId input, so legacy Word formats work through the same pipeline.
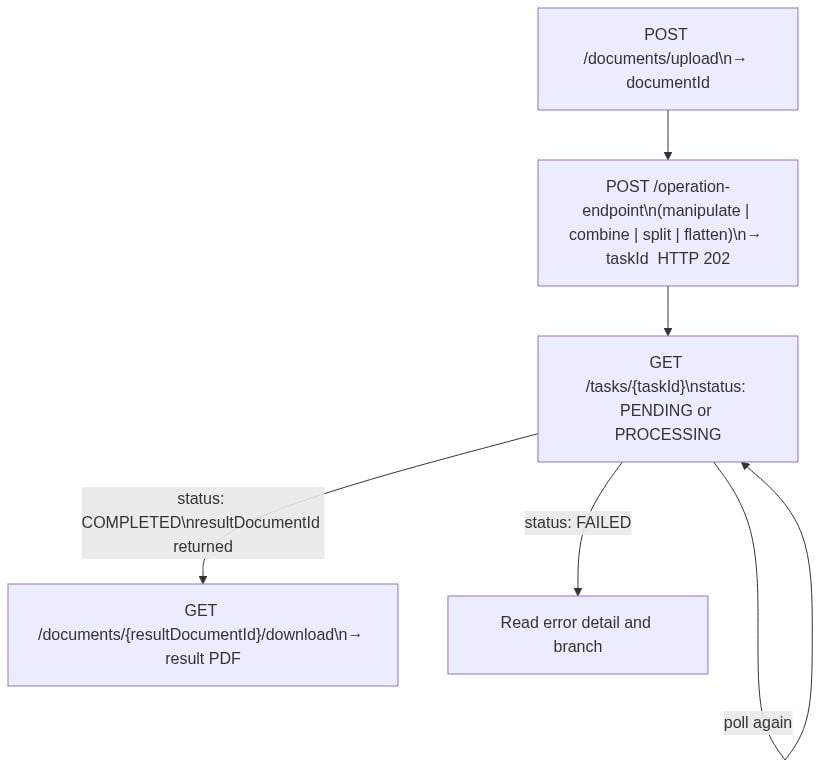
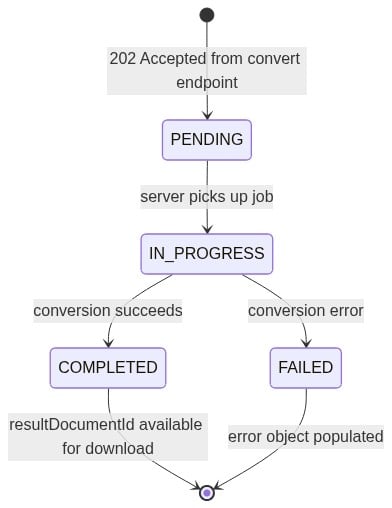
Step 3: Polling the Task Status
GET /pdf-services/api/tasks/{task-id} returns four fields you need to act on in your polling loop:
status: one ofPENDING,IN_PROGRESS,COMPLETED, orFAILEDprogress: int32, 0 to 100resultDocumentId: populated when status reachesCOMPLETEDerror: populated when status reachesFAILED
The task state machine advances in one direction: PENDING to IN_PROGRESS, then to either COMPLETED or FAILED.
Embed Secure eSignatures into Your App with Foxit API

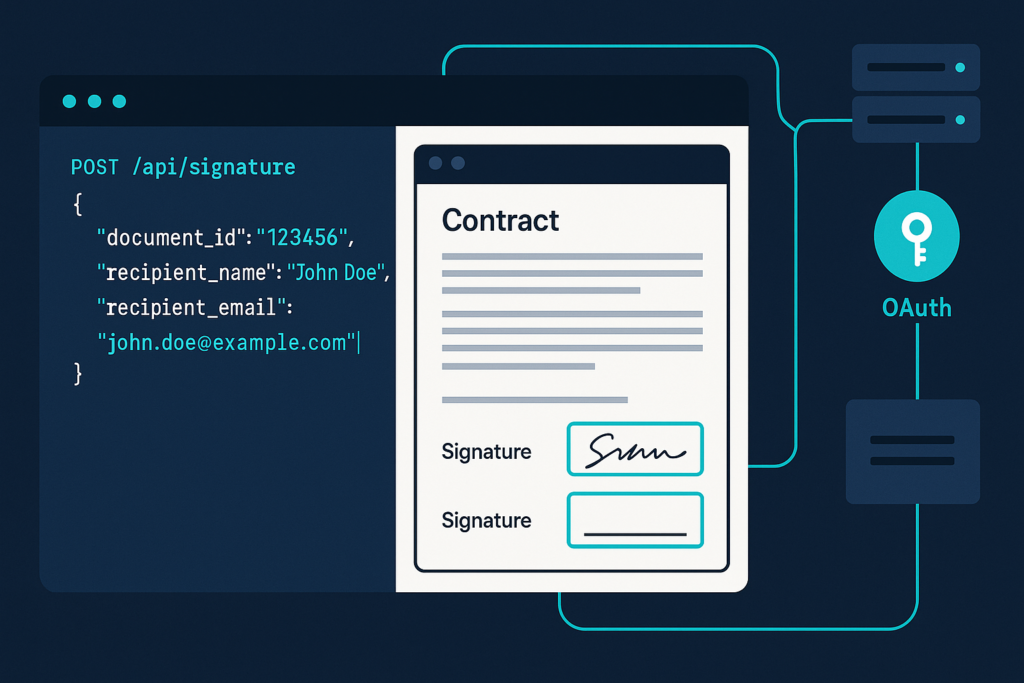
Foxit eSign makes electronic signatures easy, but developers can take it further by automating the process. This tutorial shows how to use the Foxit eSign API to embed secure eSignatures in your apps. With Python code examples, you’ll learn to send documents for signing, dispatch reminders, and check the signing status programmatically.
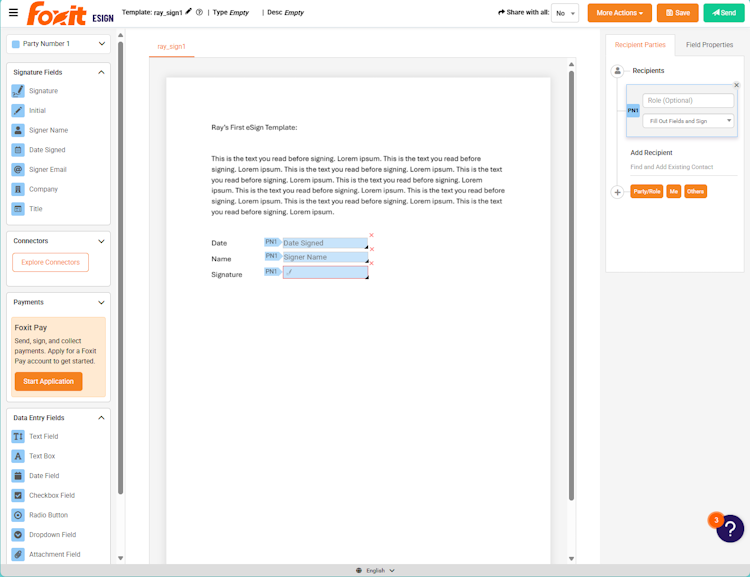
eSign Via API
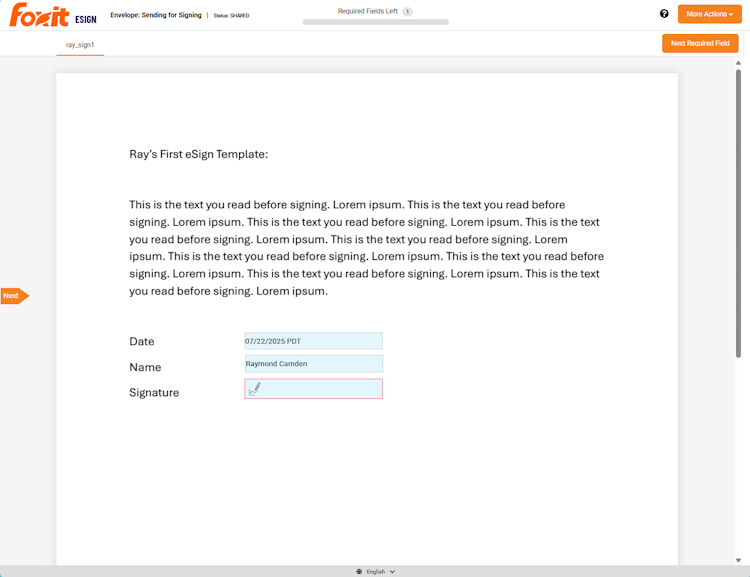
Before digging into the APIs, take a quick look at the API Reference. The signing process itself can get complex. Two, three, or more people may need to sign a document in a specific order, and the template field setup can be done entirely in Word. The focus here is a simple signing example, but nothing stops you from building more advanced, flexible workflows.
The full signing flow this article walks through, end to end:

The first step in any API usage is authentication. When you have an eSign account with API access, you receive a client_id and client_secret value, both of which you exchange for an access token at the appropriate endpoint. You’ll find the client_id and client_secret under the API tab in your Foxit eSign account settings once you’ve activated API access. A simple Python implementation looks like this:
Document Generation Explained: How the Template-to-API Pipeline Actually Works
Manual document workflows break down fast as volume grows. This guide explains what document generation is, how template-driven APIs replace manual processes, and what the pipeline looks like from a Word template and JSON payload to a finished PDF.
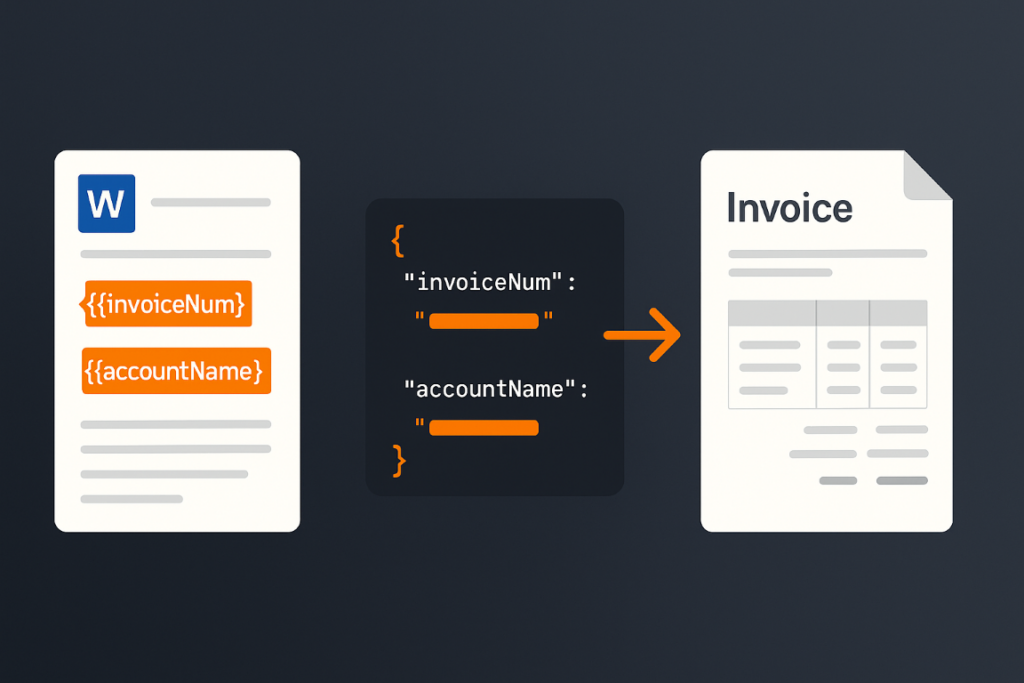
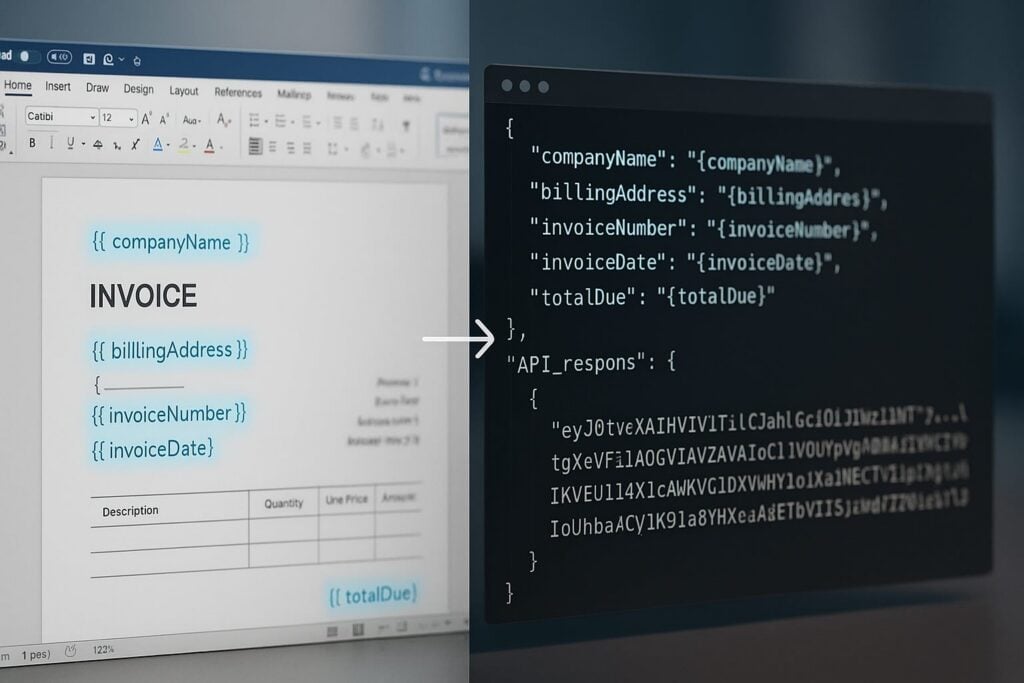
The rendering engine walks the template, matches each token to the corresponding key in the payload, and writes the formatted value into the output. Template authors work entirely in Word, while the engine handles token resolution, format application, and output assembly.
Repeating sections use loop delimiters to produce table rows that repeat for each element in a JSON array. Placing {{TableStart:lineItems}} before a table row and {{TableEnd:lineItems}} after it tells the engine to emit one row per object in the lineItems array. Both delimiters must sit in cells of the same Word table row. Inside that loop, {{ROW_NUMBER}} auto-increments across rows, and a footer row immediately below the loop can use {{=SUM(ABOVE) \# "$#,##0.00"}} to compute and format a column total, so a ten-line invoice produces a correctly numbered, fully summed table with no post-processing.
Conditional content uses Word’s native Field Code View (opened with ALT + F9) to write IF-field conditions that show or hide text blocks based on data values. A clause that should appear only when contractType equals "enterprise" lives inside a field condition, and the rendering engine evaluates it at generation time. There’s no separate scripting layer and no custom expression language to learn.
The three components converge at a single API endpoint: your base64-encoded DOCX template and JSON data payload go in together, and the generated document comes back in the same HTTP response.

The API Pipeline: From POST Request to Final Document
The Foxit DocGen API compresses the generation pipeline into a single synchronous call. You POST to one endpoint with your template and data, and you receive the generated document in the same HTTP response, with no separate template upload step, no job ID to poll, and no webhook to configure for individual document generation.
Before building a generation workflow, you can use the Analyze Document API to scan a DOCX template and return a list of all embedded tokens, which confirms the token-to-key mapping before you commit to a data schema. That’s a single POST to a separate endpoint on the same host, and it returns a structured list of placeholder names and their types.
For the generation call itself, the dev-tier endpoint is:
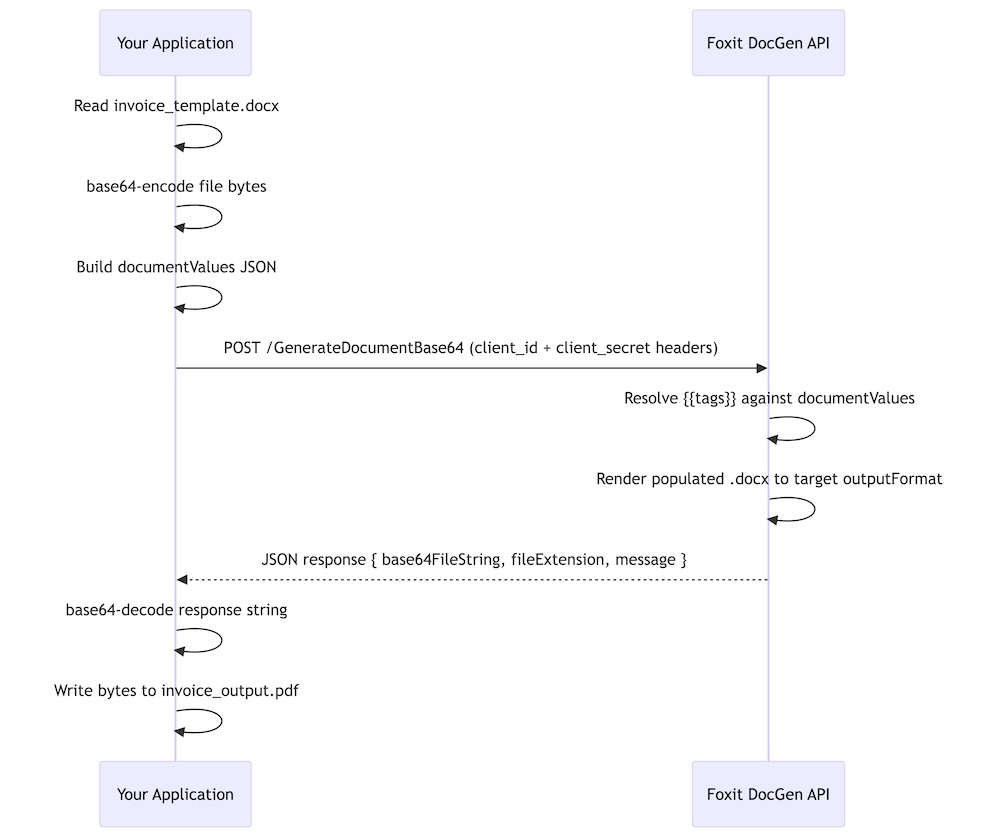
POST https://na1.fusion.foxit.com/document-generation/api/GenerateDocumentBase64
Authentication passes your client_id and client_secret as custom HTTP headers alongside Content-Type: application/json. You retrieve both credentials from the dashboard at account.foxit.com/site/sign-up after activating your free developer plan, with no OAuth exchange and no session setup required before your first call.
The request body takes three fields:
base64FileStringis your DOCX template, base64-encoded. Keep the source.docxunder 4 MB (the practical ceiling for a single request) since base64 encoding inflates the payload by roughly 33%. If a template runs large, embedded images are usually the cause, so compress them through Word’s Picture Format settings before exporting.documentValuesis the JSON object whose keys map to token names in the templateoutputFormatis the string"pdf"or"docx", lowercase and exact (the API returns HTTP 500 for any other value, including"PDF"or"DOCX")
For an invoice template with a lineItems array, the full curl command carries your base64-encoded DOCX, the matching data object, and your credentials in the request headers:
PDF Translation with Verifiable Quality: Build a Confidence-Scored Pipeline with Foxit API and Straker.ai
Most machine translation tools hand back a translated PDF with no signal about which parts to trust — a real problem for contracts, medical forms, and regulatory filings. This guide shows how to build a pipeline that scores every segment before the final render, using Foxit for structural extraction and layout-preserving rendering and Straker.ai for translation plus per-segment quality scoring.
Most machine translation tools give you a translated file and nothing else. They do not tell you which parts are correct and which parts are wrong. For a simple blog post, that is fine. For a contract, a medical form, or a legal notice, it is a real problem. A bad translation can sit in the final PDF for days before anyone notices, often only after the document has already been signed or sent.
Teams today are translating more documents, into more languages, and faster than ever. Legal, finance, healthcare, HR, and insurance teams all deal with PDFs where one wrong word can cause a lot of damage: a broken contract, a failed audit, or even a safety issue. Most translation tools were not built to catch these mistakes. They just move text from one language to another. When quality checks happen at all, they usually mean a person reading the final PDF line by line and hoping they spot the errors.
This article shows how to build a better setup. You will learn how to build a PDF translation pipeline that gives every segment a quality score before the final PDF is created. Instead of hoping the translation is right, the pipeline tells you which parts to trust, which parts to review, and which parts to send back to a human translator. All of this happens automatically on every run.
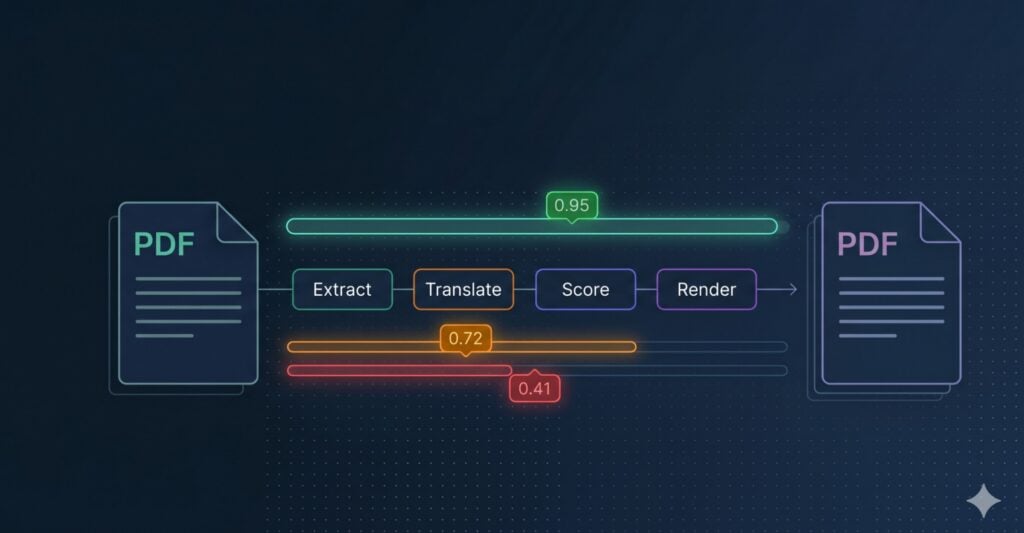
Architecture at a Glance
Before going deeper, it helps to see the full pipeline in one picture. The diagram below traces a source PDF through every stage: extract, translate, score, route, and render. Each box is a single responsibility handled by a single service, with the routing layer acting as the glue you control.

The pipeline has two external services:
- Foxit PDF Translation API handles anything PDF-specific. It pulls the structured text out of the source document with element IDs attached, then renders the final PDF back in the original layout (multi-column text, tables, font substitution, image positions) using the approved translations.
- Straker AI translates each source segment AND scores the translation in the same request. It returns the target text, a numeric score on a 0.0 to 1.0 scale, and a categorical label (
best,good,acceptable,bad) for every element ID. This step is pluggable, so you can swap Straker for DeepL, Google Cloud Translation, AWS Translate, or an in-house NMT if you already have a contract with one of them. The contract between this step and the rest of the pipeline is a flat dict of element IDs to translated text plus per-segment scores.
and one piece of code you own:
- Routing layer is your business logic. It reads the score, decides whether the segment auto-accepts, flags for human review, or escalates to a translator, and then hands the approved set to Foxit’s render call.
With the shape of the pipeline on the table, the rest of the article works through each piece in order, starting with why per-segment quality scoring is worth the integration effort in the first place.
The Quality Gap
You ship a translated PDF to a legal team. Three days later, compliance flags a clause in the German version. The term “indemnification” was rendered as “Entschädigung” (compensation) rather than “Freistellung” (hold harmless). Your MT pipeline returned a 200 status. Nobody’s alerting on that delta.
Raw machine translation output carries no quality signal by default. Every segment comes back translated, and your pipeline treats them identically regardless of whether the model was confident or guessing. For marketing copy that’s an acceptable tradeoff, but for a loan covenant, a clinical trial protocol, or a regulatory filing, a 95%-accurate translation can still be contractually or legally dangerous because the 5% failure may concentrate precisely in the high-stakes clauses.
A confidence score, in the translation QA context, is a per-segment numeric signal from a verification engine. It tells you how reliable each translated unit is on a scale your system can act on programmatically. High-confidence segments auto-accept, medium-confidence ones queue for post-edit review, and low-confidence segments escalate directly to a human translator before they ever reach the final document.
The compound problem for PDFs specifically is that most translation pipelines strip document structure before the MT engine even sees the text. The extraction step flattens multi-column layouts, collapses table cells, and drops font metadata. By the time you get a translated output, you’ve lost both layout fidelity and any quality signal. The rendered PDF looks wrong and you have no programmatic way to know which segments caused it.
Foxit’s PDF Translation Trial API extracts structured text from a source PDF with element IDs preserved, so the layout blueprint travels alongside the text through the entire workflow. You hand the source segments to Straker AI, which returns the translated text plus a per-segment numeric score and a quality label in a single call. (If you already run DeepL, Google Cloud Translation, AWS Translate, or an in-house NMT Engine, you can drop it in at this step without changing the rest of the pipeline.) Your routing logic decides which segments pass, which get flagged, and which escalate to human review. Foxit’s render endpoint then re-assembles the PDF in the original layout using the accepted translations, giving you a layout-preserved translated PDF with a documentable quality trail attached to every segment.
How the Pipeline Works
Foxit and Straker are two independent APIs that you wire together. Foxit owns PDF structure, extracting structured text keyed by element ID and re-rendering the final PDF in the original layout. Straker AI handles translation and per-segment quality scoring in a single request, returning the translated text alongside a numeric score and a quality label. You own the routing decision that sits between the scores and the render call.
The pipeline runs in seven steps:

Foxit covers steps 1-3 and 6-7 (PDF structure and rendering). Straker AI covers step 4, producing translations and per-segment quality scores in one round-trip. Step 5 is your business logic.
The Foxit PDF Translation API defines steps 2, 3, and 6. The upload and download calls use the general PDF Services endpoints. Straker AI is a separate API at https://api-verify.straker.ai. You submit XLF 1.2 files containing source segments and Straker returns the translated target_text per segment plus a numeric score (0.0 to 1.0) and a quality label (best, good, acceptable, bad). Because Foxit’s ExtractedText.json is a flat { "elementId": "text" } map, and XLF trans-unit IDs round-trip through Straker’s external_id field unchanged, the element IDs Foxit emits are the same IDs that come back with translations and scores attached. That alignment is what makes programmatic routing possible.
One clarification for readers who’ve seen the Foxit-Straker partnership announcement: that partnership covers Foxit eSignature Services, enabling end users to translate and sign documents in the eSign product. That’s an end-user feature. The PDF Translation Trial API used here is a separate developer surface. Its OpenAPI spec (v2.2.0) contains zero Straker references, and the preprocess-pdf documentation explicitly instructs developers to “translate the text in ExtractedText.json using your preferred translation tool.” You wire the two APIs together manually. This tutorial uses Straker AI as the default translation engine because it produces translations and quality scores in the same call, but you can substitute DeepL, Google Cloud Translation, AWS Translate, or your own NMT at step 4 without changing the Foxit calls.
Credentials and Setup
Get your Foxit credentials at app.developer-api.foxit.com/pricing. The free Developer plan gives you 20 AI credits per month with no credit card and no sales call required. Once you’ve signed in, your Client ID and Client Secret appear in the developer dashboard. Every Foxit API call requires both in the request headers as client_id and client_secret (lowercase snake_case). Export them in your shell as FOXIT_CLIENT_ID and FOXIT_CLIENT_SECRET so the code below reads them from the environment rather than hard-coding secrets.
For Straker, sign up at straker.ai/ai-platform/verify for API access. Straker issues a UUID-style API token that you send as a bearer token on every call (Authorization: Bearer <your-token>). The API lives at https://api-verify.straker.ai and its full reference is published at api-verify.straker.ai/docs. Export your token as STRAKER_API_KEY for the code below. You can confirm the token works and check your balance with a quick GET /user/balance. Both services offer trial access, so you can build and test the full pipeline before any procurement conversation.
Before you finalize your language matrix, check both APIs for supported languages. Foxit’s render endpoint accepts 23 target language codes (en, zh, zh_tw, fr, de, es, it, pt, nl, ja, ko, th, vi, hi, ru, ar, tr, pl, sv, no, nb, da, and fi). Straker AI identifies languages by UUID rather than ISO code. You fetch the full list with GET /languages and look up the UUID for your target (for example, 917FF728-0725-A033-1278-33025F49CA40 is French (France), 917FF7D8-9107-0BF8-97EE-065C20F453DE is German). The intersection of the two sets determines your production language coverage.
If you already have a contract with DeepL, Google Cloud Translation, AWS Translate, or an in-house NMT service, you can swap that engine in at step 4. The pipeline contract upstream (Foxit element IDs mapped to source strings) and downstream (a dict of {element_id: {score, quality, target_text}} feeding the router) does not change. The code below uses Straker AI by default because the same API returns the translation and the quality signal in one call.
Building the PDF Translation Pipeline
The complete seven-step pipeline runs in Python using requests, json, zipfile, os, and the standard-library xml.etree.ElementTree for building XLF. The first snippet covers Foxit steps 1-3 (upload, structural extraction, and preprocessing).
Extract Anything from Any PDF: Inside Foxit’s Advanced Extraction Engine

Basic PDF extraction libraries break on scanned documents, complex tables, and form fields, leaving downstream pipelines starved of clean data. Foxit’s PDF Structural Extraction API combines OCR, layout recognition, and AI parsing to return all twelve PDF element types as structured JSON, ready for RAG, BI, and CRM workflows.
Your PDF extraction pipeline passes unit tests against the sample invoices you built it on. Then production arrives and you’re looking at 47% garbled output on the Q4 contract batch because half those documents are scanned TIFFs wrapped in a PDF envelope, and your extraction library has no concept of what an image-only page actually is.
The failure modes are specific. PyMuPDF’s get_text() returns empty strings on scanned PDFs because it reads content streams directly, and image-only pages carry no text stream. pdfplumber’s table detection merges rows when column widths span non-uniform grids, which is standard in any financial statement that mixes summary and line-item rows on the same page. Embedded images containing meaningful text (stamped signatures, engineering drawing annotations, letterhead logos) get silently dropped. The library extracts coordinates for the XObject reference but does nothing with the raster data inside. Form fields built on non-standard annotation types (AcroForms using widget annotations with custom action streams) lose their values entirely when you serialize to text.
The architectural distinction that creates this problem is the difference between content serialization and semantic extraction. A PDF converter reads a content stream and writes out whatever character sequences it finds in rendering order. An extraction engine understands the spatial relationships between those character sequences: that two columns of text at x=72 and x=320 are parallel body copy, that the row at y=210 belongs to the table starting at y=180, that the text block repeating on every page is a header carrying lower retrieval weight in a RAG index. Output that lacks spatial and semantic classification looks correct on screen but breaks every downstream consumer that depends on structure.
BI dashboards require numbers tied to the right row labels. AI ingestion pipelines require heading hierarchy to chunk accurately. CRMs require form field values extracted from AcroForm widget dictionaries, delivered with field names intact. The delta between what basic extraction libraries return and what those systems can actually consume is where document pipeline engineering hours accumulate.
How Foxit’s PDF Structural Extraction Engine Works Under the Hood
Foxit exposes this capability as the PDF Structural Extraction (Trial) endpoint inside the PDF Services API (POST /pdf-services/api/documents/pdf-structural-extract). Trial status means the schema is versioned at v1.0.7 and may evolve, but the contract is stable enough to build against today, and the endpoint runs against the production base URL at developer-api.foxit.com.
The engine runs three coordinated layers. The OCR layer operates on rasterized page content, recognizing characters from image-based PDFs and scanned documents across 200+ languages. The layout recognition layer applies spatial analysis to identify column boundaries, reading order, table cell boundaries, figure regions, and header/footer zones. The AI-based parsing layer classifies extracted objects semantically, resolving ambiguous blocks (a text run that spans two layout columns, or a figure caption that reads syntactically like a section heading) into typed elements.
All three layers run inside Foxit’s core PDF engine, which powers 700 million+ users across 20+ years of production deployments. That engine has native awareness of PDF internal structures: content streams, XObject dictionaries, AcroForm field trees, and annotation layers. The OCR layer operates on the same internal page representation the rendering engine uses, so it handles annotated PDFs where text overlaps image regions, and form fields where the visual display and stored value diverge.
The same Structural Extraction endpoint is also Step 1 of Foxit’s PDF Translation (Trial) workflow, which signals that the extraction output is structured enough to backbone a full rewrite-and-rerender pipeline.
NVIDIA’s July 2025 NeMo Retriever research on PDF extraction showed that specialized OCR-based pipelines outperform general-purpose vision-language models on retrieval recall and throughput for complex elements including tables, charts, and infographics. VLMs produce plausible-looking output on clean documents but degrade on exactly the edge cases (multi-column scans, mixed-content pages, annotated overlays) that a specialized pipeline handles systematically.
The Full Object Map: All 12 Extractable PDF Element Types
The Structural Extraction schema v1.0.7 defines twelve element types in the type enum: title, head, paragraph, table, image, headerFooter, form, hyperlink, footnote, sidebar, annotation, and formula.
The API exposes no per-object filter parameters. The only request body fields are documentId (required) and password (optional, for protected PDFs). The engine extracts the full element graph and returns everything in one asynchronous round-trip. You filter client-side on the returned JSON. The design is correct for the workload because partial extraction would require re-running layout recognition per request, costing more compute than transmitting the full element set in a single ZIP.
The result is a ZIP archive. At minimum it contains StructureInfo.json, whose top-level analyzeResult object holds version, pages, elements, and info. Documents that contain figures or tables also produce additional binary files (image renditions and table renditions) alongside the JSON, referenced from individual elements so the JSON payload stays manageable on large documents.
Each element in the document-wide flat elements array carries its own id, type, content, region (with page and an 8-point boundingBox polygon), and score confidence value. A table element adds its cell grid. A form element adds field data. An image element points to its binary file in the ZIP. Because title, head, and paragraph elements appear in document reading order in the elements array, they chunk cleanly on semantically correct boundaries, which is what a RAG index needs to return complete, coherent passages.
Each type maps directly to a downstream use case: table feeds financial reporting pipelines, form drives automated CRM data entry, image routes to computer vision workflows or document archives, annotation builds compliance audit trails, and head combined with paragraph elements in reading order feeds RAG ingestion.
API Walkthrough: The Four-Step Async PDF Extraction Flow
There’s no synchronous path. You upload, get a task ID, poll until completion, then download the result ZIP. Every request carries two headers: client_id and client_secret (lowercase snake_case, as specified in the API spec’s security schemes). Both come from the Developer Portal’s default application. Pass them as named HTTP headers on every request and do not use Authorization: Bearer.
The four-step sequence runs as follows:
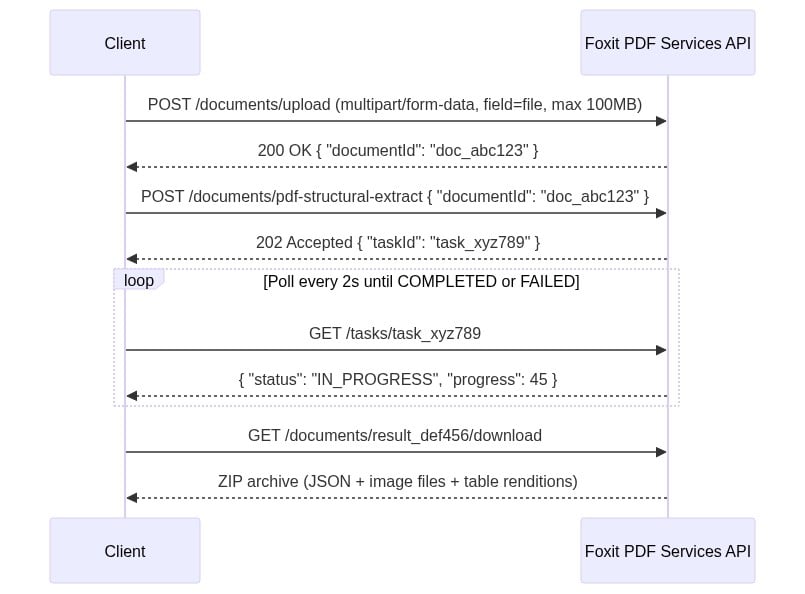
The four-step sequence diagram uses two headers on every request: client_id and client_secret. Create a free developer account at account.foxit.com/site/sign-up (no credit card required, no sales call). Once you’re in, the credentials live under the default application in the Developer Portal. Copy the Client ID and Client Secret pair and treat them like any other API secret. Pass them as named HTTP headers on every call (lowercase snake_case, not Authorization: Bearer).
Step 1: Upload the PDF to
POST /pdf-services/api/documents/uploadasmultipart/form-datawith the file under field namefile. The 100MB ceiling is enforced with a413and error codeMAX_UPLOAD_SIZE_EXCEEDED. The response body returns{ "documentId": "doc_abc123" }.Step 2: Starts extraction with
POST /pdf-services/api/documents/pdf-structural-extract, passing{ "documentId": "doc_abc123" }. Add a"password"field for protected PDFs. The response is202 Acceptedwith{ "taskId": "task_xyz789" }.Step 3: Polls
GET /pdf-services/api/tasks/{task-id}. TheTaskResponsecarriestaskId,status,progress(0-100 integer),resultDocumentId, and an optionalerrorobject. Thestatusenum values arePENDING,IN_PROGRESS,COMPLETED, andFAILED. Portal narrative copy occasionally uses “PROCESSING,” but the schema enum value isIN_PROGRESS. Match your code against the enum. Poll untilCOMPLETEDand captureresultDocumentId.Step 4: Downloads with
GET /pdf-services/api/documents/{resultDocumentId}/download, which streams the ZIP archive. The optionalfilenamequery parameter overrides the default filename.
The complete cURL sequence for all four steps:
Automate Dynamic PDF Generation with the Foxit DocGen API: Word Templates, JSON Data, and Real API Calls
Skip the HTML-to-PDF headaches. Use Foxit’s DocGen API to turn Word templates and JSON data into clean, formatted PDFs with one API call.