<

Foxit MCP Server: Give AI Agents Direct Access to 30+ PDF Tools via Model Context Protocol

Learn how the Foxit MCP Server lets AI agents handle PDF conversion, OCR, merge, signing, and document workflows.
Foxit PDF API MCP Server architecture connecting AI agents to 30+ PDF tools, eSign, and DocGen workflows via Model Context Protocol.

Building a document automation agent with raw REST calls means writing the same boilerplate every time: upload a file, poll for task completion, download the result, handle errors, and manage auth tokens across multiple endpoints. For PDF operations, that loop repeats for every conversion, OCR call, or merge operation in your pipeline. The Foxit PDF API MCP Server collapses those loops into 30+ directly callable tools, with the MCP Server handling upstream REST complexity internally.

This guide covers how the server registers, what it exposes, how Foxit’s eSign and DocGen REST APIs extend the same agent session into signing and document generation workflows, and a concrete four-step workflow you can replicate against your own documents.

MCP Architecture in 90 Seconds

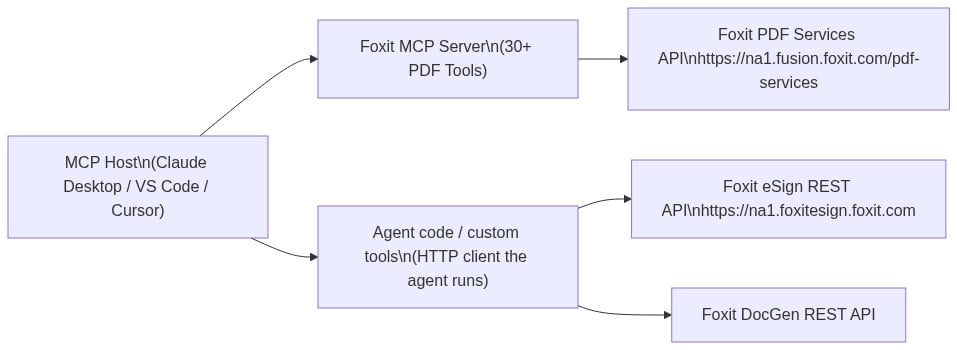
The MCP specification defines three roles. The Host is the LLM runtime (Claude Desktop, VS Code with GitHub Copilot, or Cursor) that manages the conversation and decides when to call tools. The Server is the capability provider, a process that advertises tools over the MCP protocol and executes them against some underlying service. Tools are the individual callable operations each server exposes, defined by a JSON schema the host uses to understand inputs and outputs.

Foxit occupies both sides of this architecture. Foxit PDF Editor ships as an MCP Host, the first PDF application to do so, connecting outward to external MCP servers like Gmail or Salesforce so its AI assistant can reach those services. The Foxit PDF API MCP Server works in the other direction, exposing Foxit’s cloud PDF Services API as 30+ tools for any MCP Host to call.

The MCP Server exposes PDF Services operations covering conversion between formats, content extraction, OCR, merge, split, compress, flatten, linearize, compare, watermark, form data import/export, security, and property inspection. Foxit’s eSign API and DocGen API are separate REST services that are not part of the MCP Server, so they are not exposed as MCP tools. A single agent workflow can still reach them, but through the agent’s own code-execution layer rather than through the MCP protocol, a distinction the eSign section explains in detail. The MCP tools handle PDF processing, while code the agent runs handles signing and template generation.

Flowchart showing how an MCP host such as Claude Desktop, VS Code, or Cursor connects to Foxit services along two paths.

Prerequisites and Configuration

You need three things before registering the server:

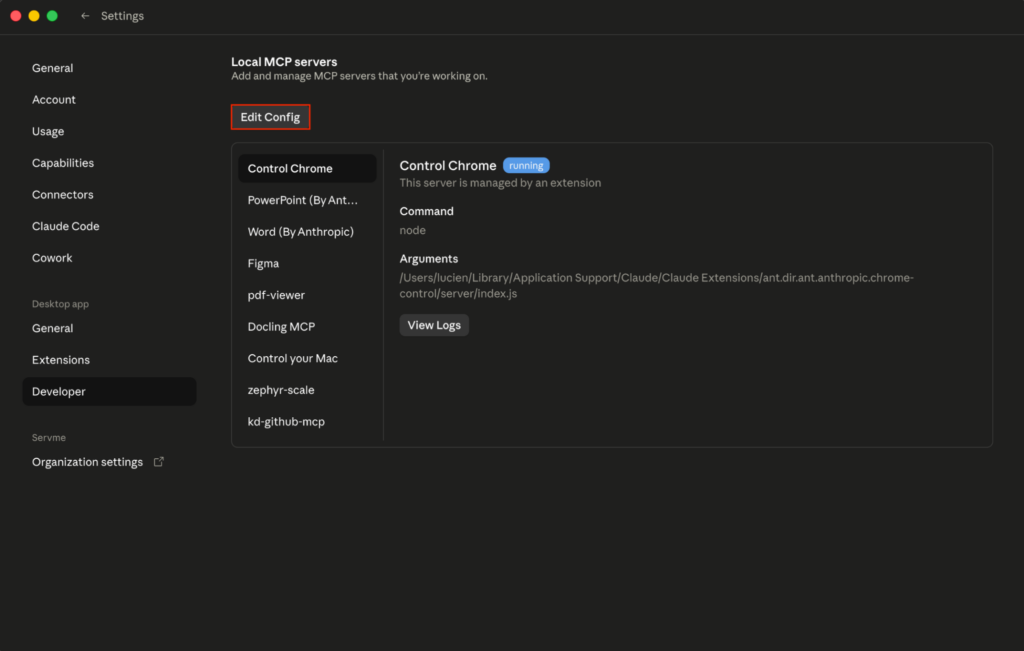
Clone the repo from github.com/foxitsoftware/foxit-pdf-api-mcp-server, then register it in your host’s MCP config. The walkthrough below uses Claude Desktop, but the same commandargs, and env values work in any MCP host. In Claude Desktop, open Settings, select the Developer tab, and click Edit Config.

Claude Desktop's Settings on the Developer tab, with the Edit Config button highlighted above the Local MCP servers list.

Then open claude_desktop_config.json with any text edito(stored at ~/Library/Application Support/Claude/ on macOS or %APPDATA%\Claude\ on Windows).

The claude_desktop_config.json file open in a text editor, showing the foxit-pdf server registered under mcpServers with its command, args, and env credentials.

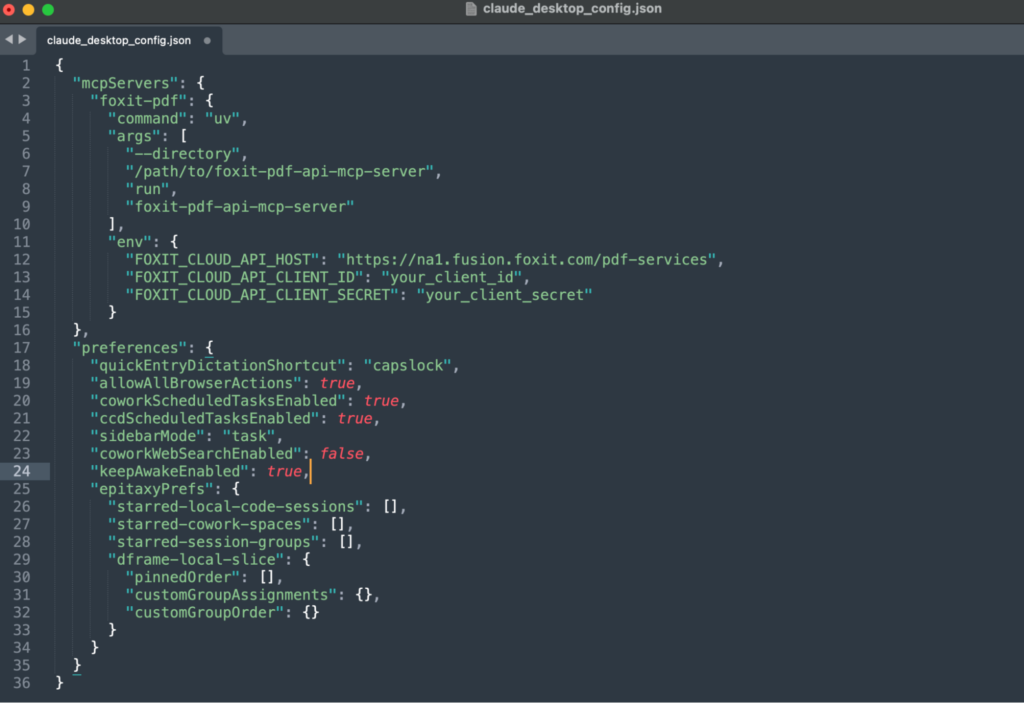
Add the Foxit server under the mcpServers key:

{
  "mcpServers": {
    "foxit-pdf": {
      "command": "uv",
      "args": [
        "--directory",
        "/path/to/foxit-pdf-api-mcp-server",
        "run",
        "foxit-pdf-api-mcp-server"
      ],
      "env": {
        "FOXIT_CLOUD_API_HOST": "https://na1.fusion.foxit.com/pdf-services",
        "FOXIT_CLOUD_API_CLIENT_ID": "your_client_id",
        "FOXIT_CLOUD_API_CLIENT_SECRET": "your_client_secret"
      }
    }
  }
}

Set FOXIT_CLOUD_API_CLIENT_ID and FOXIT_CLOUD_API_CLIENT_SECRET as environment variables on your system before the host process launches. Passing credentials through prompt context is a security risk your production setup should address. The client_id and client_secret from your developer portal authenticate all MCP tool calls to the PDF Services API. Adding eSign to the same agent session requires its own OAuth2 token exchange (covered in the next section), keeping the two credential scopes isolated.

After saving, completely quit and reopen Claude Desktop so it loads the config and launches the server as a local subprocess over standard input and output, the transport the Foxit server uses.

Claude Desktop's Local MCP servers panel with foxit-pdf selected and marked as running, showing its npx command and arguments.

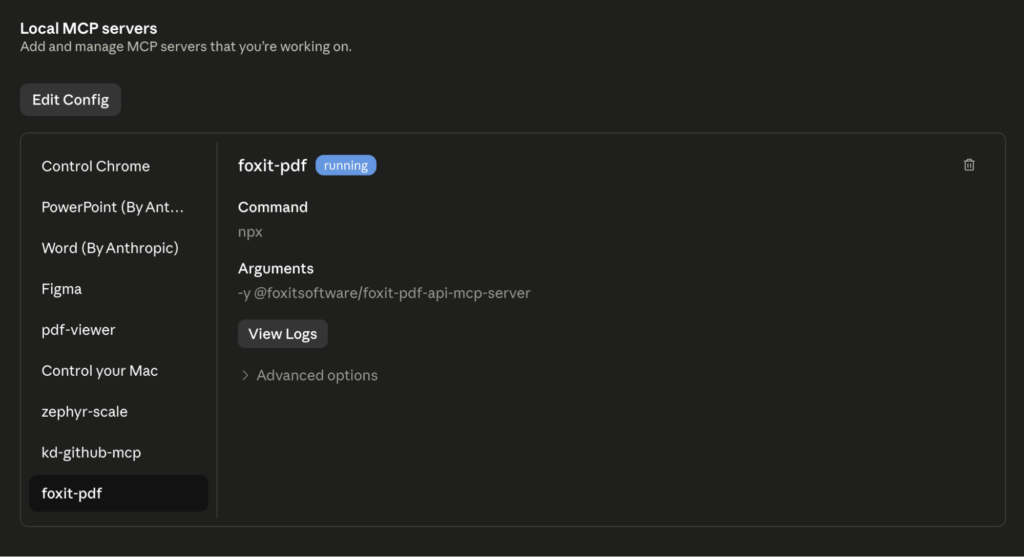
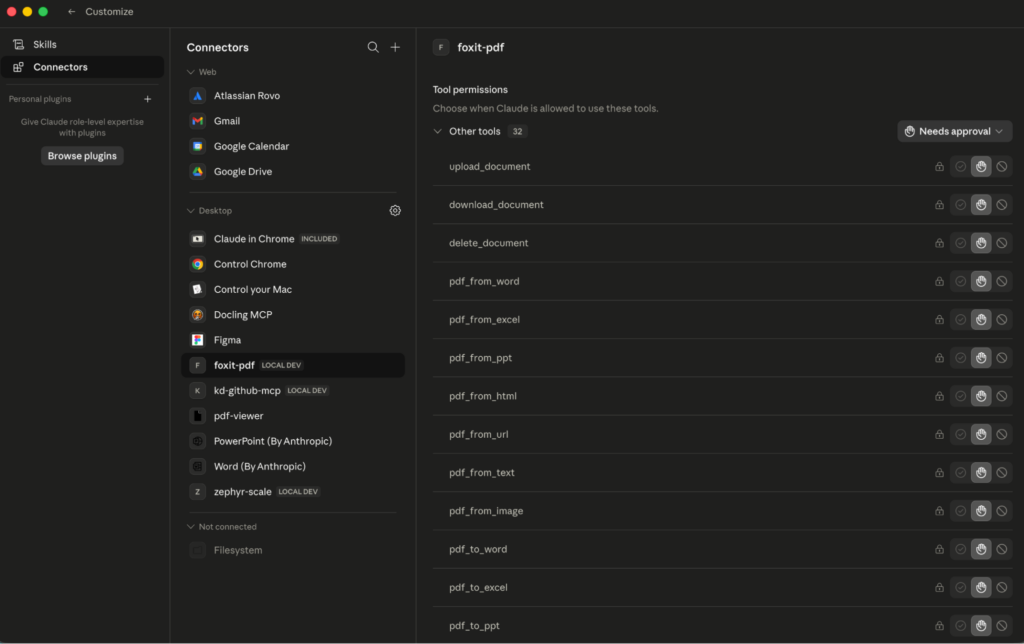
On restart, you should see the foxit MCP as Running in the local MCP servers in the developer tab. If you go the Customize tab then open the Connectors and click foxit-pdf to see the tools that the Foxit MCC has access to, you should see the 30+ tools registered.

The Connectors settings screen showing foxit-pdf tool permissions, with a scrollable list of tools like upload_document, pdf_from_word, and pdf_to_word.

If the connector never appears, the server failed to launch, and Claude’s logs at ~/Library/Logs/Claude/mcp*.log usually point to the cause, commonly a missing uv binary or a wrong --directory path.

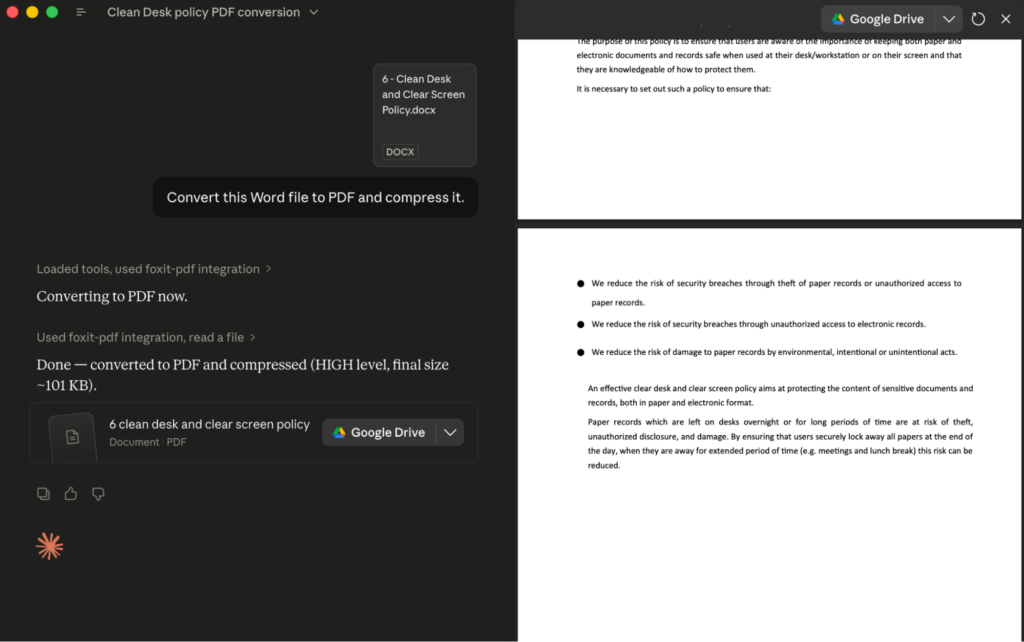
To call a tool, type a natural-language request such as “Convert this Word file to PDF and compress it.” The agent selects pdf_from_word and pdf_compress, and Claude Desktop shows an approval prompt with the exact tool name and arguments before each call runs; the tool’s JSON result then streams back into the conversation.

A Claude Desktop chat converting a Word file to PDF, showing the approval prompt for the pdf_from_word tool from foxit-pdf.

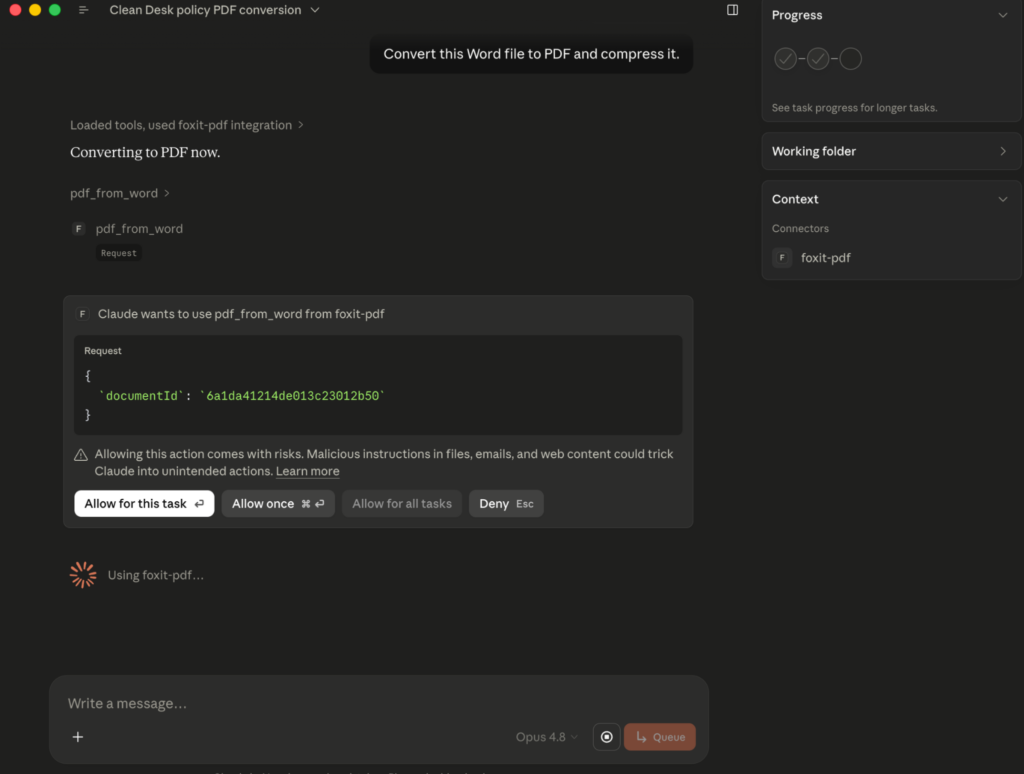
That per-call approval is your audit point, since it surfaces precisely which tool the agent chose and what it passed.


If you would rather run the server in VS Code, the equivalent entry goes in .vscode/mcp.json under a top-level servers key, with an added "type": "stdio" field so VS Code launches the server the same way:

{
  "servers": {
    "foxit-pdf": {
      "type": "stdio",
      "command": "uv",
      "args": [
        "--directory",
        "/path/to/foxit-pdf-api-mcp-server",
        "run",
        "foxit-pdf-api-mcp-server"
      ],
      "env": {
        "FOXIT_CLOUD_API_HOST": "https://na1.fusion.foxit.com/pdf-services",
        "FOXIT_CLOUD_API_CLIENT_ID": "your_client_id",
        "FOXIT_CLOUD_API_CLIENT_SECRET": "your_client_secret"
      }
    }
  }
}

You can also run MCP: Add Server from the Command Palette (Cmd+Shift+P or Ctrl+Shift+P), choose Command (stdio), and pick Workspace to write the entry into .vscode/mcp.json or Global to store it in your user profile. Once saved, VS Code shows inline StartStop, and Restart actions above the server entry and lists it under the MCP SERVERS – INSTALLED view, where a green indicator and the discovered tool count confirm the connection.

PDF Services MCP Tools: Full Catalog

The 30+ tools organize into seven functional categories. Most tools expect a documentId returned by a prior upload_document call, and return a resultDocumentId you pass to download_document when you want the output locally. The exception is pdf_from_url, which accepts a URL directly.

Document Lifecycle

  • upload_document: upload a PDF, Office file, image, HTML file, or plain text file; returns a documentId for subsequent operations
  • download_document: retrieve a processed result to a local file path
  • delete_document: clean up stored files from cloud storage

PDF Creation (file to PDF)

  • pdf_from_wordpdf_from_excelpdf_from_ppt: convert Office documents to PDF
  • pdf_from_textpdf_from_imagepdf_from_html: convert plaintext, image files, or HTML to PDF
  • pdf_from_url: fetch a live URL and convert the rendered page to PDF

PDF Conversion (PDF to file)

  • pdf_to_wordpdf_to_excelpdf_to_ppt: extract editable Office formats from a PDF
  • pdf_to_textpdf_to_htmlpdf_to_image: export text, HTML, or image representations

Manipulation

  • pdf_merge: combine multiple PDFs into one
  • pdf_split: split by page ranges, page count, or every page individually
  • pdf_extract: pull a subset of pages from a PDF
  • pdf_compress: reduce file size by 30-70% depending on content type
  • pdf_flatten: convert form fields and annotations to static content (required for compliance archiving workflows)
  • pdf_linearize: optimize for Fast Web View so browsers can stream PDF pages incrementally
  • pdf_watermark: apply text or image watermarks with configurable position, opacity, and rotation
  • pdf_manipulate: rotate, delete, or reorder pages

Analysis

  • pdf_compare: diff two PDFs and return a color-coded annotation document showing changes
  • pdf_ocr: convert scanned or image-based PDFs to searchable text with multi-language support
  • pdf_structural_analysis: detect document structure (titles, headings, paragraphs, tables with cell grids, images, form fields, hyperlinks, and metadata) with bounding boxes, following the Foxit PDF structural extraction engine schema. The result is JSON packaged inside a downloadable ZIP, not a return of named business entities; it reports layout and structure, and turning that into fields like party names is the job of the agent’s LLM, which performs the semantic extraction over that JSON

Security and Forms

  • pdf_protect: add password protection with 128-bit or 256-bit AES encryption and granular permission flags
  • pdf_remove_password: strip password protection from a document
  • export_pdf_form_data: extract form field values as JSON
  • import_pdf_form_data: populate form fields from a JSON payload

Properties

  • get_pdf_properties: return page count, page dimensions, PDF version, encryption status, digital signature info, embedded files, font inventory, and document metadata

The most-used operation in production document pipelines is pdf_from_word. Your agent uploads a DOCX file, gets back a documentId, then calls pdf_from_word with that ID. The underlying PDF Services API runs the conversion asynchronously, but the MCP Server handles polling internally and delivers the final result directly to your agent.

MCP tool call:

{
  "name": "pdf_from_word",
  "input": {
    "documentId": "doc_abc123"
  }
}

MCP tool response:

{
  "success": true,
  "taskId": "task_xyz789",
  "resultDocumentId": "doc_result456",
  "message": "Word document converted to PDF successfully. Download using documentId: doc_result456"
}

Pass doc_result456 to download_document to write the output PDF to disk, or feed it directly into another tool call like pdf_structural_analysis or pdf_compress as the next step in a chain.

Extending to eSign: Foxit’s Signing API as a Complementary REST Layer

After PDF processing via MCP tools, the next stage of the workflow dispatches a document for signature through Foxit’s eSign REST API, which lives at https://na1.foxitesign.foxit.com. This guide uses the na1 (US) region throughout.

Foxit also operates regional eSign hosts for the EU (eu1.foxitesign.foxit.com), Canada (na2.foxitesign.foxit.com), and Australia (au1.foxitesign.foxit.com). The endpoints and payloads are identical; only the host changes, so pick the host that matches your data residency requirements.

The eSign API is not part of the Foxit MCP Server, so it is not an MCP tool, and that distinction matters for how the agent reaches it. Most MCP hosts cannot make arbitrary HTTP calls on their own, so the agent does not reach eSign “through MCP.” Instead, the agent invokes eSign from its own code-execution layer, whether that is a code interpreter the host provides, an agent framework that runs Python, or a custom tool you register that wraps the eSign calls. The cleanest production pattern is to wrap the eSign operations you need as custom MCP tools so the host calls them the same way it calls the PDF tools; the production considerations section returns to this. The code below is what that layer runs.

Authentication uses OAuth2 client_credentials. The eSign token exchange is a distinct flow from the PDF Services header auth that backs your MCP tools:

import requests

resp = requests.post(
    "https://na1.foxitesign.foxit.com/api/oauth2/access_token",
    data={
        "client_id": ESIGN_CLIENT_ID,
        "client_secret": ESIGN_CLIENT_SECRET,
        "grant_type": "client_credentials",
        "scope": "read-write"
    }
)
access_token = resp.json()["access_token"]

The Foxit eSign API developer guide uses “folder” terminology throughout. The key endpoints in an automated signing flow are:

  • POST /api/folders/createfolder: create a signing folder from one or more PDF documents, with signers, subject, and message
  • POST /api/folders/sendDraftFolder: dispatch a draft folder to its signers
  • POST /api/templates/createtemplate: save a reusable template from a PDF with pre-placed signature fields (instantiate a folder from it later via POST /api/templates/createFolder)
  • GET /api/folders/viewActivityHistory?folderId={id}: retrieve the activity audit trail for a folder once it has been sent (a draft that has never been shared returns an error)
  • Webhook channels for status callbacks: register a callback URL to receive real-time events when signers view, sign, or decline

createfolder call takes the PDF output from your MCP pipeline, uploaded to eSign’s document storage after download_document retrieves it, and sets up the signing workflow:

POST /api/folders/createfolder
Authorization: Bearer {access_token}
Content-Type: application/json
{
  "folderName": "Acme Corp Contract - Q3 2025",
  "sendNow": false,
  "fileUrls": ["https://your-storage.example.com/acme_contract_final.pdf"],
  "fileNames": ["acme_contract_final.pdf"],
  "parties": [
    {
      "firstName": "John",
      "lastName": "Smith",
      "emailId": "[email protected]",
      "permission": "FILL_FIELDS_AND_SIGN",
      "sequence": 1
    }
  ]
}

Set sendNow to false to create a draft folder, then dispatch it with a separate call to /api/folders/sendDraftFolder. Alternatively, set sendNow to true to create and send in a single call. For files not accessible via URL, add "inputType": "base64" and pass the documents as a base64FileString array instead of fileUrls; omitting inputType makes the API reject the base64 payload as empty.

Foxit’s eSign API ships with HIPAAeIDASESIGN ActUETA21 CFR Part 11, FERPA, and FINRA compliance built in. Audit trail records carry signer location, IP address, recipient identity, event timestamp, consent confirmation, security level, and complete folder history. For legal defensibility in regulated industries, capture and store these fields in your own data layer, because relying solely on Foxit’s folder history API for compliance record-keeping introduces a single point of failure in your audit chain.

End-to-End Workflow: AI Agent Automates a Sales Contract

Picture a sales ops agent that starts from a single natural language goal, “Generate a contract for Acme Corp, $48,000 ARR, and send it to [email protected] for signature.” Nothing about the tool sequence is hard-coded. The MCP Server advertises its PDF tools to the host on connection, so the agent can read the goal, recognize that it has a template to render and a document to route for signature, and decide which operations to call and in what order. The PDF steps run as MCP tool calls; the DocGen and eSign steps run from the agent’s code layer. The sequence below is one plausible run the agent might choose, not a fixed script you wire up in advance.

Sequence diagram showing an AI agent automating a sales contract across the Foxit MCP Server, DocGen REST API, and eSign REST API. The agent uploads a DOCX through the MCP server, converts it to PDF with pdf_from_word, runs pdf_structural_analysis, and downloads the resulting ZIP to read the structure and extract fields.

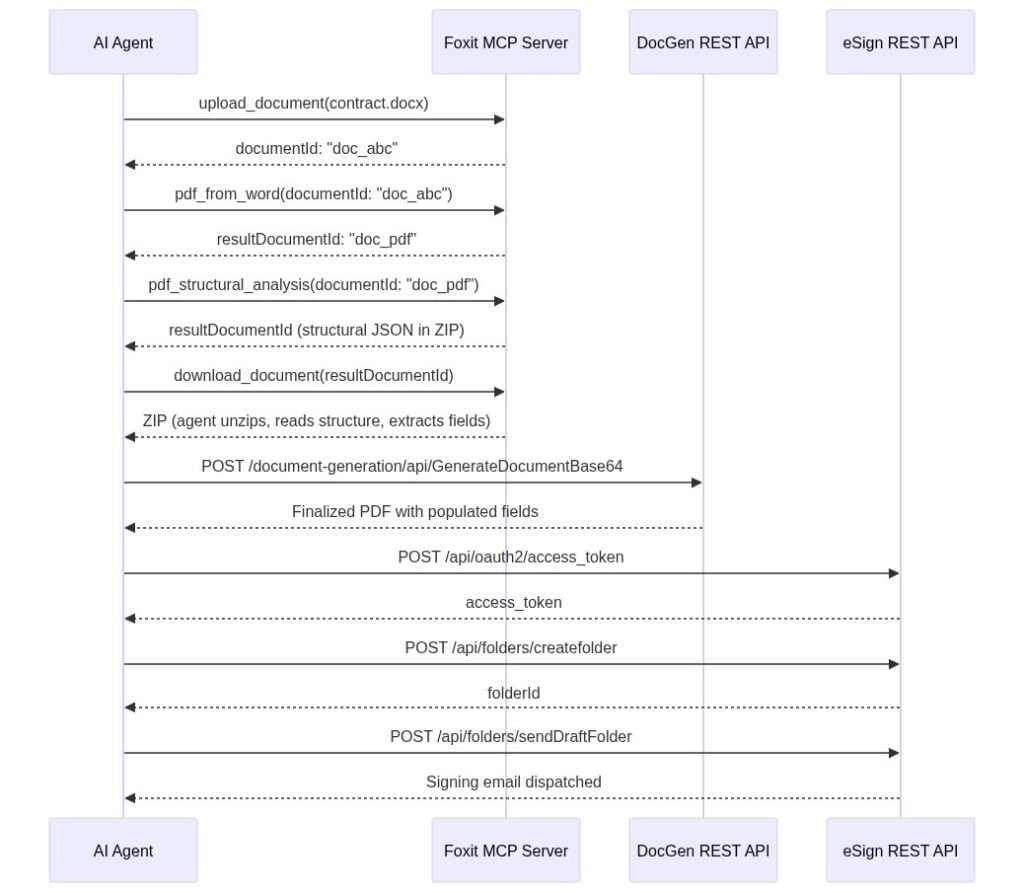
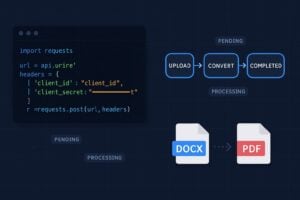
To get a PDF to work with, the agent first reaches for MCP tools. It calls upload_document with the DOCX contract template, receives documentId: "doc_abc", and calls pdf_from_word. The MCP Server handles the async conversion internally and returns resultDocumentId: "doc_pdf" once it completes.

Needing to know what is inside that PDF, the agent calls pdf_structural_analysis with documentId: "doc_pdf". The tool does not hand back named entities like “party” or “ARR.” It returns a resultDocumentId pointing to a ZIP archive, so the agent calls download_document to retrieve it, unzips it, and reads the structural JSON, which describes headings, paragraphs, and table cells with their positions. The agent’s LLM is what performs the semantic extraction: it reads the structural JSON and pulls “Acme Corp” out of a heading or a contract value out of a table cell, confirming the fields it needs are present. The tool hands back structure; the model turns that structure into meaning. If you want the API to return business entities directly rather than leaning on the model to interpret layout, that is the job of Foxit’s iDox.ai Document API, a separate service built for entity and PII extraction.

With the field values in hand, the agent generates the finished contract through the DocGen API, posting to /document-generation/api/GenerateDocumentBase64 with the values merged into the template via {{dynamic_tags}} syntax. DocGen is synchronous, so the call returns the finalized PDF in the response body, with Acme Corp’s name, the $48,000 ARR figure, and the correct dates populated. No polling step is involved.

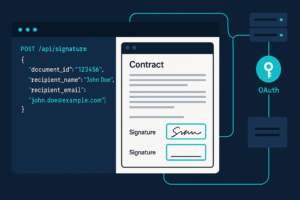
Finally, the agent routes the document for signature. It authenticates against the eSign OAuth2 endpoint, uploads the DocGen output, creates a signing folder via /api/folders/createfolder with [email protected] as the signer, and dispatches it via /api/folders/sendDraftFolder.

What ties this together is that the model decides the order from the goal, not a script. The PDF steps resolve to MCP tool calls the host already knows about; the DocGen and eSign steps run through the agent’s code layer, since those APIs are not MCP tools. The agent chains the output of one step into the input of the next, and the only orchestration you maintain is whatever exposes that code layer to the model, ideally a set of custom tools rather than ad hoc scripting.

Production Considerations: Error Handling, Rate Limits, and Data Governance

When you call PDF Services through the MCP Server, async polling happens inside the server process. Your agent receives a final resultDocumentId only after the task completes. When you call the raw PDF Services REST API directly, every operation returns a taskId you poll manually. The pattern below applies exponential backoff with a ceiling of 10 seconds per interval and a 30-second total timeout:

import time, requests

API_HOST = "https://na1.fusion.foxit.com/pdf-services"
auth_headers = {
    "client_id": "your_client_id",
    "client_secret": "your_client_secret"
}

def poll_task(task_id: str, max_wait: int = 30) -> str:
    delay = 1
    elapsed = 0
    while elapsed < max_wait:
        resp = requests.get(
            f"{API_HOST}/api/tasks/{task_id}",
            headers=auth_headers
        )
        data = resp.json()
        if data["status"] == "COMPLETED":
            return data["resultDocumentId"]
        time.sleep(delay)
        elapsed += delay
        delay = min(delay * 2, 10)
    raise TimeoutError(f"Task {task_id} timed out after {max_wait}s")

Because eSign and DocGen are not MCP tools, decide deliberately how the agent reaches them. Letting the model emit raw HTTP from a free-form code interpreter is brittle and hard to audit. The more durable pattern is to wrap the specific eSign and DocGen operations you use, such as create-folder, send-folder, and generate-document, as custom MCP tools with typed inputs. The host then calls them through the same protocol it uses for the PDF tools, the credentials stay in the tool process rather than in the prompt, and the agent’s choices become inspectable tool calls instead of opaque scripts.

The output of pdf_structural_analysis deserves its own caution. The structural JSON for a long contract can run to many thousands of elements, and feeding the entire file into the model can quietly blow past its context window, which tends to surface as a truncated or confused extraction rather than a clean error. Have the code that unzips the archive filter the JSON before the model sees it, keeping only the element types and pages that matter (for a contract, usually the heading blocks and the relevant table), rather than passing the whole document through.

The free developer plan at developer-api.foxit.com covers development and testing volumes. Production workloads above the free-tier threshold require a volume plan requested through the Developer Portal.

For data governance, all API traffic runs over TLS 1.2+, and documents at rest use AES-256 encryption. Foxit’s API security documentation covers SOC 2 Type II audit status, HIPAA BAA support, GDPR, CCPA, eIDAS, ESIGN Act, UETA, 21 CFR Part 11, FERPA, and FINRA requirements. Customer data runs in logically segmented environments. For healthcare, legal, or financial services pipelines, confirm your data residency requirements before connecting production document flows, then choose the matching regional eSign host noted earlier, since the host you call determines where data is processed.

PDF API MCP Server FAQs

The Foxit PDF API MCP Server is an open-source Model Context Protocol server that exposes Foxit’s cloud PDF Services API as 30+ callable tools. Any MCP-compatible AI agent host, including Claude Desktop, VS Code with GitHub Copilot, and Cursor, can invoke these tools directly.

The server supports conversion (Word, Excel, PowerPoint, image, HTML, and URL to PDF and back), OCR, merge, split, extract, compress, flatten, linearize, watermark, compare, form data import/export, password protection, and full document property inspection across seven functional tool categories.

PDF Services tools authenticate via a client_id and client_secret set as environment variables before the MCP host launches. The eSign API uses a separate OAuth2 client_credentials token exchange against https://na1.foxitesign.foxit.com/api/oauth2/access_token. The two credential scopes are isolated by design.

Yes. The server registers using a standard mcp.json config block for VS Code with GitHub Copilot or a claude_desktop_config.json block for Claude Desktop. The same config structure works for Cursor. All three hosts discover the server’s tools automatically on connection.

The Foxit developer account is free with no credit card required and covers development and testing volumes. Production workloads above the free-tier threshold require a volume plan through the Developer Portal.

Run Your First Tool Call Now

Getting a working MCP tool call takes under 15 minutes:

  1. Create a free developer account at developer-api.foxit.com (no credit card, instant access). Copy your client_id and client_secret from the dashboard.

  2. Set the three environment variables:

export FOXIT_CLOUD_API_HOST="https://na1.fusion.foxit.com/pdf-services"
export FOXIT_CLOUD_API_CLIENT_ID="your_client_id"
export FOXIT_CLOUD_API_CLIENT_SECRET="your_client_secret"
  1. Clone the repo, register it using the config block from the Prerequisites section, restart your MCP host, and invoke pdf_from_url with any public URL. You’ll have a confirmed PDF output in your working directory. The Developer Portal also includes a live API Playground for validating request payloads against the PDF Services API before wiring them into an agent.

For a full signing workflow, the minimum viable addition to the MCP setup is authenticating against the eSign OAuth2 endpoint and posting to /api/folders/createfolder with a static PDF. DocGen field population, pdf_structural_analysis extraction, and webhook callbacks extend the same pattern incrementally from there.

Get your free API access at developer-api.foxit.com.

Explore More Blogs

API Webinars

Explore Real-World Use Cases, Live Demos, and Best Practices.
Our technical team walks through practical applications of Foxit APIs with live Q&A, hands-on demos, and clear integration strategies. Whether you're comparing tools or actively building, these sessions are designed to help you move faster with fewer roadblocks

What You'll Learn