
Automate Dynamic PDF Generation with the Foxit DocGen API: Word Templates, JSON Data, and Real API Calls
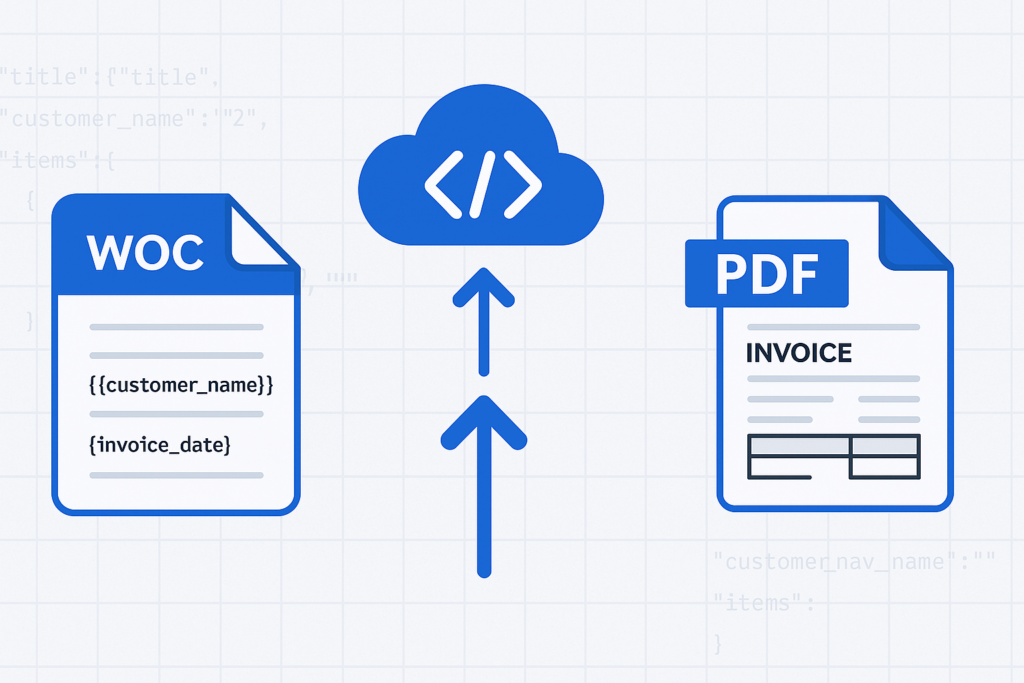
Skip the HTML-to-PDF headaches. Use Foxit’s DocGen API to turn Word templates and JSON data into clean, formatted PDFs with one API call.
If you’ve tried to generate a contract or invoice from HTML, you’ve probably burned hours on page-break-inside: avoid declarations that Chrome renders one way and a headless browser renders another. Headers and footers require separate print-media queries, and by the time you’ve got a repeating table header working correctly across pages, you’ve invested a full day of engineering into CSS that exists solely to trick a browser into behaving like a printer.
HTML documents reflow content into a viewport while PDF documents have fixed page geometry. Forcing one model into the other produces predictable failure modes: footnotes that collide with page footers, tables that split at the worst possible row, custom fonts that substitute silently, and signature blocks that drift off-page on longer documents.
There’s a larger practical cost too. For most teams, the authoritative source for enterprise document templates is already a Word file. Your legal team owns the NDA in .docx format. Finance owns the invoice in .docx format. Every structural change flows through Word because that’s where the tracked changes, formatting history, and review process live. Maintaining a parallel HTML version of each template doubles your maintenance surface from day one.
Foxit’s DocGen API eliminates that parallel entirely. You keep your templates as .docx files, embed data tags directly in Word, POST the base64-encoded template and a JSON payload to a single REST endpoint, and receive the rendered PDF (or DOCX) in the response body. You eliminate the browser rendering engine, the print-media CSS layer, and the overhead of a second template format.
How the Foxit DocGen API Works
The core model is a single synchronous POST to the GenerateDocumentBase64 endpoint at developer-api.foxit.com. Your request body carries three fields:
base64FileString: your .docx template, base64-encodeddocumentValues: a JSON object containing your merge dataoutputFormat: either"pdf"or"docx"
The API processes the template, resolves every tag against your data, and returns a JSON response containing base64FileString (the rendered document) and a message field confirming success or describing a failure. The exchange is fully synchronous, so you receive the finished document in the same HTTP response with no job ID to poll and no webhook to configure.
Authentication uses two HTTP headers: client_id and client_secret. Both come from the Foxit Developer Portal when you create an account. The free Developer plan provides 500 credits per year with no credit card required, and each GenerateDocumentBase64 call consumes exactly one credit. The Startup plan ($1,750/year) provides 3,500 credits. The Business plan ($4,500/year) covers 150,000 credits for production workloads. For context, Nutrient’s API starts at $75 for 1,000 credits, and Apryse requires a sales conversation before you can access pricing at all.
The complete call flow runs from template file to PDF on disk.
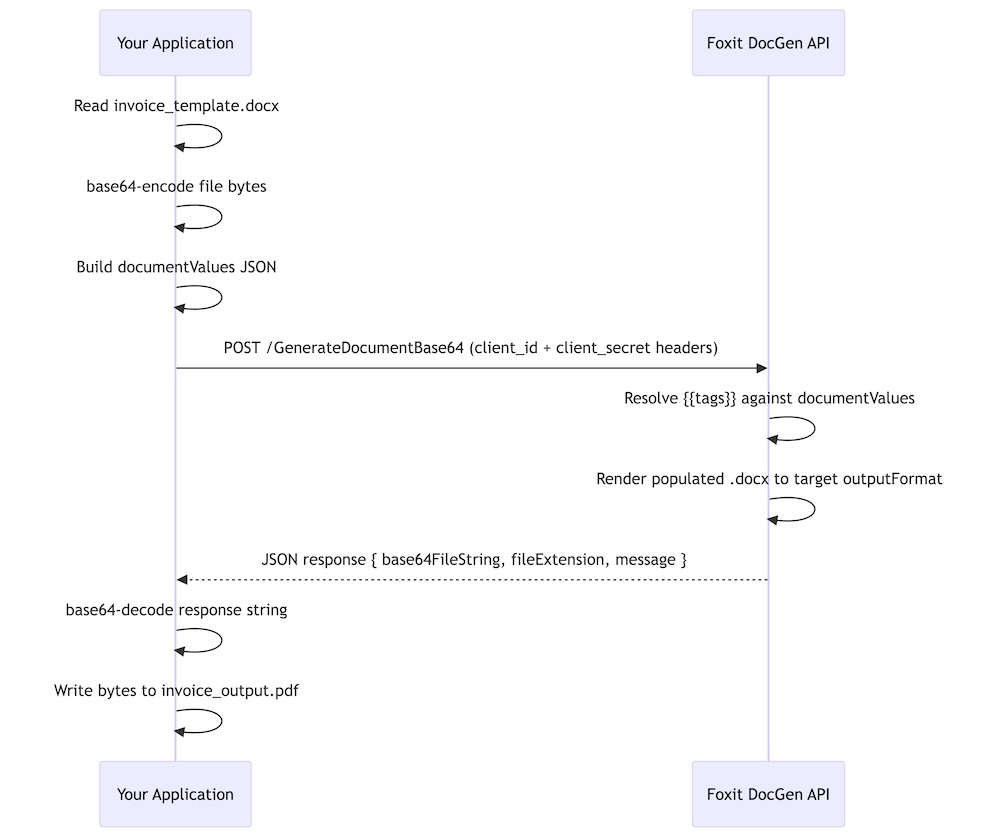
You can explore every endpoint in the live API playground at developer-api.foxit.com, and the portal includes a Postman collection you can import to run authenticated requests without writing a line of code first.
Build a Word Template with DocGen Tags
Open any .docx file in Microsoft Word and type your tags as plain text directly in the document. The DocGen API uses double-brace syntax: {{field_name}}. Tags go anywhere Word accepts text: headings, body paragraphs, table cells, headers, footers, or text boxes.
Scalar field tags resolve directly to the matching key from your documentValues JSON. A document header with {{customer_name}}, {{invoice_number}}, and {{invoice_date}} pulls those three values straight from the top-level keys of your payload.
For arrays, you wrap a single table row (the data row, not the header row) with {{TableStart:array_name}} and {{TableEnd:array_name}} markers. The wrapped row acts as a template row, and the API renders one output row per item in the JSON array. An invoice line-items table in Word looks like this:
| Description | Qty | Unit Price | Total |
|---|---|---|---|
{{TableStart:line_items}}{{description}} | {{qty}} | {{unit_price}} | {{total}}{{TableEnd:line_items}} |
Within the array row, ROW_NUMBER auto-increments with each rendered row. A SUM(ABOVE) field placed in the row directly below the {{TableEnd:line_items}} marker calculates a column total across all rendered data rows.
For nested JSON objects, use dot-notation in your tags. A shipping address block references {{shipping.street}}, {{shipping.city}}, and {{shipping.postal_code}}, mapping to properties nested inside a shipping object in your payload. The nesting can go multiple levels deep, so {{customer.address.city}} resolves against documentValues.customer.address.city.
For a working starting point, grab the downloadable invoice template from the foxit-demo-templates repo. The file is well under the 4 MB upload limit and demonstrates every pattern this article uses: scalar tags, {{TableStart:line_items}} / {{TableEnd:line_items}} with {{ROW_NUMBER}}, currency and date format switches, and subtotal / tax / total fields below the line-items table.
One sizing constraint applies while you build your own template. DocGen rejects uploads larger than 4 MB, so if you embed product photos, scanned letterhead, or full font subsets, compress the images before saving, drop embedded fonts where you can rely on system fonts, or split a large template into smaller per-section templates that you generate and merge separately.
Make Your First API Call: Generate a PDF from JSON
Run a quick pre-flight check before the first call to catch the issues that derail most clean-account run-throughs:
- Account created and
client_id/client_secretcopied from the Developer Portal API Keys section - Sample template saved locally as
invoice_template.docxin the directory you’ll run the script from - Template file size confirmed under 4 MB (
ls -lh invoice_template.docxon macOS or Linux, right-click → Properties on Windows)
With those in place, confirm your credentials work with a cURL call. The Foxit Developer Portal includes a Postman collection for this, but a quick cURL request against the API catches auth issues before any code runs:
curl -X POST "https://na1.fusion.foxit.com/document-generation/api/GenerateDocumentBase64" \
  -H "client_id: YOUR_CLIENT_ID" \
  -H "client_secret: YOUR_CLIENT_SECRET" \
  -H "Content-Type: application/json" \
  -d '{"base64FileString":"","documentValues":{},"outputFormat":"pdf"}'
A 401 here means invalid credentials. A 400 with a message about the template confirms your headers are accepted and you can proceed to the full call.
Save your .docx template as invoice_template.docx in the same directory as this script, then run the complete generation:
import requests
import base64

CLIENT_ID = "your_client_id"
CLIENT_SECRET = "your_client_secret"
API_URL = "https://na1.fusion.foxit.com/document-generation/api/GenerateDocumentBase64"

# Read and encode the template
with open("invoice_template.docx", "rb") as f:
    template_b64 = base64.b64encode(f.read()).decode("utf-8")

# Build the data payload
document_values = {
    "customer_name": "Acme Corporation",
    "invoice_number": "INV-2025-0042",
    "invoice_date": "07/15/2025",
    "due_date": "08/14/2025",
    "line_items": [
        {
            "description": "API Integration Consulting",
            "qty": 8,
            "unit_price": 195.00,
            "total": 1560.00
        },
        {
            "description": "Document Automation Setup",
            "qty": 1,
            "unit_price": 750.00,
            "total": 750.00
        }
    ],
    "subtotal": 2310.00,
    "tax_rate": 0.08,
    "tax_amount": 184.80,
    "total_due": 2494.80
}

# Construct the request body
payload = {
    "base64FileString": template_b64,
    "documentValues": document_values,
    "outputFormat": "pdf"
}

headers = {
    "client_id": CLIENT_ID,
    "client_secret": CLIENT_SECRET,
    "Content-Type": "application/json"
}

response = requests.post(API_URL, json=payload, headers=headers)

if response.status_code == 200:
    result = response.json()
    pdf_bytes = base64.b64decode(result["base64FileString"])
    if pdf_bytes[:5] != b"%PDF-":
        raise ValueError("Response did not contain a valid PDF")
    with open("invoice_output.pdf", "wb") as out:
        out.write(pdf_bytes)
    print("PDF written to invoice_output.pdf")
else:
    print(f"Error {response.status_code}: {response.json().get('message')}")
The success response is a JSON object with three keys: base64FileString (the rendered PDF, base64-encoded), fileExtension ("pdf"), and message ("PDF Document Generated Successfully"). Decoding and writing the bytes to disk gives you a complete, formatted PDF with every tag replaced by its corresponding data value. If you omit a key from documentValues, the API renders the corresponding tag as an empty string, producing a blank field in the output.
Advanced Data Scenarios: Arrays, Nested Objects, and Built-In Functions
The two-row invoice above works, but most production documents have more complex data shapes. Three patterns cover the majority of real-world cases.
For multi-row tables, the line_items array in the Python snippet above already shows the basic structure. To generate five rows, pass five objects in the array. The Word template row tagged with {{TableStart:line_items}} and {{TableEnd:line_items}} repeats exactly once per array item:
{
  "line_items": [
    {
      "description": "UX Design Review",
      "qty": 4,
      "unit_price": 150.0,
      "total": 600.0
    },
    {
      "description": "Backend API Development",
      "qty": 12,
      "unit_price": 185.0,
      "total": 2220.0
    },
    {
      "description": "Database Schema Migration",
      "qty": 3,
      "unit_price": 200.0,
      "total": 600.0
    },
    {
      "description": "QA Testing",
      "qty": 6,
      "unit_price": 95.0,
      "total": 570.0
    },
    {
      "description": "Deployment and Documentation",
      "qty": 2,
      "unit_price": 175.0,
      "total": 350.0
    }
  ]
}
The API generates exactly five table rows. Swap in 50 items and you get 50 rows, with page breaks handled by Word’s native pagination logic.
For nested objects, the DocGen API resolves dot-notation paths against the full depth of your JSON structure. A shipping confirmation template referencing {{customer.address.city}} works against this payload without any flattening on your end:
{
  "customer": {
    "name": "Sarah Chen",
    "email": "[email protected]",
    "address": {
      "street": "742 Evergreen Terrace",
      "city": "Portland",
      "state": "OR",
      "postal_code": "97201"
    }
  }
}
In the Word template, {{customer.name}}, {{customer.address.city}}, and {{customer.address.postal_code}} each resolve to the correct nested value. You can reference the same nested object from multiple locations in the template, and the API populates each instance independently.
For numeric and date formatting, the DocGen API respects Word’s native field switch syntax. Adding \# Currency to a tag formats a numeric value as a currency string, so {{unit_price \# Currency}} renders 195.00 as \$195.00. Date fields accept \@ "MM/dd/yyyy" to control output format, so {{invoice_date \@ "MM/dd/yyyy"}} formats an ISO date string to 07/15/2025. To auto-calculate a column total, place a SUM(ABOVE) field in the Word table row immediately below {{TableEnd:line_items}} and the API evaluates it against the rendered data rows.
Error Handling and Production Readiness
The DocGen API returns a focused set of HTTP status codes. A 200 confirms successful generation. A 401 means your client_id or client_secret headers are invalid, and the fix is to re-copy the credentials from the Developer Portal. A 400 covers three cases. The first is a malformed request body, for example a missing base64FileString or outputFormat. The second is structural issues with the template itself, such as a {{TableStart}} marker placed outside its table row. The third is an oversize template; DocGen rejects .docx uploads larger than 4 MB, and the fix is to compress embedded images, drop embedded fonts, or split the template before re-encoding. The message field in every non-200 response body gives you the specific reason, so log it rather than discarding the response object.
A production wrapper handles all three cases and adds exponential backoff for transient server errors:
import requests
import base64
import time

def generate_document(client_id, client_secret, template_path,
                      document_values, output_format="pdf"):
    API_URL = "https://na1.fusion.foxit.com/document-generation/api/GenerateDocumentBase64"

    with open(template_path, "rb") as f:
        template_b64 = base64.b64encode(f.read()).decode("utf-8")

    payload = {
        "base64FileString": template_b64,
        "documentValues": document_values,
        "outputFormat": output_format
    }
    headers = {
        "client_id": client_id,
        "client_secret": client_secret,
        "Content-Type": "application/json"
    }

    max_retries = 3
    for attempt in range(max_retries):
        try:
            response = requests.post(API_URL, json=payload,
                                     headers=headers, timeout=30)

            if response.status_code == 200:
                return base64.b64decode(response.json()["base64FileString"])

            if response.status_code == 401:
                raise ValueError("Authentication failed: re-check client_id and client_secret")

            if response.status_code == 400:
                msg = response.json().get("message", "Bad request")
                raise ValueError(f"Request error: {msg}")

            if response.status_code >= 500:
                if attempt < max_retries - 1:
                    wait = 2 ** attempt
                    print(f"Server error ({response.status_code}), retrying in {wait}s...")
                    time.sleep(wait)
                    continue
                raise RuntimeError(f"Server error after {max_retries} attempts")

        except requests.exceptions.Timeout:
            if attempt < max_retries - 1:
                time.sleep(2 ** attempt)
                continue
            raise

    raise RuntimeError("Max retries exceeded")
The wrapper raises immediately on 4xx responses because retrying a credential error or a malformed request produces the same result. Exponential backoff applies only to 5xx responses and timeouts, where the issue is transient.
Once generate_document() returns raw PDF bytes, routing them downstream takes three lines:
import boto3

s3 = boto3.client("s3")
pdf_bytes = generate_document(CLIENT_ID, CLIENT_SECRET, "invoice_template.docx", document_values)
s3.put_object(Bucket="my-documents-bucket", Key="invoices/INV-2025-0042.pdf", Body=pdf_bytes)
To attach the output to an email, pass pdf_bytes directly as the smtplib attachment payload. To collect a signature on the generated document, base64-encode the bytes and POST them to Foxit’s eSign API with the signer’s email address in the request body. The full eSign API reference is at docs.developer-api.foxit.com.
Common Mistakes
A short list of the issues that account for almost every failed first run.
- Smart-quote autocorrect on braces. Word’s AutoCorrect can convert the second
{of{{into a curly-quote glyph, which breaks tag parsing silently. Disable “Straight quotes with smart quotes” under AutoCorrect Options, or paste tags as plain text. - Token case sensitivity.
{{Customer_Name}}and{{customer_name}}are different keys. Match the casing in your JSON exactly. TableStartandTableEndmust sit in the same Word table row. Splitting them across two rows, or placing either marker outside the table, leaves the loop unrendered with no error.- Template over 4 MB. The API rejects oversize uploads with a 400. Compress embedded images, drop embedded fonts where system fonts will do, or split the template into smaller pieces.
- Missing payload key. The API renders an unmatched tag as an empty string rather than failing, so a 200 response does not guarantee every field is populated. Spot-check the rendered PDF as part of any pipeline test.
- Auth header typos. Headers are
client_idandclient_secretin snake_case.Client-Id,ClientId, orX-Client-Idall return 401.
Run the Full Invoice Example End-to-End Right Now
Create a free account directly at account.foxit.com/site/sign-up. This skips the pricing-page redirect you hit from the marketing site and drops you straight into the account form.
- Open account.foxit.com/site/sign-up and complete the form (no credit card required).
- After verification, sign in to the Developer Portal and the Developer plan (500 credits per year) is active by default.
- Open the API Keys section and copy your
client_idandclient_secret.
With credentials in hand, run the example end-to-end:
- Download
invoice_full.docxfrom the foxit-demo-templates repo and save it locally asinvoice_template.docxin your working directory. The file is well under the 4 MB upload limit and exercises every tag pattern this article covers. - Paste your credentials into the
CLIENT_IDandCLIENT_SECRETvariables in the Python script from the previous section. - Edit the
document_valuesdictionary with your own customer name, invoice number, and line items. - Run the script and open
invoice_output.pdf.
The free Developer plan’s 500 annual credits cover this tutorial dozens of times over before you spend anything. The full API reference at docs.developer-api.foxit.com covers every endpoint parameter, the complete tag specification, all supported output formats, and the full GenerateDocumentBase64 request and response schema.
Get started with a free account (no credit card required) and generate your first dynamic PDF in under 10 minutes.
Foxit DocGen API Quickstart: Word Template to Pixel-Perfect PDF in Under 10 Minutes
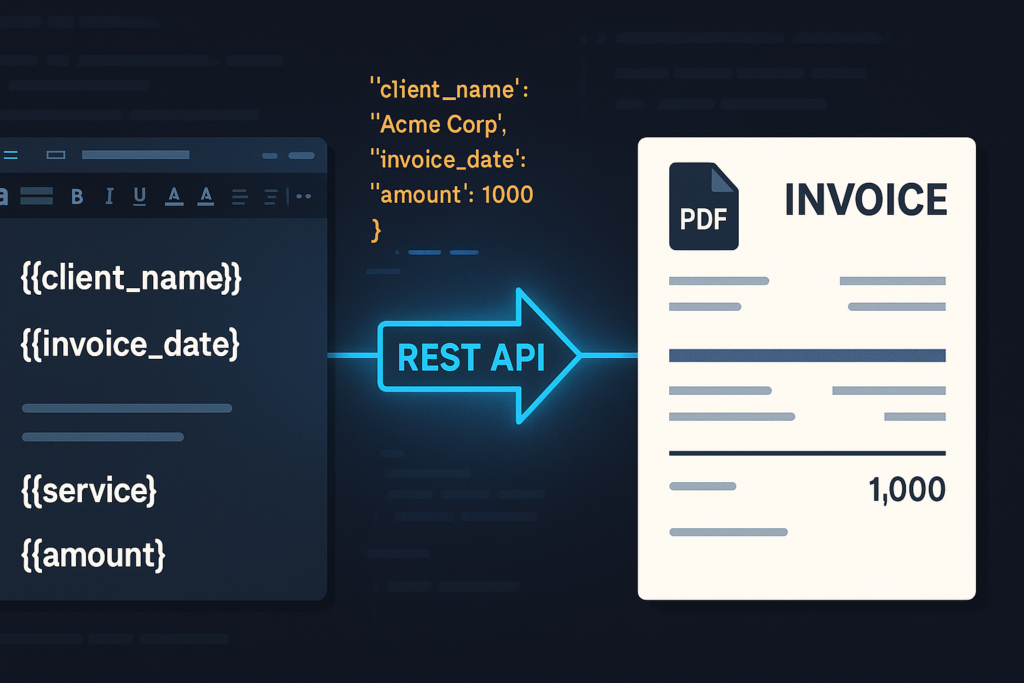
Go from a Word template to a pixel-perfect PDF in under 10 minutes with the Foxit DocGen API. This guide covers template authoring, JSON payload structure, the GenerateDocumentBase64 call, and the most common errors that trip people up.
Most document generation quickstarts hand you a template with one text field, a trivial JSON payload, and no explanation of what breaks when you add a repeating table, a date format string, or a missing key. You end up in the docs trying to work backwards from a 400 error. This tutorial covers the complete Foxit DocGen API flow end-to-end: authoring a Word template with scalar fields, formatted dates, and repeating line-item rows; building the matching JSON payload; and POSTing everything to GenerateDocumentBase64 to retrieve a production-ready PDF. Working Python and cURL throughout.
Before starting, you’ll need a free Foxit developer account at developer-api.foxit.com (no credit card required; the free tier includes 500 credits/year), your client_id and client_secret from the developer dashboard, Python 3.x with requests installed (pip install requests), and Microsoft Word for template authoring.
How the Foxit DocGen API Works: One Endpoint, One Call
The GenerateDocumentBase64 endpoint accepts a single POST request and returns the rendered document in the same response body. You pass three things: your .docx template (base64-encoded), your structured JSON data, and the desired output format. The API merges template with data and returns the rendered file as a base64-encoded string.
Your .docx file defines layout, branding, and placeholder tokens. Your JSON payload carries the runtime values that populate those tokens. The API resolves every token in the template against the corresponding key in documentValues and renders the result as a PDF or DOCX.
 The call is synchronous, returning the rendered file in the HTTP 200 response body with no job ID, polling loop, or webhook callback required. The request body always carries three keys:
 base64FileString (your .docx template, base64-encoded), documentValues (the JSON object whose keys map to template tokens), and outputFormat ("pdf" or "docx").
Authentication passes client_id and client_secret as custom HTTP headers on every request, with no OAuth 2.0 flow and no token exchange step.
Author Your Word Template with Dynamic Tags
Open Word and create a standard .docx. Place your dynamic content using double-curly-brace tokens typed directly in the document body.
For scalar string and number fields, the syntax is {{field_name}}. For a date with a specific display pattern, use {{ field_name \@ MM/dd/yyyy }}. The \@ format string controls how the API renders date values from your JSON payload.
An invoice template header section looks like this:
Invoice #: {{invoice_number}}
Date: {{ invoice_date \@ MM/dd/yyyy }}
Bill To: {{client_name}}
Address: {{billing_address}}
Repeating table rows use a pair of range markers. Place {{TableStart:line_items}} in the first cell of the row you want to repeat, and {{TableEnd:line_items}} in the last cell of that same row. The array name in both markers (line_items here) must exactly match the key name in your JSON payload. Cells within the repeating row take individual field tokens:
| {{TableStart:line_items}}{{ROW_NUMBER}} | {{description}} | {{qty}} | {{unit_price}}{{TableEnd:line_items}} |
{{ROW_NUMBER}} auto-increments across all rendered rows. Word’s built-in SUM(ABOVE) formula in a totals row below the table still works for column totals.
Two authoring mistakes account for the majority of template parsing failures. Placing tokens inside merged table cells causes a parser error because the API can’t determine which logical cell owns the token. Using Word’s smart (curly) quotes instead of straight ASCII double-braces causes an encoding mismatch that returns a 400. Before uploading your template, check Word’s autocorrect settings and run a Find & Replace search for any {{ or }} pairs that got converted to curly equivalents.
Authenticate and Prepare the Template
Your client_id and client_secret from the developer dashboard at developer-api.foxit.com pass as custom headers on every request. The base64 module ships with Python’s standard library, so the encoding step adds no new dependencies to your project:
import base64
import requests

# Load and encode the .docx template
with open("invoice_template.docx", "rb") as f:
    template_b64 = base64.b64encode(f.read()).decode("utf-8")

# Authentication and content-type headers
headers = {
    "client_id": "YOUR_CLIENT_ID",
    "client_secret": "YOUR_CLIENT_SECRET",
    "Content-Type": "application/json"
}

# Scalar fields (the line_items array is added in the next section)
document_values = {
    "invoice_number": "INV-2025-0042",
    "invoice_date": "2025-07-15",
    "client_name": "Meridian Software Inc."
}

payload = {
    "base64FileString": template_b64,
    "documentValues": document_values,
    "outputFormat": "pdf"
}
The cURL equivalent encodes the file on the fly and passes the same headers:
# Encode the template
TEMPLATE_B64=$(base64 < invoice_template.docx)

curl -s -X POST "https://na1.fusion.foxit.com/document-generation/api/GenerateDocumentBase64" \
  -H "client_id: YOUR_CLIENT_ID" \
  -H "client_secret: YOUR_CLIENT_SECRET" \
  -H "Content-Type: application/json" \
  -d "{\"base64FileString\": \"${TEMPLATE_B64}\", \"documentValues\": {\"invoice_number\": \"INV-2025-0042\", \"invoice_date\": \"2025-07-15\", \"client_name\": \"Meridian Software Inc.\"}, \"outputFormat\": \"pdf\"}"
Build the JSON Data Payload for DocGen
The full documentValues payload maps scalar fields at the top level and places the repeating line-item array under the key that matches your {{TableStart:}} / {{TableEnd:}} marker name exactly.
{
  "invoice_number": "INV-2025-0042",
  "invoice_date": "2025-07-15",
  "client_name": "Meridian Software Inc.",
  "billing_address": "400 Pine Street, Suite 12, Seattle, WA 98101",
  "line_items": [
    {
      "description": "API Integration Consulting",
      "qty": "8",
      "unit_price": "225.00"
    },
    {
      "description": "DocGen Template Authoring",
      "qty": "4",
      "unit_price": "175.00"
    },
    {
      "description": "QA and Deployment Support",
      "qty": "2",
      "unit_price": "150.00"
    }
  ]
}
A few type behaviors worth tracking. The API formats date values using the \@ format string in the template tag, so pass dates as ISO 8601 strings ("2025-07-15") and let the tag control the display format. Numeric quantities and prices work as either strings or integers. When a template token has no matching key in documentValues, the API leaves that placeholder blank in the output rather than returning an error, so missing keys produce silent blanks in your document.
Call the Generation Endpoint and Retrieve the PDF
This complete Python function adds the line_items array, posts to the endpoint, validates the response, and writes the output to disk:
import base64
import requests

with open("invoice_template.docx", "rb") as f:
    template_b64 = base64.b64encode(f.read()).decode("utf-8")

headers = {
    "client_id": "YOUR_CLIENT_ID",
    "client_secret": "YOUR_CLIENT_SECRET",
    "Content-Type": "application/json"
}

document_values = {
    "invoice_number": "INV-2025-0042",
    "invoice_date": "2025-07-15",
    "client_name": "Meridian Software Inc.",
    "billing_address": "400 Pine Street, Suite 12, Seattle, WA 98101",
    "line_items": [
        {"description": "API Integration Consulting", "qty": "8", "unit_price": "225.00"},
        {"description": "DocGen Template Authoring", "qty": "4", "unit_price": "175.00"},
        {"description": "QA and Deployment Support", "qty": "2", "unit_price": "150.00"}
    ]
}

payload = {
    "base64FileString": template_b64,
    "documentValues": document_values,
    "outputFormat": "pdf"
}

response = requests.post(
    "https://na1.fusion.foxit.com/document-generation/api/GenerateDocumentBase64",
    headers=headers,
    json=payload
)

if response.status_code == 200:
    result = response.json()
    pdf_bytes = base64.b64decode(result["base64FileString"])

    # Confirm the response is a valid PDF before writing to disk
    if pdf_bytes[:5] != b"%PDF-":
        raise ValueError("Response did not contain a valid PDF")

    with open("invoice_output.pdf", "wb") as f:
        f.write(pdf_bytes)
    print("PDF written: invoice_output.pdf")
else:
    error = response.json()
    print(f"Error {response.status_code}: {error.get('message', 'Unknown error')}")
A successful response returns HTTP 200 with a JSON body containing three fields: base64FileString (the rendered PDF, base64-encoded), fileExtension ("pdf"), and message ("PDF Document Generated Successfully"). A failed call returns a 4xx status with a JSON body containing a message field describing the error. The API is synchronous: no job IDs, no polling, no webhooks.
The %PDF- magic bytes check catches cases where the API returned a non-PDF payload: a malformed template, an incorrect outputFormat value, or an error body that got decoded as if it were the file. Run this validation before writing to disk so failures surface immediately rather than producing a corrupt file.
The cURL equivalent uses jq to extract the base64 field and writes the decoded PDF directly to a file:
curl -s -X POST "https://na1.fusion.foxit.com/document-generation/api/GenerateDocumentBase64" \
  -H "client_id: YOUR_CLIENT_ID" \
  -H "client_secret: YOUR_CLIENT_SECRET" \
  -H "Content-Type: application/json" \
  -d @request_body.json \
  | jq -r '.base64FileString' \
  | base64 --decode > invoice_output.pdf
Store the full JSON payload from the previous section in request_body.json. The jq -r flag strips JSON string escaping from the base64 field before it reaches base64 --decode. Omitting -r produces a corrupt output file.
Debugging Common Failures
Unmatched tags render as blank strings in the output PDF. The API produces an HTTP 200 and a valid PDF with the missing data absent. If your output has blank fields, compare your template token names character-by-character against your JSON keys. Token matching is case-sensitive: {{client_name}} and {{Client_Name}} are treated as different fields.
Authentication failures return a 401 with a JSON body:
{
  "message": "Unauthorized. Invalid client credentials."
}
The header names are lowercase (client_id, client_secret), and values must appear without surrounding quotes or whitespace. If you recently rotated keys, regenerate credentials from the developer dashboard and verify you’re reading the correct environment’s values.
Template parse errors return a 400:
{
  "message": "Template parsing error: invalid token format detected."
}
Two root causes produce this error. A .docx re-saved through LibreOffice alters the underlying XML structure in ways that break the parser, so re-author the template in Word. Curly (smart) quote characters in token braces cause an encoding mismatch, so use Word’s Find & Replace to swap any curly {{ and }} back to straight ASCII equivalents.
Payload size limits apply to the base64-encoded template. Check docs.developer-api.foxit.com for the current threshold. Templates exceeding the limit should have embedded images compressed through Word’s Picture Format settings before export. For templates that remain too large after compression, split the document into two .docx files and merge the generated PDFs using Foxit’s PDF Services API.
Wire the Foxit DocGen API Into Your Stack: Next Steps
The integration pattern for a CRM-triggered flow covers four steps: receive the webhook event, pull the record data from your CRM’s API, POST to GenerateDocumentBase64, then upload the decoded PDF to Amazon S3 or return it as a download URL.
def handle_crm_webhook(event):
    record = crm_client.get_record(event["record_id"])
    pdf_bytes = generate_document(record)           # wraps the API call above
    s3_url = upload_to_s3(pdf_bytes, record["id"])  # store in your delivery layer
    crm_client.attach_document(record["id"], s3_url)
Once DocGen is generating your contracts, invoices, and compliance reports, adding signatures is the natural next step. Foxit’s eSign API accepts the same PDF output and adds a fully auditable, legally binding signing workflow via REST. For low-code integration with Salesforce, HubSpot, or SAP, Foxit’s 40+ pre-built connectors let you trigger document generation from a workflow automation tool without writing the HTTP call yourself. Full documentation and connector references are at docs.developer-api.foxit.com.
Create your free account at developer-api.foxit.com, grab your client_id and client_secret, import the Postman collection from the developer dashboard, and run your first generation call against your own .docx. The round trip from account creation to a rendered PDF takes under five minutes.
Frequently Asked Questions
What does the Foxit DocGen API GenerateDocumentBase64 endpoint return?
It returns a synchronous HTTP 200 response whose JSON body contains a base64FileString key holding the fully rendered PDF (or DOCX) encoded in base64. There’s no job ID, polling loop, or webhook. The rendered file arrives in the same response.
What happens when a template token has no matching key in the JSON payload?
The API silently leaves that placeholder blank in the rendered output and still returns HTTP 200. Missing keys don’t trigger a 400 error, so always validate rendered output programmatically. The %PDF- magic bytes validation shown above is a reliable first check.
Why does my Foxit DocGen template return a 400 parsing error?
The two most common causes are token braces containing Word’s smart (curly) quotes instead of straight ASCII double-braces, and a .docx re-saved through LibreOffice, which alters the underlying OOXML structure in ways the parser rejects. Re-author the template in Microsoft Word and replace any curly quote characters using Find & Replace.
Can I generate DOCX output instead of PDF with the DocGen API?
Yes. Set "outputFormat": "docx" in the request body. The same template syntax and documentValues structure apply regardless of output format.
How does authentication work with the Foxit DocGen API?
Pass your client_id and client_secret as custom HTTP request headers on every call. There’s no OAuth token exchange or session management. Credentials are validated per-request and can be generated or rotated from the Foxit developer dashboard.
DocGen QuickStart FAQs
What is the Foxit DocGen API used for?
The Foxit DocGen API is used to generate documents from structured data. Developers can populate templates with data from systems like CRMs, databases, forms, or internal applications, then output branded PDFs or DOCX files for contracts, invoices, reports, disclosures, and other document workflows.
How does the Foxit GenerateDocumentBase64 endpoint work?
The GenerateDocumentBase64 endpoint accepts a base64-encoded document template, a JSON object containing document values, and an output format such as PDF or DOCX. The API merges the template with the supplied data and returns the generated file as a base64-encoded response.
What inputs do I need to generate a PDF with the Foxit DocGen API?
To generate a PDF, you need a document template, structured JSON data that matches the template fields, Foxit API credentials, and an output format value. In the blog example, the template is a Word .docx file and the output format is set to PDF.
Can the Foxit DocGen API generate DOCX files as well as PDFs?
Yes. The blog states that developers can set the output format to docx instead of pdf when calling the DocGen API. The same general template and data-mapping approach applies, but this specific behavior should still be validated against the current API documentation before publication.
How do repeating table rows work in a Foxit DocGen template?
In the blog example, repeating table rows use TableStart and TableEnd markers around a row in the Word template. The marker name must match the array name in the JSON payload, and each object in the array supplies values for the repeated row fields.
What happens if a JSON key is missing from a Foxit DocGen template?
The blog states that if a template token does not have a matching key in documentValues, the generated document leaves that placeholder blank instead of returning an error. Because this is a specific API behavior, it should be confirmed against the current DocGen API documentation.
How do developers authenticate with the Foxit DocGen API?
The blog states that developers authenticate by passing client_id and client_secret as HTTP request headers. Before publication, Foxit should confirm that this is the current recommended authentication method and add guidance to store credentials securely in environment variables or a secrets manager.
Why does a Foxit DocGen template return a 400 parsing error?
According to the blog, common causes include invalid template token formatting, smart quote characters in template tags, or .docx files saved in a way that changes the underlying document structure. This is useful troubleshooting guidance, but it should be validated by the product or documentation team.
Can I use the Foxit DocGen API with CRM data?
Yes. Foxit’s Document Generation API materials position the API for generating documents from structured data in systems such as CRMs, databases, web forms, ERP, or HR systems. Common use cases include quotes, contracts, disclosures, invoices, onboarding documents, and customer communications.
How can Foxit DocGen fit into a larger document workflow?
Foxit DocGen can generate a document from structured data, then the generated PDF can move into downstream workflows such as signing, storage, delivery, or archiving. Foxit’s broader API materials position Document Generation, eSign, PDF Services, and PDF Embed APIs as part of a full-stack document automation ecosystem.
Generate Dynamic PDFs from JSON using Foxit APIs

See how easy it is to generate PDFs from JSON using Foxit’s Document Generation API. With Word as your template engine, you can dynamically build invoices, offer letters, and agreements—no complex setup required. This tutorial walks through the full process in Python and highlights the flexibility of token-based document creation.
Generate Dynamic PDFs from JSON using Foxit APIs
One of the more fascinating APIs in our library is the Document Generation API. This document generation API lets you create dynamic PDFs or Word documents using your own data as templates. That may sound simple – and the code you’re about to see is indeed simple – but the real power lies in how flexible Word can be as a template engine. This API could be used for:
- Creating invoices
- Creating offer letters
- Creating dynamic agreements (which can integrate with our eSign API)
All of this is made available via a simple API and a “token language” you’ll use within Word to create your templates. Whether you’re feeding in data from a database, a form submission, or a JSON API response, the process looks the same from your Python script. Let’s take a look at how this is done.
Credentials
Before we go any further, head over to our developer portal and grab a set of free credentials. This will include a client ID and secret values – you’ll need both to make use of the API.
Don’t want to read all of this? You can also follow along by video:
Using the API
The Document Generation API flow is a bit different from our PDF Services APIs in that the execution is synchronous. You don’t need to upload your document beforehand or download a result. You simply call the API (passing your data and template) and the result has your new PDF (or Word document). With it being this simple, let’s get into the code.
Loading Credentials
My script begins by loading in the credentials and API root host via the environment:
CLIENT_ID = os.environ.get('CLIENT_ID')
CLIENT_SECRET = os.environ.get('CLIENT_SECRET')
HOST = os.environ.get('HOST')
As always, try to avoid hard coding credentials directly into your code.
Calling the API
The endpoint only requires you to pass the output format, your data, and a base64 version of your file. “Your data” can be almost anything you like—though it should start as an object (i.e., a dictionary in Python with key/value pairs). Beneath that, anything goes: strings, numbers, arrays of objects, and so on.
Here’s a Python wrapper showing this in action:
def docGen(doc, data, id, secret):

    headers = {
        "client_id":id,
        "client_secret":secret
    }

    body = {
        "outputFormat":"pdf",
        "documentValues": data,
        "base64FileString":doc
    }

    request = requests.post(f"{HOST}/document-generation/api/GenerateDocumentBase64", json=body, headers=headers)
    return request.json()
And here’s an example calling it:
with open('../../inputfiles/docgen_sample.docx', 'rb') as file:
    bd = file.read()
    b64 = base64.b64encode(bd).decode('utf-8')

data = {
    "name":"Raymond Camden",
    "food": "sushi",
    "favoriteMovie": "Star Wars",
    "cats": [
        {"name":"Elise", "gender":"female", "age":14 },
        {"name":"Luna", "gender":"female", "age":13 },
        {"name":"Crackers", "gender":"male", "age":13 },
        {"name":"Gracie", "gender":"female", "age":12 },
        {"name":"Pig", "gender":"female", "age":10 },
        {"name":"Zelda", "gender":"female", "age":2 },
        {"name":"Wednesday", "gender":"female", "age":1 },
    ],
}

result = docGen(b64, data, CLIENT_ID, CLIENT_SECRET)
You’ll note here that my data is hard-coded. In a real application, this would typically be dynamic—read from the file system, queried from a database, or sourced from any other location.
The result object contains a message representing the success or failure of the operation, the file extension for the result, and the base64 representation of the result. To turn that base64 string back into a file, decode it first:
b64_bytes = result["base64FileString"].encode('ascii')
binary_data = base64.b64decode(b64_bytes)
Most likely you’ll always be outputting PDFs, so here’s a simple bit of code that stores the result:
with open('../../output/docgen_sample.pdf', 'wb') as file:
    file.write(binary_data)
    print('Done and stored to ../../output/docgen_sample.pdf')
There’s a bit more to the API than I’ve shown here so be sure to check the docs, but now it’s time for the real star of this API, Word.
Using Word as a Template
I’ve probably used Microsoft Word for longer than you’ve been alive and I’ve never really thought much about it. But when you begin to think of a simple Word document as a template, all of a sudden the possibilities begin to excite you. In our Document Generation API, the template system works via simple “tokens” in your document marked by opening and closing double brackets.
Consider this block of text:
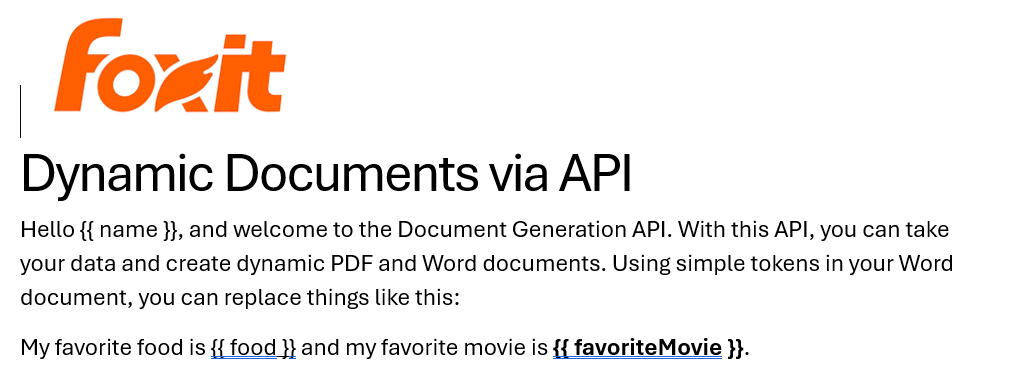
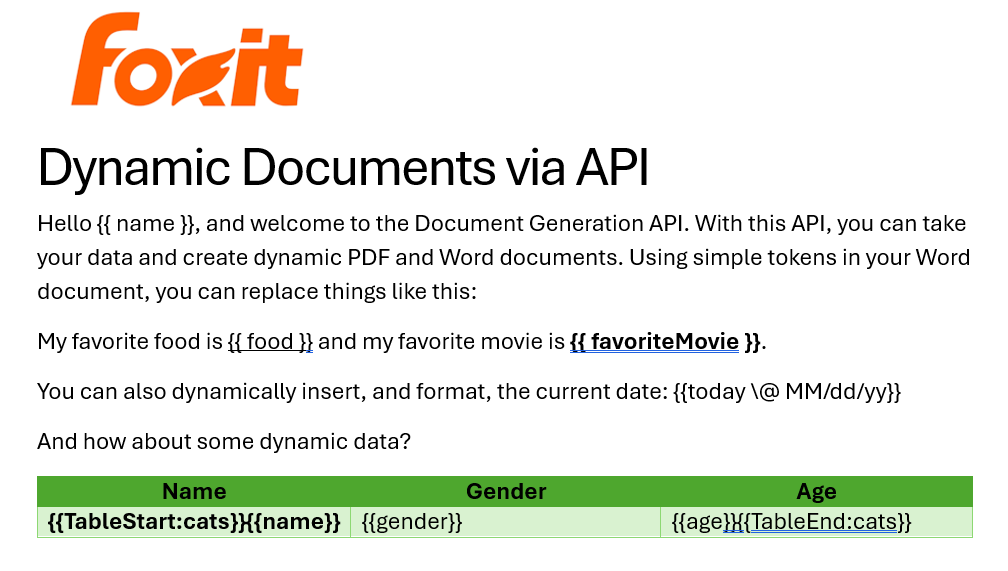
See how name is surrounded by double brackets? And food and favoriteMovie? When this template is sent to the API along with the corresponding values, those tokens are replaced dynamically. In the screenshot, notice how favoriteMovie is bolded. That’s fine. You can use any formatting, styling, or layout options you wish.
That’s one example, but you also get some built-in values as well. For example, including today as a token will insert the current date, and can be paired with date formatting to specify how the date looks:

Remember the array of cats from earlier? You can use that to create a table in Word like this:

Notice that I’ve used two new tags here, TableStart and TableEnd, both of which reference the array, cats. Then in my table cells, I refer to the values from that array. Again, the color you see here is completely arbitrary and was me making use of the entirety of my Word design skills.
Here’s the template as a whole to show you everything in context:
The Result
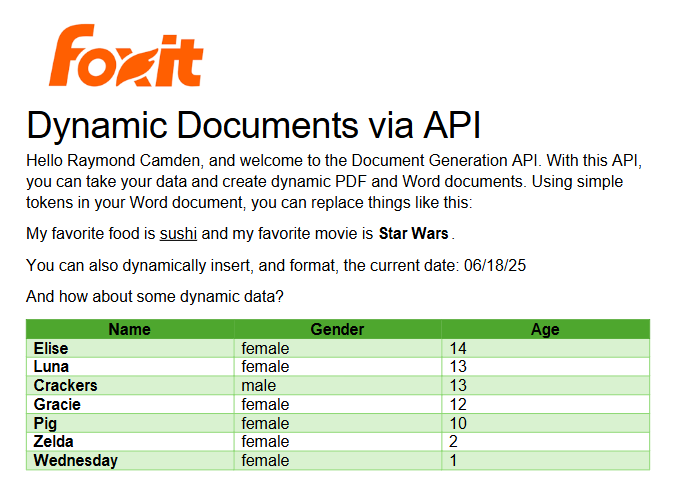
Given the code shown above with those values, and given the Word template just shared, once passed to the API, the following PDF is created:
What About Converting PDF to JSON?
So far we’ve been going one direction: JSON data in, PDF out. But what if you need to go the other way—extract structured content from a PDF and work with it in your application?
Foxit’s PDF Services API includes an Extract endpoint that handles exactly this. You upload a PDF, specify whether you want TEXT, IMAGE, or PAGE-level data, and the API returns the extracted content. The text output is particularly useful if you want to feed the result into a data pipeline, search index, or AI workflow.
Here’s a quick look at how extraction works in Python. First, upload your PDF:
def uploadDoc(path, id, secret):
    headers = {
        "client_id":id,
        "client_secret":secret
    }
    with open(path, 'rb') as f:
        files = {'file': (path, f)}
        request = requests.post(f"{HOST}/pdf-services/api/documents/upload", files=files, headers=headers)
    return request.json()

doc = uploadDoc("../../inputfiles/input.pdf", CLIENT_ID, CLIENT_SECRET)
Then call the Extract endpoint with the document ID and the type of content you want. The result comes back in a structured format you can parse, store, or pass along to other tools—including an LLM if you’re building an AI document pipeline.
You can read a full walkthrough in our PDF text extraction guide.
Ready to Try?
If this looks cool, be sure to check the docs for more information about the template language and API. Sign up for some free developer credentials and reach out on our developer forums with any questions.
If you’re building AI agents or LLM-powered workflows, Foxit also offers an MCP server that lets you connect your agents directly to Foxit PDF Services—so your AI tools can generate, extract, and process documents without any custom glue code.
Want the code? Get it on GitHub (Python).
If you are more of a Node person, check out that version. Get it on GitHub (Node.js).
Document Workflow Automation: An Architectural Guide to Building API-Driven Document Pipelines
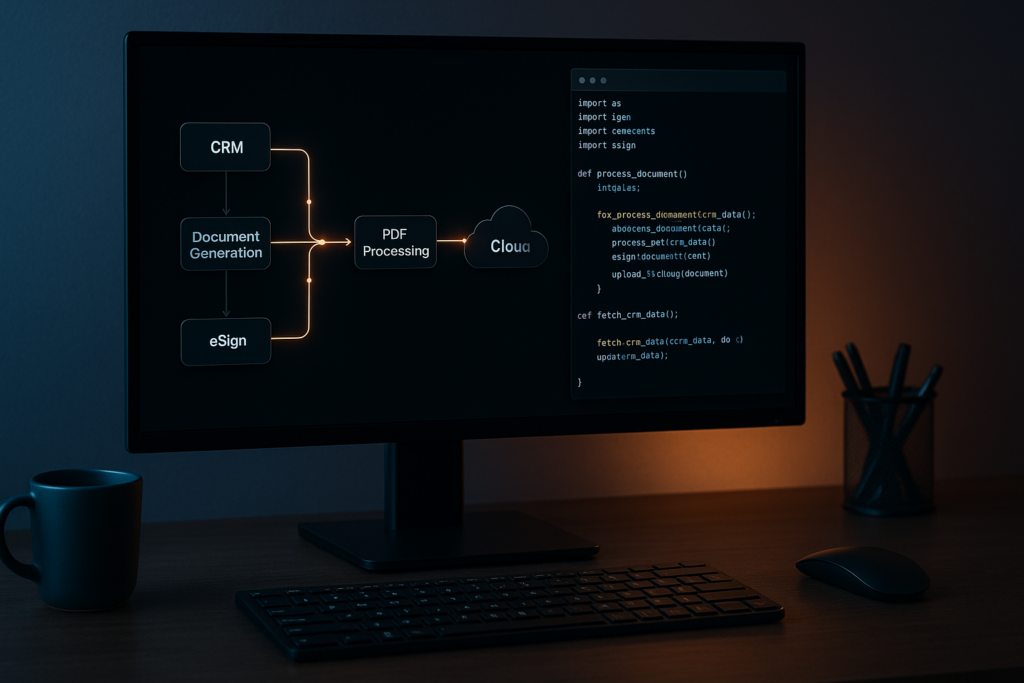
Automate document workflows with APIs. Learn how to scale PDF generation, eSign, and processing pipelines using modern architecture.
A PDF generation script that breaks on special characters. A cron job that retries failed document conversions by rerunning the entire job. An eSign flow tracked in a shared spreadsheet where “sent” means someone sent an email. These aren’t hypothetical failure modes; they’re the actual engineering artifacts that accumulate when document workflows grow faster than the architecture beneath them.
The scale problem compounds quickly. A team processing 200 contracts a month can survive on scripts and email hand-offs. At 2,000 contracts, those same workflows are the bottleneck. At 20,000, engineers are maintaining hacks that should have been replaced two years ago: retry logic bolted onto cron jobs, signing flows with no audit trail, and PDF generation that silently drops content when a CRM field contains a Unicode character.
The global intelligent document processing market was valued at $2.3B in 2024 and is projected to reach $12.35B by 2030 at a 33.1% CAGR, not because AI is newly fashionable, but because manual document handling is a measurable operational ceiling. The organizations crossing that ceiling aren’t doing it by adopting better tools in isolation. They’re adopting an architectural model.
The problem isn’t a lack of API options for document generation, conversion, or signing. The problem is the absence of a framework for assembling those operations into a pipeline that’s resilient, auditable, and testable. This guide gives you that framework, then grounds it in working Python examples against a real REST API suite.
Anatomy of a Document Automation Pipeline: The Five Stages
Before you write a single API call, you need a model for what you’re building. Every document workflow automation pipeline, regardless of domain, decomposes into five discrete stages.
Stage 1 is intake: you receive or capture the source data that will drive the document. This might be a webhook payload from your CRM when a deal closes, a form submission, or a batch export from an ERP system. The manual failure mode here is no schema validation, no deduplication, and no observable queue depth. Documents arrive out of order, get processed twice, or disappear without trace.
Stage 2 is generation: you render a document from a template and the structured data from stage 1. Common outputs include contracts, invoices, compliance reports, and onboarding kits. The failure mode is template version drift (production runs a different template version than staging), no validation of input data against the template’s expected schema, and no idempotent retry path if the generation call fails partway through.
Stage 3 is processing: you transform, extract from, or optimize the generated document. This covers format conversion (DOCX to PDF), content extraction for downstream indexing, compression, and linearization for fast web delivery. The failure mode is processing steps chained with no error isolation, so a failed compression step blocks the entire document from reaching signing.
Stage 4 is signing: you route the document for signature, track signer status, and capture consent with a full audit trail. The failure mode is manual polling for signer status, no webhook-driven callbacks, and no programmatic access to the audit log when a compliance review is triggered.
Stage 5 is archival and distribution: you store the signed document with a retention policy and push it to downstream systems, your DMS, CRM, or data warehouse. The failure mode is no content-addressed versioning, no record of which document version was signed, and no delivery confirmation to downstream consumers.
Idempotency is a first-class requirement at every stage. Each operation should be safely retryable: the same inputs produce the same output, and a retried call doesn’t create a duplicate document, signing request, or archive record. You implement idempotency in your orchestration layer by generating a unique key per document job and checking it before re-processing. This is a design responsibility. The API doesn’t handle it for you automatically.
The data flow through a well-designed document automation pipeline looks like this:

One constraint to know upfront: the three APIs in this stack don’t share a document ID namespace. Each stage boundary requires a file handoff. DocGen returns the rendered document as base64 in the response body. You decode it and either save it to disk or upload it directly to PDF Services. PDF Services returns a resultDocumentId that you download as a file, then re-upload to eSign, which runs on a different host with different authentication. The handoff pattern is a feature, not a limitation. It makes each stage independently testable and replayable.
Architectural Decision Framework: Four Axes Before You Write Code
Four decisions determine whether your document pipeline scales cleanly or becomes the thing your team rewrites in 18 months.
Axis 1: REST API vs. SDK
Use REST APIs for cloud-native, horizontally scalable pipelines where document operations are stateless HTTP calls. Use an SDK for on-premise deployments, air-gapped environments, or latency-sensitive processing where network round-trips are a constraint. Foxit offers both: REST APIs for cloud-native pipelines and PDF SDKs for on-premise or air-gapped deployments, so the axis is a real choice, not a theoretical one. If your document pipeline runs inside a regulated environment where data can’t leave the network perimeter, the SDK is the correct answer regardless of how convenient the REST API is.
Axis 2: Synchronous vs. Asynchronous Processing
This is the most consequential call you’ll make, and it varies by stage within a single pipeline.
| Factor | Synchronous | Asynchronous |
|---|---|---|
| Document size | Under ~10 pages | Large or variable-length |
| SLA requirement | Sub-second response | Variable completion time acceptable |
| Typical use case | Real-time contract preview | Batch invoice processing |
| Error handling | Inline exception handling | Dead-letter queue, retry on callback |
| Foxit API example | DocGen (returns document in response body) | PDF Services (returns taskId, poll for result); eSign (webhook callback on folder execution) |
The Foxit suite itself illustrates this split cleanly. DocGen is synchronous: POST your template and data payload, get the rendered document back immediately in the response body. No taskId, no polling. PDF Services is asynchronous: a conversion call returns a taskId, and you poll a status endpoint until the result is ready. eSign is asynchronous via webhooks: creating a folder returns immediately, and the API delivers a callback to your registered endpoint when the folder is executed (all signers complete). Design your pipeline around this reality rather than assuming a uniform execution model across all three APIs.
Axis 3: Linear Pipeline vs. Event-Driven Architecture
A linear pipeline (where stage A blocks until complete before stage B starts) works for simple three-stage flows with predictable volume and acceptable end-to-end latency. An event-driven pipeline, where each stage emits a completion event consumed by the next stage, is the correct choice when you need error isolation (a failed stage 3 doesn’t block stage 2 outputs from being replayed), partial replay (reprocess from stage 2 without regenerating the document), or parallel processing branches (send the same document to multiple downstream consumers simultaneously).
For pipelines that start as linear but need to scale, n8n is a practical bridge. You can call Foxit’s REST APIs from n8n workflows via HTTP Request nodes, which lets you wire pipeline stages without writing custom glue code while you validate the workflow logic before committing to a fully coded implementation.
Axis 4: Error Handling Strategy for Document Pipelines
Three components belong in your initial design, not bolted on afterward.
The first is idempotency keys. Generate a unique key per document job (a UUID tied to the source record ID and timestamp works well) and check it before re-processing. If a worker crashes mid-job and the job re-queues, the idempotency key prevents duplicate processing.
The second is dead-letter handling. Define what happens to a document that has failed three consecutive processing attempts. It should route to a dead-letter queue with the failure reason and enough context to replay it manually or trigger an alert.
The third is a circuit breaker. If PDF Services returns 5xx responses on five consecutive calls within 30 seconds, stop sending requests and return a fast failure to the calling system. This prevents a degraded upstream API from exhausting your worker pool and cascading failures downstream. The circuit breaker pattern maps cleanly onto any stateless HTTP integration.
Building the Pipeline: Foxit APIs in Practice
We’ll use Foxit’s PDF Services, DocGen, and eSign APIs for the examples below. The patterns translate to any REST-based document API, but these are the endpoints we’ll call.
Document Generation with the DocGen API
DocGen takes a DOCX template (encoded as base64) and a JSON data payload, and returns the rendered document immediately in the response body. There’s no templateId concept; you send the template inline with every request. This means you own template versioning. Keep your templates in version control and pin the version used for each job to your event log.
One practical cap to design around: the DocGen endpoint rejects .docx uploads larger than 4 MB once base64-encoded. Compress embedded images through Word’s Picture Format settings, drop embedded fonts and OLE objects, and split very large templates into multiple files before the request leaves your service.
The request uses client_id and client_secret as HTTP headers against na1.fusion.foxit.com.
# Illustrative example - not production code
import base64
import requests
import json

def generate_contract(template_path: str, data: dict) -> bytes:
    with open(template_path, "rb") as f:
        template_b64 = base64.b64encode(f.read()).decode("utf-8")

    payload = {
        "outputFormat": "pdf",
        "documentValues": data,
        "base64FileString": template_b64
    }

    response = requests.post(
        "https://na1.fusion.foxit.com/document-generation/api/GenerateDocumentBase64",
        headers={
            "client_id": "YOUR_CLIENT_ID",
            "client_secret": "YOUR_CLIENT_SECRET",
            "Content-Type": "application/json"
        },
        json=payload
    )
    response.raise_for_status()
    result = response.json()
    return base64.b64decode(result["base64FileString"])

# Data pulled from your CRM or ERP; validate against your template schema before calling
contract_data = {
    "client_name": "Acme Corp",
    "contract_value": "48000",
    "effective_date": "2025-09-01",
    "payment_terms": "Net 30"
}

pdf_bytes = generate_contract("templates/msa_v3.docx", contract_data)
Validate your data payload against the template’s expected field schema before the API call. DocGen doesn’t catch type errors or missing fields with a clean error response. You get a malformed document instead. A Pydantic model or JSON Schema validation step before the POST saves significant debugging time.
PDF Processing with the PDF Services API
The most common PDF Services operation is conversion. The DOCX-to-PDF call is also the simplest entry point for teams new to the API. PDF Services uses a two-step pattern: upload the source file first to get a documentId, then call the operation endpoint with that ID. Because operations are asynchronous, the call returns a taskId that you poll until the result is available.
# Illustrative example - not production code
import time
import requests

PDF_SERVICES_HOST = "https://na1.fusion.foxit.com"
HEADERS = {
    "client_id": "YOUR_CLIENT_ID",
    "client_secret": "YOUR_CLIENT_SECRET"
}

def upload_document(file_bytes: bytes, filename: str) -> str:
    response = requests.post(
        f"{PDF_SERVICES_HOST}/pdf-services/api/documents/upload",
        headers=HEADERS,
        files={"file": (filename, file_bytes, "application/octet-stream")}
    )
    response.raise_for_status()
    return response.json()["documentId"]

def poll_task(task_id: str) -> str:
    while True:
        status_resp = requests.get(
            f"{PDF_SERVICES_HOST}/pdf-services/api/tasks/{task_id}",
            headers=HEADERS
        )
        status_resp.raise_for_status()
        status_data = status_resp.json()

        if status_data["status"] == "COMPLETED":
            return status_data["resultDocumentId"]
        elif status_data["status"] == "FAILED":
            raise RuntimeError(f"Task failed: {status_data}")
        time.sleep(2)

def download_document(document_id: str) -> bytes:
    response = requests.get(
        f"{PDF_SERVICES_HOST}/pdf-services/api/documents/{document_id}/download",
        headers=HEADERS
    )
    response.raise_for_status()
    return response.content

def convert_docx_to_pdf(docx_bytes: bytes) -> bytes:
    doc_id = upload_document(docx_bytes, "document.docx")
    response = requests.post(
        f"{PDF_SERVICES_HOST}/pdf-services/api/documents/create/pdf-from-word",
        headers={**HEADERS, "Content-Type": "application/json"},
        json={"documentId": doc_id}
    )
    response.raise_for_status()
    result_doc_id = poll_task(response.json()["taskId"])
    return download_document(result_doc_id)

def extract_text(pdf_bytes: bytes) -> str:
    doc_id = upload_document(pdf_bytes, "document.pdf")
    response = requests.post(
        f"{PDF_SERVICES_HOST}/pdf-services/api/documents/modify/pdf-extract",
        headers={**HEADERS, "Content-Type": "application/json"},
        json={"documentId": doc_id, "extractType": "TEXT"}
    )
    response.raise_for_status()
    result_doc_id = poll_task(response.json()["taskId"])
    return download_document(result_doc_id).decode("utf-8")
The pdf-extract endpoint pulls text from the PDF (pass extractType as TEXT, IMAGE, or PAGE depending on what you need). Both conversion and extraction follow the same upload, execute, poll, download cycle. Feed the text output to a downstream search index so the document is queryable immediately after processing.
Signature Orchestration with the eSign API
The eSign API uses OAuth2, not header-based authentication. Your first call exchanges client_id and client_secret for a Bearer token on a separate host (na1.foxitesign.foxit.com).
# Illustrative example - not production code
import json
import requests
from flask import Flask, request as flask_request

ESIGN_HOST = "https://na1.foxitesign.foxit.com"

def get_esign_token(client_id: str, client_secret: str) -> str:
    response = requests.post(
        f"{ESIGN_HOST}/api/oauth2/access_token",
        data={
            "grant_type": "client_credentials",
            "client_id": client_id,
            "client_secret": client_secret
        }
    )
    response.raise_for_status()
    return response.json()["access_token"]

def create_signing_folder(token: str, pdf_bytes: bytes, signers: list) -> str:
    folder_payload = {
        "folderName": "MSA - Acme Corp",
        "parties": [
            {
                "firstName": s["first_name"],
                "lastName": s["last_name"],
                "emailId": s["email"],
                "permission": "FILL_FIELDS_AND_SIGN",
                "sequence": s["sequence"]
            }
            for s in signers
        ]
    }

    response = requests.post(
        f"{ESIGN_HOST}/api/folders/createfolder",
        headers={"Authorization": f"Bearer {token}"},
        files={
            "file": ("contract.pdf", pdf_bytes, "application/pdf"),
            "data": (None, json.dumps(folder_payload), "application/json")
        }
    )
    response.raise_for_status()
    return response.json()["folderId"]

# Webhook handler receives the folder-executed event
app = Flask(__name__)

@app.route("/webhooks/esign", methods=["POST"])
def esign_webhook():
    event = flask_request.json
    if event.get("event_type") == "folder_executed":
        folder_id = event["folder_id"]
        signed_doc_url = event["documents"][0]["download_url"]
        archive_signed_document(folder_id, signed_doc_url)
    return "", 200
Register your webhook endpoint in the eSign developer portal settings. When a folder is executed (all signers complete), the API POSTs the event payload to your endpoint. Extract the signed document URL from the callback and pass it to your archival stage. The eSign API also exposes a folder activity history endpoint that returns a complete audit trail: signer identity, timestamp, IP address, and authentication method for every interaction with the folder.
Chaining the Pipeline Stages with Idempotency
The file handoff between stages is explicit by design. Here’s a minimal orchestration wrapper that chains all three stages and demonstrates the idempotency pattern:
# Illustrative example - not production code
import uuid

def run_document_pipeline(job_id: str, template_path: str, data: dict, signers: list):
    idempotency_key = f"{job_id}:{uuid.uuid4()}"

    if is_already_processed(idempotency_key):
        return  # Safe to retry

    # Stage 2: Generate (DocGen returns PDF bytes synchronously)
    pdf_bytes = generate_contract(template_path, data)
    log_pipeline_event(job_id, "generated", hash_document(pdf_bytes))

    # Stage 3: Process (extract text for indexing; convert if needed)
    extracted = extract_text(pdf_bytes)
    index_document(job_id, extracted)
    log_pipeline_event(job_id, "processed", hash_document(pdf_bytes))

    # Stage 4: Sign (eSign returns folder ID; completion arrives via webhook)
    token = get_esign_token("YOUR_CLIENT_ID", "YOUR_CLIENT_SECRET")
    folder_id = create_signing_folder(token, pdf_bytes, signers)
    log_pipeline_event(job_id, "sent_for_signature", folder_id)

    mark_processed(idempotency_key)
For async pipelines handling thousands of documents per hour, replace direct function calls with queue messages. Each stage worker pulls a job from Redis or Amazon SQS, executes the API call, ACKs on success, and publishes a completion event to the next stage’s queue. If a worker crashes mid-job, the unACKed message re-queues and the idempotency key prevents re-processing a document that has already been completed.
Auditability and Compliance by Design
GDPR, HIPAA, and SOC 2 Type II each impose specific requirements around document lifecycle traceability. Retrofitting an audit layer onto a pipeline that wasn’t designed for it takes far more work than building it in from the start.
The event sourcing pattern fits document pipelines directly. Maintain an append-only log of every document event: created, converted, sent_for_signature, signed, archived. Use a stable document_id as the primary key. This log makes replay straightforward: if signing fails, you can replay from the processing output without regenerating the document from scratch. Each event record should include the stage name, timestamp, operator identity, and a SHA-256 hash of the document bytes at that stage.
The SHA-256 hash at each stage isn’t overhead; it’s your tamper detection mechanism. If the hash of the document presented for signing doesn’t match the hash recorded at generation, you have an integrity problem that’s immediately visible. This satisfies document integrity requirements in regulated industries without any additional tooling.
The Foxit eSign API’s built-in audit trail captures signer identity, timestamp, IP address, and authentication method for every folder interaction. Query the folder activity history endpoint to retrieve this data and persist it in your own audit store alongside your pipeline event log. Storing it in your own system, rather than relying solely on the eSign provider’s records, gives you a complete, portable audit trail that survives a provider migration.
Scaling Document Workflow Automation Without Rebuilding It
Batch Ingestion
Place incoming document jobs on a queue (Redis list or SQS FIFO queue) and run a pool of stateless worker processes. Each worker pulls a job, executes the API call with an idempotency key, and ACKs on success. Dead-letter routing handles permanently failed documents.
This pattern processes thousands of documents per hour without hammering the API or requiring coordination between workers. Because each REST API call is stateless, workers scale horizontally without any shared state. You add capacity by adding workers, not by redesigning the pipeline.
Credit Quota and Backoff
Foxit’s pricing model is credit-based: API calls consume credits, and calls pause when credits are exhausted until renewal or upgrade. Implement exponential backoff with jitter on 5xx responses as a general practice for any REST API integration.
# Illustrative example - not production code
import time
import random
import requests

def api_call_with_retry(url, headers, payload, max_retries=4):
    for attempt in range(max_retries):
        response = requests.post(url, headers=headers, json=payload)
        if response.status_code < 500:
            return response
        wait = (2 ** attempt) + random.uniform(0, 1)
        time.sleep(wait)
    response.raise_for_status()
Log quota exhaustion as a separate metric category. Consistent credit exhaustion is a signal to upgrade your plan. It shouldn’t require digging through application logs to detect.
Observability
Instrument each pipeline stage with three metrics: processing latency (time from job enqueue to stage completion), error rate per stage, and document volume per time window. Use structured JSON logging so stage failures are queryable without parsing free-text log lines. Tools like OpenTelemetry make it straightforward to emit these metrics in a vendor-neutral format.
A document that enters the pipeline and never exits is a data integrity problem. Track in-flight documents explicitly: when a job enters signing, record it. When the eSign webhook fires, close the record. Any job that’s been in stage 4 for longer than your expected SLA without a webhook callback warrants an alert, not just a log entry.
Ship Your First Document Pipeline Stage Today
The gap between a collection of one-off scripts and a production document pipeline isn’t as wide as it looks. It starts with one stage, not five.
Create a free account directly at account.foxit.com/site/sign-up (no credit card required; the Developer plan ships with 500 credits per year). The direct URL skips the pricing-page redirect you would otherwise hit from the developer portal, so you finish on the account form and then land in the API Keys section where credentials live. From there, make your first conversion call: POST a DOCX file from your own system to the PDF Services conversion endpoint using the Python example above and confirm you get a valid PDF back. That single round-trip validates your auth, your network path, and the basic integration pattern before you write any orchestration logic.
Once that’s working, pick one document type in your system that’s currently generated or processed manually and map it to the five-stage model from the second section of this article. Find the highest-friction bottleneck stage and start there, not at stage 1. If generation is the pain point, use the Developer Playground in the developer portal to test DocGen templates against real data payloads before writing a single line of integration code. If signing is the bottleneck, wire up the eSign folder creation and a webhook handler to close the loop.
The patterns in this guide (idempotency keys, event-sourced audit logs, async stage handoffs, circuit breakers) apply to any document API stack. A unified REST API suite covering generation, processing, and signing from a single provider cuts the number of authentication models to manage, reduces integration surface area, and gives you a consistent debugging path when something fails across stages. That’s the practical payoff of treating document workflow automation as a first-class architectural concern rather than a collection of scripts that should have been replaced two years ago.
Start building your first pipeline stage today.
Frequently Asked Questions
What is document workflow automation?
Document workflow automation replaces manual, script-driven document operations (generation, conversion, signing, and archival) with a structured API-driven pipeline. Each stage is independently testable, retryable via idempotency keys, and observable through structured event logs. At scale (thousands of documents per hour), automation eliminates the bottlenecks created by cron jobs, shared spreadsheets, and one-off scripts.
When should I use a synchronous vs. asynchronous document API?
Use synchronous APIs when you need sub-second responses for small documents, for example, real-time contract previews under approximately 10 pages. Use asynchronous APIs (polling or webhook-driven) for large or variable-length documents, batch invoice processing, or any workflow where variable completion time is acceptable. Many document API suites, including Foxit’s, mix both models across different endpoints, so design each pipeline stage around the actual execution model of the specific API call it makes.
How do I make a document pipeline idempotent?
Generate a unique key per document job (a UUID tied to the source record ID and timestamp works well) and check whether that key has already been processed before executing any stage. Store processed keys in a fast key-value store (Redis is a common choice). On retry, the idempotency check returns early without duplicating the document, signing request, or archive record. This is an orchestration-layer responsibility; the document API itself doesn’t provide it automatically.
What compliance requirements apply to document pipelines?
GDPR, HIPAA, and SOC 2 Type II each require document lifecycle traceability. Implement an append-only event log keyed by a stable document_id, capturing stage name, timestamp, operator identity, and a SHA-256 hash of the document at each stage. For eSign specifically, store the provider’s audit trail (signer identity, IP address, authentication method, timestamp) in your own system so the record is portable across provider migrations.
HTML to PDF API: Building Production-Grade Conversion Pipelines with Foxit PDF Services

Automate HTML to PDF conversion with Foxit’s API. Build scalable pipelines to replace Puppeteer, handle bulk processing, and ensure reliable document generation.
Your Puppeteer setup works fine at low volume. You launch a Chrome process, load the page, call page.pdf(), and write the bytes to disk. Clean enough. Then your invoice generation hits 500 documents per night, your report export feature goes live in three time zones simultaneously, and the wheels start coming off. Chrome processes time out waiting for JavaScript hydration. Memory climbs until your container OOMs. The font that renders correctly on your MacBook looks wrong on the Linux build server. You spend a Friday afternoon tuning networkidle2 timeouts per template instead of shipping features.
This is the failure mode of treating a rendering engine as a conversion service. Headless Chrome is a browser. Running it at production document volume means you’re operating a browser fleet: process pooling, memory isolation, crash recovery, rendering consistency across OS environments. That infrastructure overhead comes directly out of engineering time.
The architectural alternative is a managed REST API: POST your HTML (or a URL), let the service render the PDF, and download the result. The rendering infrastructure becomes the API provider’s problem. This guide covers how to build that conversion pipeline end-to-end using Foxit PDF Services API, from authentication through batch processing and production error handling.
The Production Problem with Headless Browser PDF Conversion
A standard Puppeteer setup looks like this:
const browser = await puppeteer.launch();
const page = await browser.newPage();
await page.goto(url, { waitUntil: "networkidle2" });
const pdf = await page.pdf({ format: "A4", printBackground: true });
await browser.close();
At five documents a day, this is fine. At five hundred concurrent, each puppeteer.launch() spins up a full Chromium process (roughly 100-200MB RSS on Linux). If you’re running in a container with 2GB of memory and you get 20 concurrent requests, you’re at the limit before accounting for the Node.js process itself or any other application memory.
The standard solution is a Chrome process pool (libraries like puppeteer-cluster or generic-pool). Now you’re managing pool size tuning, handling pool exhaustion under burst traffic, and writing cleanup logic for crashed Chrome instances. You’ve added significant operational complexity to what started as a one-liner.
Font rendering is a separate category of pain. Chrome on macOS uses CoreText. Chrome on Linux uses FreeType with fontconfig. The same CSS font-family: 'Inter' declaration produces visibly different output depending on whether Inter is installed as a system font or loaded via a @font-face declaration, and whether the fallback stack resolves differently across environments. Teams that ship invoice PDFs to customers discover this in production, not in development.
JavaScript execution adds another dimension. If your page renders a data table via a React component that fetches data on mount, networkidle2 is not a reliable wait condition. Network activity can go idle before the DOM has finished updating. You end up tuning waitForSelector or adding arbitrary timeouts per template, and those timeouts become technical debt that breaks when the page changes.
The architectural fix isn’t a better Puppeteer wrapper. It’s offloading the entire rendering layer to a service that was built to handle it reliably: a managed REST API with consistent rendering environments, predictable behavior, and no infrastructure for your team to maintain.
How Cloud HTML-to-PDF APIs Handle Rendering
Cloud conversion APIs typically accept input in two modes: URL mode and file upload mode.
In URL mode, you pass a public URL. The API fetches the page, renders it, and returns a PDF. This works when your page is publicly accessible and all assets (fonts, images, stylesheets) load from the same domain or CDN. The tradeoff is that the API’s rendering environment must reach your server, which creates a dependency on network reachability and your server’s response time. If you’re generating PDFs from an internal dashboard behind a VPN, URL mode doesn’t work without additional networking.
In file upload mode, you construct the complete HTML file (with inlined CSS and assets where needed) and upload it to the API. The service processes the file and returns a PDF. This eliminates the external asset dependency and makes your conversion more deterministic: the same HTML file always produces the same PDF, regardless of what’s deployed on your web server at the time.
Beyond input mode, rendering fidelity depends on several factors:
- CSS
@media printrules control what renders into the PDF. Navigation bars, sidebars, and hover states should be hidden via print stylesheets so they don’t appear in the output. - Font loading strategy determines rendering consistency. Relying on system fonts produces different output across environments. Embedding fonts via
@font-facewith a CDN URL or base64-inlined data guarantees consistent rendering. - Page layout properties (paper size, margins, orientation) can be controlled through CSS
@pagerules embedded in the HTML itself. This keeps layout configuration in the document rather than in API parameters. - JavaScript execution matters for pages that render content dynamically. Some APIs wait for the page to stabilize before capturing; others capture immediately.
These factors are the same ones you’d manage with Puppeteer’s page.pdf() options, but with a cloud API you handle them through your HTML/CSS rather than through in-process code.
Setting Up Foxit PDF Services API: Authentication and First Conversion
Foxit PDF Services API is a cloud-hosted REST API built on Foxit’s proprietary PDF engine, backed by over 20 years of PDF technology development. Create an account at the Foxit Developer Portal (the Developer plan is free, includes 500 credits/year, and requires no credit card). Generate your API credentials (a client_id and client_secret) from the Developer Dashboard.
Understanding the Async Workflow
Unlike a simple request-response API, Foxit PDF Services uses an asynchronous task-based workflow. Every operation follows the same pattern:
- Submit the job (upload a file, or POST a URL)
- Receive a
taskIdin the response - Poll the task status until it completes or fails
- Download the result using the
resultDocumentIdfrom the completed task
This design handles long-running operations gracefully. A complex HTML page might take several seconds to render; the async pattern means your client never blocks on a single HTTP request waiting for rendering to finish.
URL-to-PDF Conversion
For pages that are publicly accessible, URL-to-PDF is the simplest path. You POST the URL directly and the API fetches, renders, and converts it. Here’s the complete workflow in Python using the requests library:
import os
import requests
from time import sleep

HOST = os.environ["FOXIT_API_HOST"]  # e.g., https://na1.fusion.foxit.com
CLIENT_ID = os.environ["FOXIT_CLIENT_ID"]
CLIENT_SECRET = os.environ["FOXIT_CLIENT_SECRET"]

AUTH_HEADERS = {
    "client_id": CLIENT_ID,
    "client_secret": CLIENT_SECRET,
}


def create_url_to_pdf_task(url: str) -> str:
    """Submit a URL for PDF conversion. Returns a taskId."""
    headers = {**AUTH_HEADERS, "Content-Type": "application/json"}
    response = requests.post(
        f"{HOST}/pdf-services/api/documents/create/pdf-from-url",
        json={"url": url},
        headers=headers,
    )
    response.raise_for_status()
    return response.json()["taskId"]


def poll_task(task_id: str, interval: int = 5) -> dict:
    """Poll until the task completes or fails. Returns the task status object."""
    headers = {**AUTH_HEADERS, "Content-Type": "application/json"}
    while True:
        response = requests.get(
            f"{HOST}/pdf-services/api/tasks/{task_id}",
            headers=headers,
        )
        response.raise_for_status()
        status = response.json()
        if status["status"] == "COMPLETED":
            return status
        elif status["status"] == "FAILED":
            raise RuntimeError(f"Task {task_id} failed: {status}")
        sleep(interval)


def download_document(document_id: str, output_path: str) -> None:
    """Download the resulting PDF by its document ID."""
    response = requests.get(
        f"{HOST}/pdf-services/api/documents/{document_id}/download",
        headers=AUTH_HEADERS,
        stream=True,
    )
    response.raise_for_status()
    with open(output_path, "wb") as f:
        for chunk in response.iter_content(chunk_size=8192):
            f.write(chunk)


# Full workflow: URL to PDF
task_id = create_url_to_pdf_task("https://example.com/invoice/1042")
result = poll_task(task_id)
download_document(result["resultDocumentId"], "invoice_1042.pdf")
print("PDF generated successfully.")
In this code, you define three reusable functions that map to the async workflow: create_url_to_pdf_task() submits a public URL and returns a taskId, poll_task() checks the task status in a loop until it reaches COMPLETED or FAILED, and download_document() streams the resulting PDF to disk. The final three lines wire them together into the complete conversion pipeline.
Before running: Set your
FOXIT_API_HOST,FOXIT_CLIENT_ID, andFOXIT_CLIENT_SECRETenvironment variables with the values from your Foxit Developer Dashboard. Never commit credentials to source control; use environment variables or a secrets manager.
HTML File-to-PDF Conversion
When your content isn’t publicly accessible (internal dashboards, dynamically generated reports), you can upload an HTML file directly. This follows the standard 4-step async pattern:
def upload_document(file_path: str) -> str:
    """Upload a file to Foxit. Returns a documentId."""
    with open(file_path, "rb") as f:
        response = requests.post(
            f"{HOST}/pdf-services/api/documents/upload",
            files={"file": f},
            headers=AUTH_HEADERS,
        )
    response.raise_for_status()
    return response.json()["documentId"]


def create_html_to_pdf_task(document_id: str) -> str:
    """Create an HTML-to-PDF conversion task. Returns a taskId."""
    headers = {**AUTH_HEADERS, "Content-Type": "application/json"}
    response = requests.post(
        f"{HOST}/pdf-services/api/documents/create/pdf-from-html",
        json={"documentId": document_id},
        headers=headers,
    )
    response.raise_for_status()
    return response.json()["taskId"]


# Full workflow: HTML file to PDF
doc_id = upload_document("report.html")
task_id = create_html_to_pdf_task(doc_id)
result = poll_task(task_id)
download_document(result["resultDocumentId"], "report.pdf")
print("HTML converted to PDF successfully.")
In this code, you first upload a local .html file via upload_document(), which returns a documentId referencing the uploaded file on Foxit’s servers. Then create_html_to_pdf_task() submits that documentId for conversion. The rest of the workflow is identical: poll for completion, then download the result.
Note: Replace
"report.html"with the path to your own HTML file. This code reuses thepoll_task()anddownload_document()functions from the URL-to-PDF example above, so make sure both are defined in the same script.
The key difference: URL-to-PDF skips the upload step (you POST the URL directly), while HTML file conversion requires uploading the .html file first via the /documents/upload endpoint. Both use the same poll-and-download pattern after task creation.
Refer to the Foxit API documentation and the Postman workspace for the complete parameter reference, including any additional rendering options supported by these endpoints. The GitHub demo repository contains working examples in Python, Node.js, and PHP.
Controlling CSS and JavaScript Rendering in HTML-to-PDF Conversion
Regardless of which API you use for HTML-to-PDF conversion, the quality of the output depends on how well you prepare the HTML. The rendering parameters live in your document, not in API request fields.
The single most common rendering problem between “looks right in a browser” and “looks wrong in a PDF” is the CSS media type. By default, browsers render with screen styles, which means your navigation bar, sidebar, and hover states all appear. For PDF output, you want your @media print rules to take over.
Write your print styles explicitly:
@media print {
  nav,
  .sidebar,
  .no-print {
    display: none;
  }

  body {
    font-size: 11pt;
    font-family: "Inter", Arial, sans-serif;
    color: #000;
  }

  .invoice-table {
    page-break-inside: avoid;
  }

  .page-header {
    page-break-before: always;
  }

  @page {
    size: A4;
    margin: 20mm 15mm;
  }
}
In this stylesheet, you hide non-essential UI elements (navigation, sidebars) when printing, set a clean body font, and use page-break-inside: avoid to prevent the renderer from splitting a table row across pages. The nested @page rule sets the paper size and margins at the CSS level, so layout configuration stays in the document rather than in API parameters.
For font rendering consistency, don’t rely on system fonts. Include a @font-face declaration in your HTML that loads from a CDN, or inline the font as base64:
<style>
  @font-face {
    font-family: "Inter";
    src: url("https://fonts.gstatic.com/s/inter/v13/UcCO3FwrK3iLTeHuS_fvQtMwCp50KnMw2boKoduKmMEVuLyfAZ9hiJ.woff2")
      format("woff2");
    font-weight: 400;
    font-style: normal;
  }
</style>
In this snippet, you embed the Inter font directly in the HTML using a @font-face declaration that points to Google Fonts. This guarantees Inter renders in the PDF regardless of what fonts are installed in the API’s container environment. The tradeoff is latency: the rendering engine fetches the font file during conversion. If you’re running high-volume batch jobs, consider inlining the font as a base64 data URI to eliminate that network round trip.
For JavaScript-heavy pages, make sure the content has fully rendered before the API captures it. If you’re using the URL-to-PDF endpoint, the API fetches and renders the live page, so your page’s JavaScript will execute. For the HTML file upload path, keep your HTML self-contained with all data already rendered in the markup rather than relying on client-side JavaScript to populate it after load.
Batch HTML-to-PDF Conversion at Scale
Sequential conversion is the naive starting point:
for invoice in invoices:
    doc_id = upload_document(invoice.html_path)
    task_id = create_html_to_pdf_task(doc_id)
    result = poll_task(task_id)
    download_document(result["resultDocumentId"], f"output/{invoice.id}.pdf")
In this loop, each invoice is processed one at a time: upload, convert, poll, download, then move to the next. Each iteration blocks on the poll loop before starting the next conversion. At a few seconds per document (upload, render, poll, download), 500 invoices could take over 30 minutes.
The fix is concurrent dispatch with a semaphore to cap parallelism. Check your plan’s rate limits before setting the semaphore ceiling in production.
import asyncio
import aiohttp
import os
from pathlib import Path

HOST = os.environ["FOXIT_API_HOST"]
CLIENT_ID = os.environ["FOXIT_CLIENT_ID"]
CLIENT_SECRET = os.environ["FOXIT_CLIENT_SECRET"]
MAX_CONCURRENT = 10  # Adjust based on your plan's rate limits


async def convert_one(
    session: aiohttp.ClientSession,
    sem: asyncio.Semaphore,
    invoice_id: str,
    html_path: str,
    output_dir: Path,
) -> tuple[str, bool]:
    async with sem:
        try:
            auth = {"client_id": CLIENT_ID, "client_secret": CLIENT_SECRET}

            # Step 1: Upload the HTML file
            with open(html_path, "rb") as f:
                form = aiohttp.FormData()
                form.add_field("file", f, filename="document.html")
                async with session.post(
                    f"{HOST}/pdf-services/api/documents/upload",
                    data=form,
                    headers=auth,
                ) as resp:
                    if resp.status != 200:
                        return invoice_id, False
                    upload_result = await resp.json()
                    doc_id = upload_result["documentId"]

            # Step 2: Create the conversion task
            async with session.post(
                f"{HOST}/pdf-services/api/documents/create/pdf-from-html",
                json={"documentId": doc_id},
                headers={**auth, "Content-Type": "application/json"},
            ) as resp:
                if resp.status != 200:
                    return invoice_id, False
                task_result = await resp.json()
                task_id = task_result["taskId"]

            # Step 3: Poll for completion
            while True:
                async with session.get(
                    f"{HOST}/pdf-services/api/tasks/{task_id}",
                    headers={**auth, "Content-Type": "application/json"},
                ) as resp:
                    status = await resp.json()
                    if status["status"] == "COMPLETED":
                        result_doc_id = status["resultDocumentId"]
                        break
                    elif status["status"] == "FAILED":
                        print(f"Task failed for {invoice_id}")
                        return invoice_id, False
                await asyncio.sleep(5)

            # Step 4: Download the result
            async with session.get(
                f"{HOST}/pdf-services/api/documents/{result_doc_id}/download",
                headers=auth,
            ) as resp:
                if resp.status == 200:
                    pdf_bytes = await resp.read()
                    (output_dir / f"{invoice_id}.pdf").write_bytes(pdf_bytes)
                    return invoice_id, True
                return invoice_id, False

        except Exception as e:
            print(f"Error converting {invoice_id}: {e}")
            return invoice_id, False


async def batch_convert(invoices: list[dict], output_dir: str = "output") -> dict:
    output_path = Path(output_dir)
    output_path.mkdir(exist_ok=True)

    sem = asyncio.Semaphore(MAX_CONCURRENT)
    connector = aiohttp.TCPConnector(limit=MAX_CONCURRENT)

    async with aiohttp.ClientSession(connector=connector) as session:
        tasks = [
            convert_one(session, sem, inv["id"], inv["html_path"], output_path)
            for inv in invoices
        ]
        results = await asyncio.gather(*tasks)

    succeeded = [r[0] for r in results if r[1]]
    failed = [r[0] for r in results if not r[1]]
    return {"succeeded": len(succeeded), "failed": failed}


# Usage
invoices = [
    {"id": "inv_1042", "html_path": "templates/invoice_1042.html"},
    {"id": "inv_1043", "html_path": "templates/invoice_1043.html"},
    # ... up to thousands of entries
]

result = asyncio.run(batch_convert(invoices))
print(f"Converted {result['succeeded']} PDFs. Failed: {result['failed']}")
In this code, you use asyncio and aiohttp to process multiple HTML-to-PDF conversions concurrently. The convert_one() function runs the full 4-step workflow (upload, create task, poll, download) for a single invoice, while batch_convert() dispatches all invoices in parallel, capped by a semaphore. Results are collected via asyncio.gather() and split into succeeded and failed lists.
Before running: Set
FOXIT_API_HOST,FOXIT_CLIENT_ID, andFOXIT_CLIENT_SECRETas environment variables with your credentials from the Developer Dashboard. AdjustMAX_CONCURRENTbased on your plan’s rate limits, and update theinvoiceslist with your actual file paths.
With MAX_CONCURRENT = 10 and several seconds per conversion (including polling), the batch processes 10 documents at a time instead of one at a time. The semaphore prevents you from flooding the API with simultaneous requests and hitting the rate limit ceiling. Beyond aiohttp, no additional dependencies are needed since asyncio is part of Python’s standard library.
Credit consumption at scale: the Developer plan includes 500 credits/year. The Startup plan ($1,750/year) provides 3,500 credits. Each conversion typically costs 1 credit. For higher volumes, the Business plan ($4,500/year) includes 150,000 credits. Check your remaining credit balance via the Developer Dashboard before launching a large batch job.
For volumes beyond what a single process can handle efficiently, a queue-based architecture decouples submission from processing. Services like Amazon SQS or Redis Streams handle the message brokering:
App Server → Message Queue (SQS / Redis Streams) → Worker Pool (N workers)
  Worker: upload HTML → create task → poll → download PDF → store in S3/GCS
  Worker: update job status in Postgres / Redis
Each worker picks a job from the queue, runs the 4-step conversion workflow, writes the resulting PDF to S3 or GCS, and updates the job status in a database. This pattern handles burst volume naturally: jobs queue up during spikes, workers drain at the rate the API allows, and your app server is never blocked waiting for conversions to complete.
Production Deployment Patterns for HTML-to-PDF Pipelines
Error Handling and Retry Logic
Not all errors warrant a retry. Map HTTP status codes to decisions before writing any retry logic.
A 400 Bad Request means your request body is malformed. Retrying the same payload returns another 400. Fix the payload, don’t retry. A 429 Too Many Requests and a 503 Service Unavailable are transient: back off and retry. A FAILED task status means the conversion itself failed (possibly due to invalid HTML or unreachable URLs); check the task response for diagnostic details.
import time
import random
import requests
from requests.exceptions import RequestException

PERMANENT_ERRORS = {400, 401, 403, 422}
TRANSIENT_ERRORS = {429, 500, 502, 503, 504}


def post_with_retry(
    url: str,
    max_retries: int = 4,
    base_delay: float = 1.0,
    **kwargs,
) -> requests.Response:
    """POST with exponential backoff and jitter for transient errors."""
    for attempt in range(max_retries + 1):
        try:
            response = requests.post(url, timeout=60, **kwargs)

            if response.status_code in range(200, 300):
                return response

            if response.status_code in PERMANENT_ERRORS:
                raise ValueError(
                    f"Permanent error {response.status_code}: {response.text}"
                )

            if response.status_code in TRANSIENT_ERRORS:
                if attempt == max_retries:
                    raise RuntimeError(
                        f"Max retries exceeded. Last status: {response.status_code}"
                    )
                delay = base_delay * (2 ** attempt) + random.uniform(0, 0.5)
                print(f"Transient error {response.status_code}. Retrying in {delay:.1f}s...")
                time.sleep(delay)

        except RequestException as e:
            if attempt == max_retries:
                raise
            delay = base_delay * (2 ** attempt) + random.uniform(0, 0.5)
            time.sleep(delay)

    raise RuntimeError("Unexpected: exhausted retries without returning or raising")


# Usage with the URL-to-PDF endpoint
auth_headers = {
    "client_id": CLIENT_ID,
    "client_secret": CLIENT_SECRET,
    "Content-Type": "application/json",
}

response = post_with_retry(
    f"{HOST}/pdf-services/api/documents/create/pdf-from-url",
    json={"url": "https://example.com/invoice/1042"},
    headers=auth_headers,
)
task_id = response.json()["taskId"]
In this code, you wrap every POST request in a retry loop with exponential backoff. The function distinguishes between permanent errors (like 400 or 401, which should not be retried) and transient errors (like 429 or 503, which resolve on their own). Each retry doubles the wait time and adds random jitter to avoid synchronized retry waves.
Before running: Replace
CLIENT_ID,CLIENT_SECRET, andHOSTwith your Foxit credentials and API host, or load them from environment variables as shown in the earlier examples.
The jitter (random.uniform(0, 0.5)) prevents a thundering herd where every worker wakes up and retries simultaneously after a 429 burst. Without it, plain exponential backoff still produces synchronized retry waves when all workers hit the rate limit at the same time.
Output Optimization: Compression and Linearization
After conversion, you can chain additional PDF operations using the same async pattern. Upload the resulting PDF, call the compression or linearization endpoint, poll, and download the optimized version.
For PDFs served directly in a browser, linearization enables Fast Web View, which lets the browser display page one while the rest of the file downloads:
def compress_and_linearize(input_pdf_path: str, output_path: str) -> None:
    """Compress a PDF, then linearize it for fast web viewing."""
    auth = {"client_id": CLIENT_ID, "client_secret": CLIENT_SECRET}
    json_headers = {**auth, "Content-Type": "application/json"}

    # Upload the PDF
    doc_id = upload_document(input_pdf_path)

    # Compress
    resp = requests.post(
        f"{HOST}/pdf-services/api/documents/modify/pdf-compress",
        json={"documentId": doc_id, "compressionLevel": "MEDIUM"},
        headers=json_headers,
    )
    resp.raise_for_status()
    task = poll_task(resp.json()["taskId"])
    compressed_doc_id = task["resultDocumentId"]

    # Linearize the compressed result (no need to re-upload; use the resultDocumentId)
    resp = requests.post(
        f"{HOST}/pdf-services/api/documents/optimize/pdf-linearize",
        json={"documentId": compressed_doc_id},
        headers=json_headers,
    )
    resp.raise_for_status()
    task = poll_task(resp.json()["taskId"])

    # Download the final optimized PDF
    download_document(task["resultDocumentId"], output_path)
In this code, you chain two PDF operations back-to-back. First, you upload the PDF and compress it at MEDIUM level (valid options are LOW, MEDIUM, and HIGH). Once compression completes, you pass the resultDocumentId directly into the linearization step, which avoids a second upload. The final download gives you a PDF that is both smaller and optimized for progressive loading in browsers.
Note: This function reuses
upload_document(),poll_task(), anddownload_document()from the earlier examples. Make sure those functions are defined in the same script with your credentials configured. The Foxit developer blog post on chaining PDF actions covers this pattern in detail.
Monitoring and Secret Management
Track three metrics per conversion job: latency (to detect API degradation), credit consumption per job type (to project when you’ll exhaust your plan), and failure rate by error code (to catch template regressions before they hit customers). Set an alert when remaining credits drop below 20% of your plan allocation. The Foxit Developer Dashboard exposes real-time usage data you can check before launching batch runs.
API credentials go in environment variables or a secrets manager (AWS Secrets Manager, HashiCorp Vault, GCP Secret Manager). Rotate credentials from the Developer Dashboard when team members leave or when you suspect a credential has been exposed. You can generate new credentials and revoke old ones without a service interruption if you update your environment first.
Run Your First HTML-to-PDF Conversion
Sign up for the Foxit Developer plan at no cost, no credit card, with 500 credits available immediately. Generate your client_id and client_secret from the Developer Dashboard. Clone the demo repository for working examples in Python, Node.js, and PHP, or copy the URL-to-PDF example from this guide and run it against a public page.
After your first conversion completes, check your credit usage in the Dashboard to validate your throughput estimate and cost projection for production volume. The Startup plan ($1,750/year for 3,500 credits) is self-serve with no sales call required if you need more capacity.
Convert Office Docs to PDFs Automatically with Foxit PDF Services API

See how to build a powerful, automated workflow that converts Office documents (Word, Excel, PowerPoint) into PDFs. This step-by-step guide uses the Foxit PDF Services API, the Pipedream low-code platform, and Dropbox to create a seamless “hands-off” document processing system. We’ll walk through every step, from triggering on a new file to uploading the final PDF.
Convert Office Docs to PDFs Automatically with Foxit PDF Services API
With our REST APIs, it is now possible for any developer to set up an integration and document workflow using their language of choice. But what about workflow automations? Luckily, this is even simpler (of course, depending on platform) as you can rely on the workflow service to handle a lot the heavy lifting of whatever automation needs you may have. In this blog post, I’m going to demonstrate a workflow making use of Pipedream. Pipedream is a low-code platform that lets you build flexible workflows by piecing together various small atomic steps. It’s been a favorite of mine for some time now, and I absolutely recommend it. But note that what I’ll be showing here today could absolutely be done on other platforms, like n8n.
Want the televised version? Catch the video below:
Our Office Document to PDF Workflow
Our workflow is based on Dropbox folders and handles automatic conversion of Office docs to PDFs. To support that, it does the following:
- Listen for new files in a Dropbox folder
- Do a quick sanity check (is it in the input subdirectory and an Office file)
- Download the file to Pipedream
- Send it to Foxit via the Upload API
- Kick off the appropriate conversion based on the Office type
- Check status via the Status API
- When done, download the result to Pipedream
- And finally, push it up to Dropbox in an output subdirectory
Here’s a nice graphical representation of this workflow:
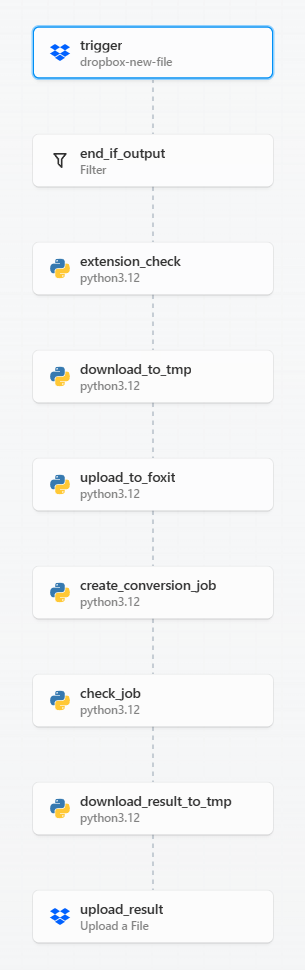
Before we get into the code, note that workflow platforms like Pipedream are incredibly flexible. When I build workflows with platforms like this I try to make each step as atomic, and focused as possible. I could absolutely have built a shorter, more compact version of this workflow. However, having it broken out like this makes it easier to copy and modify going forward (which is exactly how this one came about, it was based on a simpler, earlier version).
Ok, let's break it down, step-by-step.
Getting Triggered
In Pipedream, workflows begin with a trigger. While there are many options for this, my workflow uses a "New File From Dropbox" trigger. I logged into Dropbox via Pipedream so it had access to my account. I then specified a top level folder, "Foxit", for the integration. Additionally, there are two more important settings:
- Recursive – this tells the trigger to file for any new file under the root directory, "Foxit". My Dropbox Foxit folder has both an input and output directory.
- Include Link – this tells Pipedream to ensure we get a link to the new file. This is required to download it later.
Filtering the Document Flow
The next two steps are focused on filtering and stopping the workflow, if necessary. The first, end_if_output, is a built-in Pipedream step that lets me provide a condition for the workflow to end. First, I'll check the path value from the trigger (the path of the new file) and if it contains "output", this means it's a new file in the output directory and the workflow should not run.
The next filter is a code step that handles two tasks. First, it checks whether the new file is a supported Office type—.docx, .xlsx, or .pptx—using our APIs. If the extension isn’t one of these, the workflow ends programmatically.
Later in the workflow, I’ll also need that same extension to route the request to the correct endpoint. So the code handles both: validation and preservation of the extension.
import os

def handler(pd: "pipedream"):
  base, extension = os.path.splitext(pd.steps['trigger']['event']['name'])

  if extension == ".docx":
    api = "/pdf-services/api/documents/create/pdf-from-word"
  elif extension == ".xlsx":
    api = "/pdf-services/api/documents/create/pdf-from-excel"
  elif extension == ".pptx":
    api = "/pdf-services/api/documents/create/pdf-from-ppt"
  else:
    return pd.flow.exit(f"Exiting workflow due to unknow extension: {extension}.")

  return { "api":api }
As you can see, if the extension isn't valid, I'm exiting the workflow using pd.flow.exit (while also logging out a proper message, which I can check later via the Pipedream UI). I also return the right endpoint if a supported extension was used. This will be useful later in the flow.
Download and Upload API Data
The next two steps are primarily about moving data from the input source (Dropbox) to our API (Foxit).
The first step, download_to_tmp, uses a simple Python script to transfer the Dropbox file into the /tmp directory for use in the workflow
import requests

def handler(pd: "pipedream"):
    download_url = pd.steps["trigger"]["event"]["link"]
    file_path = f"/tmp/{pd.steps['trigger']['event']['name']}"

    with requests.get(download_url, stream=True) as response:
      response.raise_for_status()
      with open(file_path, "wb") as file:
          for chunk in response.iter_content(chunk_size=8192):
            file.write(chunk)

    return file_path
Notice at the end that I return the path I used in Pipedream. This action then leads directly into the next step of uploading to Foxit via the Upload API:
import os
import requests

def handler(pd: "pipedream"):
  clientid = os.environ.get('FOXIT_CLIENT_ID')
  secret = os.environ.get('FOXIT_CLIENT_SECRET')
  HOST = os.environ.get('FOXIT_HOST')

  headers = {
    "client_id":clientid,
    "client_secret":secret
  }

  with open(pd.steps['download_to_tmp']['$return_value'], 'rb') as f:
    files = {'file': (pd.steps['download_to_tmp']['$return_value'], f)}

    request = requests.post(f"{HOST}/pdf-services/api/documents/upload", files=files, headers=headers)

    return request.json()
The result of this will be a documentId value that looks like so:
{
  "documentId": "<string>"
}
Pipedream lets you define environment variables and I've made use of them for my Foxit credentials and host. Grab your own free credentials here!
Converting the Document Using the Foxit API
The next step will actually kick off the conversion. My workflow supports three different input types (Word, PowerPoint, and Excel). These map to three API endpoints. But remember that earlier we sniffed the extension of our input and set the endpoint there. Since all three APIs work the same, that's literally all we need to do – hit the endpoint and pass the document value from the previous step.
import os
import requests

def handler(pd: "pipedream"):

  clientid = os.environ.get('FOXIT_CLIENT_ID')
  secret = os.environ.get('FOXIT_CLIENT_SECRET')
  HOST = os.environ.get('FOXIT_HOST')

  headers = {
    "client_id":clientid,
    "client_secret":secret,
    "Content-Type":"application/json"
  }

  body = {
    "documentId": pd.steps['upload_to_foxit']['$return_value']['documentId']
  }

  api = pd.steps['extension_check']['$return_value']['api']

  print(f"{HOST}{api}")
  request = requests.post(f"{HOST}{api}", json=body, headers=headers)
return request.json(){
"taskId": "<string>"
}
Checking Your Document API Status
The next step is one that may take a few seconds – checking the job status. Foxit's endpoint returns a value like so:
{
  "taskId": "<string>",
  "status": "<string>",
  "progress": "<int32>",
  "resultDocumentId": "<string>",
  "error": {
    "code": "<string>",
    "message": "<string>"
  }
}import os
import requests
from time import sleep
def handler(pd: "pipedream"):
clientid = os.environ.get('FOXIT_CLIENT_ID')
secret = os.environ.get('FOXIT_CLIENT_SECRET')
HOST = os.environ.get('FOXIT_HOST')
headers = {
"client_id":clientid,
"client_secret":secret,
"Content-Type":"application/json"
}
done = False
while done is False:
request = requests.get(f"{HOST}/pdf-services/api/tasks/{pd.steps['create_conversion_job']['$return_value']['taskId']}", headers=headers)
status = request.json()
if status["status"] == "COMPLETED":
done = True
return status
elif status["status"] == "FAILED":
print("Failure. Here is the last status:")
print(status)
return pd.flow.exit("Failure in job")
else:
print(f"Current status, {status['status']}, percentage: {status['progress']}")
sleep(5)As shown, errors are simply logged by default—but you could enhance this by adding notifications, such as emailing an admin, sending a text message, or other alerts.
On success, the final output is passed along, including the key value we care about: resultDocumentId.
Download and Upload – Again
Ok, if the workflow has gotten this far, it's time to finish the process. The next step handles downloading the result from Foxit using the download endpoint:
import requests
import os

def handler(pd: "pipedream"):
  clientid = os.environ.get('FOXIT_CLIENT_ID')
  secret = os.environ.get('FOXIT_CLIENT_SECRET')
  HOST = os.environ.get('FOXIT_HOST')

  headers = {
    "client_id":clientid,
    "client_secret":secret,
  }

  # Given a file of input.docx, we need to use input.pdf
  base_name, _ = os.path.splitext(pd.steps['trigger']['event']['name'])
  path = f"/tmp/{base_name}.pdf"
  print(path)

  with open(path, "wb") as output:

    bits = requests.get(f"{HOST}/pdf-services/api/documents/{pd.steps['check_job']['$return_value']['resultDocumentId']}/download", stream=True, headers=headers).content
    output.write(bits)

    return {
      "filename":f"{base_name}.pdf",
      "path":path
    }
Note that I'm using the base name of the input, which is basically the filename minus the extension. So for example, input.docx will become input, which I then slap a pdf extension on to create the filename used to store locally to Pipedream.
Finally, I push the file back up to Dropbox, but for this, I can use a built-in Pipedream step that can upload to Dropbox. Here's how I configured it:
- Path: Once again,
Foxit - File Name: This one's a bit more complex, I want to store the value in the output subdirectory, and ensure the filename is dynamic. Pipedream lets you mix and match hard-coded values and expressions. I used this to enable that:
output/{{steps.download_result_to_tmp.$return_value.filename}}. In this expression the portion inside the double bracket will be dynamic based on the PDF file generated previously. - File Path: This is an expression as well, pointing to where I saved the file previously:
{{steps.download_result_to_tmp.$return_value.path}} - Mode: Finally, the mode attribute specifies what to do on a conflict. This setting will be based on whatever your particular workflow needs are, but for my workflow, I simply told Dropbox to overwrite the existing file.
Here's how that step looks configured in Pipedream:
Conclusion
Believe it or not, that's the entire workflow. Once enabled, it runs in the back ground and I can simply place any files into my Dropbox folder and my Office docs will be automatically converted. What's next? Definitely get your own free credentials and check out the docs to get started. If you run into any trouble at all, hit is up on the forums and we'll be glad to help!
How to Chain PDF Actions with Foxit

Performing a single action with the Foxit PDF Services API is straightforward, but what’s the best way to handle a sequence of operations? Instead of downloading and re-uploading a file for each step, you can chain actions together by passing the output of one job as the input for the next. This tutorial walks you through a complete Python example of how to build an efficient document optimization workflow that compresses and then linearizes a PDF.
How to Chain PDF Actions with Foxit
When working with Foxit’s PDF Services, you’ll remember that the basic flow involves:
- Uploading your document to Foxit to get an ID
- Starting a job
- Checking the job
- Downloading the result
This is handy for one off operations, for example, converting a Word document to PDF, but what if you need to do two or more operations? Luckily this is easy enough by simply handing off one result to the next. Let’s take a look at how this can work.
Credentials
Remember, to start developing and testing with the APIs, you’ll need to head over to our developer portal and grab a set of free credentials. This will include a client ID and secret values you’ll need to make use of the API.
If you would rather watch a video (or why not both?) – you can watch the walkthrough below:
Creating a Document Optimization Workflow
To demonstrate how to chain different operations together, we’re going to build a basic document optimization workflow that will:
- Compress the document by reducing image resolution and other compression algorithims.
- Linearize the document to make it better viewable on the web.
Given the basic flow described above, you may be tempted to do this:
- Upload the PDF
- Kick off the Compress job
- Check until done
- Download the compressed PDF
- Upload the PDF
- Kick off the Linearize job
- Check until done
- Download the compressed and linearized PDF
This wouldn’t require much code, but we can simplify the process by using the result of the compress job—once it’s complete—as the source for the linearize job. This gives us the following streamlined flow:
- Upload the PDF
- Kick off the Compress job
- Check until done
- Kick off the Linearize job
- Check until done
- Download the compressed and linearized PDF
Less is better! Alright, let’s look at the code.
First, here’s the typical code used to bring in our credentials from the environment, and define the Upload job:
import os
import requests
import sys
from time import sleep

CLIENT_ID = os.environ.get('CLIENT_ID')
CLIENT_SECRET = os.environ.get('CLIENT_SECRET')
HOST = os.environ.get('HOST')

def uploadDoc(path, id, secret):

	headers = {
		"client_id":id,
		"client_secret":secret
	}

	with open(path, 'rb') as f:
		files = {'file': f}

		request = requests.post(f"{HOST}/pdf-services/api/documents/upload", files=files, headers=headers)
return request.json()def compressPDF(doc, level, id, secret):
headers = {
"client_id":id,
"client_secret":secret,
"Content-Type":"application/json"
}
body = {
"documentId":doc,
"compressionLevel":level
}
request = requests.post(f"{HOST}/pdf-services/api/documents/modify/pdf-compress", json=body, headers=headers)
return request.json()
def linearizePDF(doc, id, secret):
headers = {
"client_id":id,
"client_secret":secret,
"Content-Type":"application/json"
}
body = {
"documentId":doc
}
request = requests.post(f"{HOST}/pdf-services/api/documents/optimize/pdf-linearize", json=body, headers=headers)
return request.json()Note that the compressPDF method takes a required level argument that defines the level of compression. From the docs, we can see the supported values are LOW, MEDIUM, and HIGH.
Now, two more utility methods – one that checks the task returned by the API operations above and one that downloads a result to the file system:
def checkTask(task, id, secret):

	headers = {
		"client_id":id,
		"client_secret":secret,
		"Content-Type":"application/json"
	}

	done = False
	while done is False:

		request = requests.get(f"{HOST}/pdf-services/api/tasks/{task}", headers=headers)
		status = request.json()
		if status["status"] == "COMPLETED":
			done = True
			# really only need resultDocumentId, will address later
			return status
		elif status["status"] == "FAILED":
			print("Failure. Here is the last status:")
			print(status)
			sys.exit()
		else:
			print(f"Current status, {status['status']}, percentage: {status['progress']}")
			sleep(5)

def downloadResult(doc, path, id, secret):

	headers = {
		"client_id":id,
		"client_secret":secret
	}

	with open(path, "wb") as output:

		bits = requests.get(f"{HOST}/pdf-services/api/documents/{doc}/download", stream=True, headers=headers).content
output.write(bits)input = "../../inputfiles/input.pdf"
print(f"File size of input: {os.path.getsize(input)}")
doc = uploadDoc(input, CLIENT_ID, CLIENT_SECRET)
print(f"Uploaded doc to Foxit, id is {doc['documentId']}")
task = compressPDF(doc["documentId"], "HIGH", CLIENT_ID, CLIENT_SECRET)
print(f"Created task, id is {task['taskId']}")
result = checkTask(task["taskId"], CLIENT_ID, CLIENT_SECRET)
print("Done converting to PDF. Now doing linearize.")
task = linearizePDF(result["resultDocumentId"], CLIENT_ID, CLIENT_SECRET)
print(f"Created task, id is {task['taskId']}")
result = checkTask(task["taskId"], CLIENT_ID, CLIENT_SECRET)
print("Done with linearize task.")
output = "../../output/really_optimized.pdf"
downloadResult(result["resultDocumentId"], output , CLIENT_ID, CLIENT_SECRET)
print(f"Done and saved to: {output}.")
print(f"File size of output: {os.path.getsize(output)}") This code matches the flow described above, with the exception of outputting the size as a handy way to see the result of the compression call. When run, the initial size is 355994 bytes and the final size is 16733. That's a great saving! You should, however, ensure the result matches the quality you desire and if not, consider reducing the level of compression. Linearize doesn't impact the file size, but as stated above will make it work nicer on the web.
For a complete listing, find the sample on our GitHub repo.
Next Steps
Obviously, you could do even more chaining based on the code above. For example, as part of your optimization flow, you could even split the PDF to return a 'sample' of a document that may be for sale. You could extract information to use for AI purposes and more. Dig more into our PDF Service APIs to get an idea and let us know what you build on our developer forums!
How to Extract Text from PDFs using Foxit’s REST APIs

Want to extract text from PDF files with just a few lines of Python? This guide shows how to use Foxit’s REST Extract API to pull text content from PDFs, ideal for search, automation, or AI workflows. From setting up credentials to searching for keywords across multiple files, this post walks through the full process with example code and GitHub demos.
How to Extract Text from PDFs using Foxit’s REST APIs
PDFs are an excellent way to store information—they combine text, images, and more in a perfectly laid-out, eye-catching design that fulfills every marketer’s wildest dreams. But sometimes you just need the text! There’s a variety of reasons you may want to convert a rich PDF document into plain text:
- For indexing in a search engine
- To search documents for keywords
- To pass to generative AI services for introspection
Let’s take a look at the Extract API to see just how easy this is.
Start Here: Obtain Free Credentials to Use the Foxit API
Before we go any further, head over to our developer portal and grab a set of free credentials. This will include a client ID and secret values – you’ll need both to make use of the API.
Rather watch the movie version? Check out the video below:
Foxit PDF API Workflow Overview with Python
The API follows the same format as the rest of our PDF Services in that you upload your input, kick off the job, check the job’s status, and download the result. As we’ve covered this a few times now on the blog (see my introductory post, we’ll skip over the details of uploading the document and loading in credentials. Here’s the Python code we’ve demonstrated before showing this in action:
CLIENT_ID = os.environ.get('CLIENT_ID')
CLIENT_SECRET = os.environ.get('CLIENT_SECRET')
HOST = os.environ.get('HOST')

def uploadDoc(path, id, secret):

	headers = {
		"client_id":id,
		"client_secret":secret
	}

	with open(path, 'rb') as f:
		files = {'file': (path, f)}

		request = requests.post(f"{HOST}/pdf-services/api/documents/upload", files=files, headers=headers)
		return request.json()

doc = uploadDoc("../../inputfiles/input.pdf", CLIENT_ID, CLIENT_SECRET)
print(f"Uploaded pdf to Foxit, id is {doc['documentId']}")
Now let's get into the meat of the Extract API. The API takes three arguments:
- The ID of the previously uploaded document.
- The type of information to extract—either TEXT, IMAGE, or PAGE. In theory, it should be pretty obvious what these do, but just in case: TEXT returns the text contents of the PDF. IMAGE gives you a ZIP file of images from the PDF. PAGE returns a new PDF containing just the page you requested.
- You can also pass in a page range, which can be a combo of specific pages and ranges. If you don’t include one, the entire PDF gets processed for extraction.
To make this simple to use, I've built a wrapper function that lets you pass these arguments:
def extractPDF(doc, type, id, secret, pageRange=None):

    headers = {
        "client_id":id,
        "client_secret":secret,
        "Content-Type":"application/json"
    }

    body = {
        "documentId":doc,
        "extractType":type
    }

    if pageRange:
        body["pageRange"] = pageRange

    request = requests.post(f"{HOST}/pdf-services/api/documents/modify/pdf-extract", json=body, headers=headers)
    return request.json()
Literally, that's it. At this point, you get a task object back that – like with our other APIs – can be checked for completion, and once it’s done, the results can be downloaded. Since we're working with text, though, let's simplify and just grab the text as a variable:
def getResult(doc, id, secret):

    headers = {
        "client_id":id,
        "client_secret":secret
    }

return requests.get(f"{HOST}/pdf-services/api/documents/{doc}/download", headers=headers).textdoc = uploadDoc("../../inputfiles/input.pdf", CLIENT_ID, CLIENT_SECRET)
print(f"Uploaded pdf to Foxit, id is {doc['documentId']}")
task = extractPDF(doc["documentId"], "TEXT", CLIENT_ID, CLIENT_SECRET)
print(f"Created task, id is {task['taskId']}")
result = checkTask(task["taskId"], CLIENT_ID, CLIENT_SECRET)
print(f"Final result: {result}")
text = getResult(result["resultDocumentId"], CLIENT_ID, CLIENT_SECRET)
print(text)Searching PDFs for Keywords
# Get PDFs from our input directory
inputFiles = list(filter(lambda x: x.endswith('.pdf'), os.listdir('../../inputfiles')))
# Keyword to match on:
keyword = "Shakespeare"
for file in inputFiles:

    doc = uploadDoc(f"../../inputfiles/{file}", CLIENT_ID, CLIENT_SECRET)
    print(f"Uploaded pdf, {file}, to Foxit, id is {doc['documentId']}")

    task = extractPDF(doc["documentId"], "TEXT", CLIENT_ID, CLIENT_SECRET)
    result = checkTask(task["taskId"], CLIENT_ID, CLIENT_SECRET)

    text = getResult(result["resultDocumentId"], CLIENT_ID, CLIENT_SECRET)
    if keyword in text:
        print(f"\033[32mThe pdf, {file}, matched on our keyword: {keyword}\033[0m")
    else:
        print(f"The pdf, {file}, did not match on our keyword: {keyword}")

    print("")
What’s Next?
Introducing PDF APIs from Foxit

Get started with Foxit’s new PDF APIs—convert Word to PDF, generate documents, and embed files using simple, scalable REST APIs. Includes sample Python code and walkthrough.
Introducing PDF APIs from Foxit
At the end of June, Foxit introduced a brand-new suite of tools to help developers work with documents. These APIs cover a wide range of features, including:
- Convert between Office document formats and PDF files seamlessly
- Optimize, manipulate, and secure PDFs with advanced APIs
- Generate dynamic documents using Microsoft Word templates
- Extract text and images from PDFs with powerful tools
- Embed PDFs into web pages in a context-aware, controlled manner
- Integrate with eSign APIs for streamlined signature workflows
These APIs are simple to use, and best of all, follow the “don’t surprise me” principal of development. In this post, I’m going to demonstrate one simple example – converting a Word document to PDF – but you can rest assured that nearly all the APIs will follow incredibly similar patterns. I’ll be using Python for my examples here, but will link to a Node.js version of the same example. And given that we’re talking REST APIs here, any language is welcome to join the document party. Let’s dive in.
Credentials
Before we go any further, head over to our developer portal and grab a set of free credentials. This will include a client ID and secret values you’ll need to make use of the API.
Don’t want to read all of this? You can also follow along by video:
API Flow
As I mentioned above, most of the PDF Services APIs will follow a similar flow. This comes down to:
- Upload your input (like a Word document)
- Kick off a job (like converting to PDF)
- Check the job (hey, how ya doin?)
- Download the result
Or, in pretty graphical format –
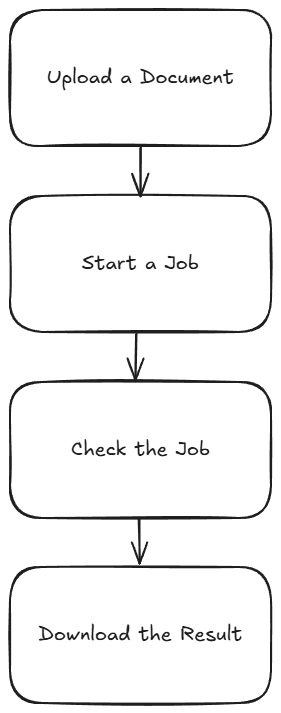
The great thing is, once you’ve completed one integration (this post focuses on converting Word to PDF), switching to another is easy—and much of your existing code can be reused. A lazy developer is happy developer! Let’s get started.
Loading Credentials
My script begins by loading the credentials and API root host via the environment:
CLIENT_ID = os.environ.get('CLIENT_ID')
CLIENT_SECRET = os.environ.get('CLIENT_SECRET')
HOST = os.environ.get('HOST')
It’s never a good idea to hard-code credentials in your code. But if you do it this one time, I won’t tell. Honest.
Uploading Your Input
As I mentioned, in this example we’ll be making use of the Word to PDF API. Our input will be a Word document, which we’ll upload to Foxit using the upload API. This endpoint is fairly simple – aside from your credentials, all you need to provide is the binary data of the input file. Here’s the method I created to make this process easier:
def uploadDoc(path, id, secret):

    headers = {
        "client_id":id,
        "client_secret":secret
    }

    with open(path, 'rb') as f:
        files = {'file': (path, f)}

        request = requests.post(f"{HOST}/pdf-services/api/documents/upload", files=files, headers=headers)
        return request.json()
And here’s how it’s used:
doc = uploadDoc("../../inputfiles/input.docx", CLIENT_ID, CLIENT_SECRET)
print(f"Uploaded doc to Foxit, id is {doc['documentId']}")
The upload API only returns one value, a documentId, which we can use in future calls.
Starting the Job
Each API operation is a job creator. By this I mean you call the endpoint and it begins your action. For Word to PDF, the only required input is the document ID from the previous call. We can build a nice little wrapper function like so:
def convertToPDF(doc, id, secret):

    headers = {
        "client_id":id,
        "client_secret":secret,
        "Content-Type":"application/json"
    }

    body = {
        "documentId":doc
    }

    request = requests.post(f"{HOST}/pdf-services/api/documents/create/pdf-from-word", json=body, headers=headers)
    return request.json()
And then call it like so:
task = convertToPDF(doc["documentId"], CLIENT_ID, CLIENT_SECRET)
print(f"Created task, id is {task['taskId']}")
The result of this call, if no errors were found, isa taskId. We can use this to gauge how the job’s performing. Let’s do that now.
Job Checking
Ok, so the next part can be a bit tricky depending on your language of choice. We need to use the task status endpoint to determine how the job is performing. How often we do this, how quickly and so forth, will depend on your platform and needs. For our little sample script here, everything is running at once. I wrote a function that will check the status. If the job isn’t finished (whether successful or not), it pauses briefly before trying again. While this approach isn’t the most sophisticated, it should work well enough for basic testing:
def checkTask(task, id, secret):

    headers = {
        "client_id":id,
        "client_secret":secret,
        "Content-Type":"application/json"
    }

    done = False
    while done is False:

        request = requests.get(f"{HOST}/pdf-services/api/tasks/{task}", headers=headers)
        status = request.json()
        if status["status"] == "COMPLETED":
            done = True
            # really only need resultDocumentId, will address later
            return status
        elif status["status"] == "FAILED":
            print("Failure. Here is the last status:")
            print(status)
            sys.exit()
        else:
            print(f"Current status, {status['status']}, percentage: {status['progress']}")
            sleep(5)
As you can see, I’m using a while loop that—at least in theory—will continue running until a success or failure response is returned, with a five-second pause between each call. You can adjust that interval as needed—test different values to see what works best for your use case. Typically, most API calls should complete in under ten seconds, so a five-second delay felt like a reasonable default.
Each call to the endpoint returns a task status result. Here’s an example:
{
    'taskId': '685abc95a0d113558e4204d7',
    'status': 'COMPLETED',
    'progress': 100,
    'resultDocumentId': '685abc952475582770d6917b'
}
The important part here is the status. But you could also use progress to give some feedback to the code waiting for results. Here’s my code calling this:
result = checkTask(task["taskId"], CLIENT_ID, CLIENT_SECRET)
print(f"Final result: {result}")
Downloading Your Result
The last piece of the puzzle is simply saving the result. If you noticed above, the task returned a resultDocumentId value. Taking that, and the [Download Document](NEED LINK) endpoint, we can build a utility to store the result like so:
def downloadResult(doc, path, id, secret):

    headers = {
        "client_id":id,
        "client_secret":secret
    }

    with open(path, "wb") as output:

        bits = requests.get(f"{HOST}/pdf-services/api/documents/{doc}/download", stream=True, headers=headers).content
        output.write(bits)
And finally, call it:
downloadResult(result["resultDocumentId"], "../../output/input.pdf", CLIENT_ID, CLIENT_SECRET)
print("Done and saved to: ../../output/input.pdf")
And that’s it! While this script could certainly benefit from more robust error handling, it demonstrates the basic flow. As mentioned, most of our APIs follow this same logic.
Next Steps
Want the complete scripts? Get it on GitHub.
Want it in Node.js? Get it on GitHub.
Rather try this yourself? Sign up for a free developer account now. Need help? Head over to our developer forums and post your questions and comments.